Introduction
You should be aware that from comments below; soldering is required to replace the battery on at least some of these trimmers. You may source your replacement battery before beginning, a search by specific model number should yield the correct replacement, or you might prefer to make certain by opening the device first to identify the battery model number, voltage, and mili-amp-hour rating (and type; tabbed for solder or easily replaceable without soldering) first. Those of you wishing to see a video of the process might find this YouTube Video of interest as well.
What you need
-
-
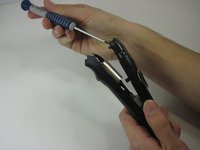
Begin by removing the rubber grip along the handle.This can be done by using a thumbnail, pick or similar tool to pry up the upper edges on both sides sufficiently to grasp and pull them downwards, essentially turning it 'inside out' as you might a tight, wet stubborn sock.
-
-
-
-
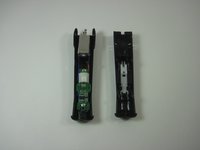
Remove the circuit board, motor and battery from the plastic body. This photo shows the motor and wires connecting it to the battery.
-
-
-
Remove the Lithium Ion Battery and replace it with the new one that you purchased.
-
In the event you battery is soldered into place you will need to desolder the old one and solder the new one into place.
-
Since this guide as originally written covers only the non-soldered battery replacement check out the link mentioned in the introduction. YouTube Video on replacing the soldered-in-place battery.
-


To reassemble your device, follow these instructions in reverse order.
Cancel: I did not complete this guide.
19 other people completed this guide.
Team

University of Maryland, Team 1-3, Shastany Fall 2013 Member of University of Maryland, Team 1-3, Shastany Fall 2013
UMD-SHASTANY-F13S1G3
3 Members
12 Guides authored
19 Guide Comments
Great guide but I made the mistake of buying just a standard 3.7v 750mAh battery to try and fit into the trimmer. The battery in the trimmer has metal terminals "stamped" to each end, so the terminals can't be unsoldered from the battery. I was hoping to just unsolder the existing battery and then solder in the new one but no such luck. New trimmer for me now lol
DM, I used a dremel tool with a thin grinding wheel to cut off the metal terminals just below the stamp point. After cutting off the metal terminals below the stamp point, approximately 1/4" inch of the terminals still remained which was just enough to connect the new battery to the remaining metal terminals with a small dab of solder. Little bit more work than I was anticipating but the trimmer works like new again. Found the 3.7v 750mAh battery at onlybatteries.com for $5 plus about $5.94 for shipping. Hope this helps for you DIYers!!
Dean Lamborn, 10/25/2015
Is it an 18650 size?
Nope, it is a AA size 14500 lithium battery.
To Nathan, DM and DL, I was with Nathan until I read about soldering a dremel (which i I own) and cutting off the metal terminals below the stamp point. Can any of you fine 'fixers' show pictures along with the soldering, dremel, cutting, terminals description? I want my Chromado to work like new too! Thanks in advance, Ka