Introduction
What you can expect from this guide is a step by step process on how to remove the battery on a Verizon Ellipsis Jetpack MHS800L.
What you need
-
Tool used on this step:Phillips #00 Screwdriver$5.49
-
With the device on its back and the label facing you, remove the rubber screw cover on the top left corner of the device.
-
Under the rubber circle, remove the 1.25 mm screw using a Phillips #00 Screwdriver.
-
-
-
Tool used on this step:iFixit Opening Picks (Set of 6)$4.99
-
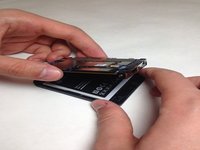
Use a plastic pick at the seams and pry open the case.
-
-
-
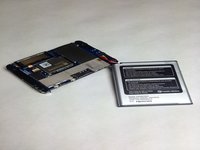
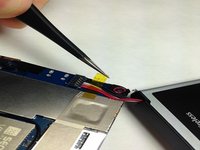
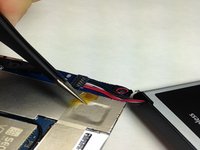
Once you have the case off of your device gently pull your battery away from the device.
-


To reassemble your device, follow these instructions in reverse order.
Cancel: I did not complete this guide.
6 other people completed this guide.
Team

IUPUI, Team 3-3, Baechle Spring 2016 Member of IUPUI, Team 3-3, Baechle Spring 2016
IUPUI-BAECHLE-S16S3G3
4 Members
6 Guides authored
5 Guide Comments
I'd like to let you know that after step 9, it is possible to unwrap the battery and break loose the circuit board on the battery. At which point you can reinstall the circuit board in the router with no battery attached. This makes the Jetpack plug-in only which is all I need it for anyways. It was a great and free fix for my swollen battery.
Thanks for the article!
Opps, I think that steps 3 & 4 have been reversed. You can't get to the "3 additional screws" until you're looking at the red cover which is below the black cover that needs to be pried off first.
Otherwise, the process seems to be going well.
It’s unclear. Once you unscrew that first screw, you have to remove the TOP black portion (the picture looks like you’re removing the bottom). Once you remove that top portion, the red plastic is exposed, revealing the three other screws.
And -- continuing with step 5, there are some plastic "snap" locks between the red and black covers -- 5 by my count, 2 along each of the long edges, 1 along the charging port edge. Always good to pry carefully.
Once apart, battery is on bottom and can be easily removed/replaced as per steps 7 & 8.
now how do we FORCE a factory data reset without the admin password?