Introduction
Different reasons leading to the PWM T1 or T2 failure, here is a guide to replace the transistor.
This guide is a fast-guide for makers. No transistor or electronics knowledge needed, hence the job can be done very quickly if parts are available. This can save you in the area of $100-$150 for replacing the whole mainboard.
The issue is addressed here:
https://ultimaker.com/en/community/11366...
The mainboard schematics are stored here:
What you need
-
-
Prepare your workspace, tools, etc. this is important due to the challenges faced in handling SMD electronic parts. Decent light conditions, non-static environment, etc. A SMD Soldering guide link is given on step 2 and 3.
-
It is recommended to purchase a batch of transistors (say 5-10) for different reasons: The failure might happen again, SMD parts are very delicate in handling, because you love transistors, etc.
-
Note: If you cannot find a BC817 replacement say at Mouser, Digikey, etc. this transistor from KEC provided by Conrad DE is confirmed as working
-
Note: If you do not have any electronics soldering equipment, take a look at this starter kit or for Europe (Germany) try this set.
-
-
-
-
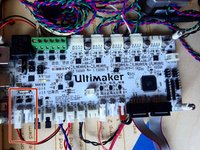
Locate the affect transistor (Channel PWM 1 or 2)
-
Note: This is a quick guide. It makes the assumption that the transistor is dead no matter what. This guide does not provide analysis and help on NPN transistors as it is not needed for getting the fan back to work.
-
Before you continue, you might want to read on SMD soldering from different sources (iFixit or see the provided On Semi guide on SMD, which looks very comprehensive or Sparkfun's Guide can be highly recommended) and plan time if you haven't got the environment already setup
-
-
Tool used on this step:Tweezers$4.99
-
Disconnect all power connections before you start and get anti-static. No warranty!
-
Have the replacement transistor ready for deployment
-
Heat up the soldering iron (350-400°C or 700°F should be right depending on your lead, iron welder, etc.); avoid temperatures that are far above melting due to the sensitivity of SMD devices, see also the On Semi guide or Sparkfun's SMD Soldering Guide
-
Remove the broken transistor by carefully heating the SMD pads that connect T1 (or T2) to the mainboard PCB. Because there are three pads, try circular rotation while using tweezer to pull of the broken device
-
Use the solder suction pump to remove any old solder around the transistor pads
-
Note: This guide is assuming that the NPN transistor has the following pinning (SOT-23): TOP LEFT: Emitter TOP RIGHT: Base BUTTON: COLLECTOR, see the data sheet and mainboard picture. Nothing too much can go wrong here, as the pads are given in direction.
-
Finally, solder the new transistor onto the pads. If you face difficulty with handling the device, tweezers, etc. try electronics magnifying glasses -- Ultimately, check the output voltage according to the software setting (PWM 255 steps) or just connect the fan hopefully it now works again!
-


If you rely on PWM1 and 2 working, this guide will sort out the transistor issue in no time.