
15% Off Selected iFixit Tools — Limited Time
Free Shipping on Domestic Orders $75+

Turtle Beach Stealth Ultra Option Buttons Replacement

What you need

  1. Turtle Beach Stealth Ultra Option Buttons Replacement, Back Plate: step 1, image 1 of 2 Turtle Beach Stealth Ultra Option Buttons Replacement, Back Plate: step 1, image 2 of 2
    • Use tweezers to pull out rubber pieces in front of the screws.

    Ask FixBot

    Add Comment

  2. Turtle Beach Stealth Ultra Option Buttons Replacement: step 2, image 1 of 2 Turtle Beach Stealth Ultra Option Buttons Replacement: step 2, image 2 of 2
    • Remove the 10 mm screws using a Phillips #00 screwdriver.

    Ask FixBot

    Add Comment

  3. Turtle Beach Stealth Ultra Option Buttons Replacement: step 3, image 1 of 2 Turtle Beach Stealth Ultra Option Buttons Replacement: step 3, image 2 of 2
    • Remove the sticker on the back of the plate.

    • Remove the 10 mm screws from the back plate using a Phillips #00 screwdriver.

    Ask FixBot

    Add Comment

  4. Turtle Beach Stealth Ultra Option Buttons Replacement: step 4, image 1 of 3 Turtle Beach Stealth Ultra Option Buttons Replacement: step 4, image 2 of 3 Turtle Beach Stealth Ultra Option Buttons Replacement: step 4, image 3 of 3
    • Use an iFixit opening tool to pry the front button plate and analog stick plate off.

    • Use a Phillips #00 screwdriver to remove the screws from the front plate on both sides of the controller.

    • Be cautious not to break the LCD screen while you move the opening tool around.

    Ask FixBot

    Add Comment

  5. Turtle Beach Stealth Ultra Option Buttons Replacement: step 5, image 1 of 3 Turtle Beach Stealth Ultra Option Buttons Replacement: step 5, image 2 of 3 Turtle Beach Stealth Ultra Option Buttons Replacement: step 5, image 3 of 3
    • Use an opening tool to detach the front plate from the back.

    • You may need to work the opening tool all the way around the seam between the two plates.

    Ask FixBot

    Add Comment

  6. Turtle Beach Stealth Ultra Option Buttons Replacement, Motherboard: step 6, image 1 of 2 Turtle Beach Stealth Ultra Option Buttons Replacement, Motherboard: step 6, image 2 of 2
    • Use a Phillips #00 screwdriver to remove the 10 mm screws connecting the handles to the controller frame.

    Ask FixBot

    Add Comment

  7. Turtle Beach Stealth Ultra Option Buttons Replacement: step 7, image 1 of 1
    • Detach the cables from the motherboard.

    Ask FixBot

    Add Comment

  8. Turtle Beach Stealth Ultra Option Buttons Replacement: step 8, image 1 of 1
    • Remove the yellow ribbon cable from the handle.

    Ask FixBot

    Add Comment

  9. Turtle Beach Stealth Ultra Option Buttons Replacement: step 9, image 1 of 2 Turtle Beach Stealth Ultra Option Buttons Replacement: step 9, image 2 of 2
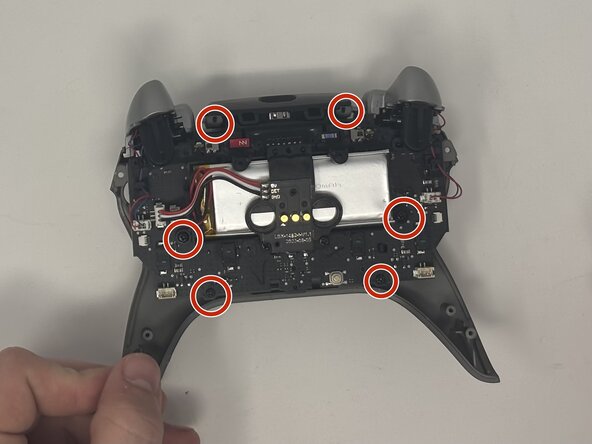
    • Remove the six 10 mm screws connected to the motherboard using a Phillips #00 screwdriver.

    Ask FixBot

    Add Comment

  10. Turtle Beach Stealth Ultra Option Buttons Replacement: step 10, image 1 of 1
    • Gently pull the motherboard away from the frame.

    Ask FixBot

    Add Comment

  11. Turtle Beach Stealth Ultra Option Buttons Replacement, Option Buttons: step 11, image 1 of 3 Turtle Beach Stealth Ultra Option Buttons Replacement, Option Buttons: step 11, image 2 of 3 Turtle Beach Stealth Ultra Option Buttons Replacement, Option Buttons: step 11, image 3 of 3
    • Use the spudger to pry the option buttons out from the front plate.

    Ask FixBot

    Add Comment

Conclusion

To reassemble your device, follow these instructions in reverse order.

Cancel: I did not complete this guide.

One other person completed this guide.

Dominic Dodge

Member since: 09/09/25

799 Reputation

7 Guides authored

Team

0 Guide Comments

Add Comment

View Statistics:

Past 24 Hours: 1

Past 7 Days: 14

Past 30 Days: 64

All Time: 316