
Turtle Beach Elite Pro Right Speaker Replacement

What you need

  1. Turtle Beach Elite Pro Right Speaker Replacement, Ear Cushions: step 1, image 1 of 1
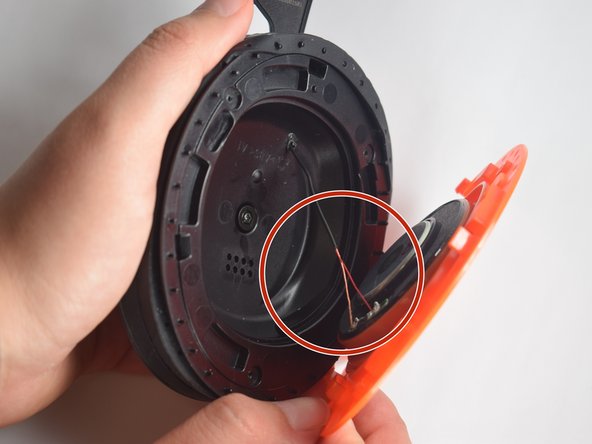
    • Firmly pinch ear cushion between thumb and forefinger.

    • Using the hand not holding the ear cushion, grasp the orange plate that is below the ear cushion.

    • If the black rubber lining on the orange plate is grasped, then the rubber lining on the ear piece may tear.

  2. Turtle Beach Elite Pro Right Speaker Replacement: step 2, image 1 of 2 Turtle Beach Elite Pro Right Speaker Replacement: step 2, image 2 of 2
    • Rotate ear cushion counter-clockwise about half an inch.

    • The ear cushion should audibly snap out of place.

    • After it has audibly snapped out of place, lift the ear cushion off of the device.

    • During reassembly, rotate the ear cushion clockwise.

  3. Turtle Beach Elite Pro Right Speaker Replacement: step 3, image 1 of 2 Turtle Beach Elite Pro Right Speaker Replacement: step 3, image 2 of 2
    • Using the new cushion, align the pegs located on both the orange plate and ear cushion.

    • Make sure that both the ear cushion and the orange plate have the same designation.

    • Once the pegs are aligned, push the new ear cushion in place.

  4. Turtle Beach Elite Pro Right Speaker Replacement, Right Speaker: step 4, image 1 of 1
    • Remove the right ear cushion.

    • The right ear piece does not have any additional attachments.

  5. Turtle Beach Elite Pro Right Speaker Replacement: step 5, image 1 of 1
    • Using the Phillips #0 screwdriver, remove the 6.0 mm screws on the orange plate.

  6. Turtle Beach Elite Pro Right Speaker Replacement: step 6, image 1 of 2 Turtle Beach Elite Pro Right Speaker Replacement: step 6, image 2 of 2
    • Use the opening tool to separate the orange plate from the black base plate.

    • Focus on the wires that are connected to the speaker.

  7. Turtle Beach Elite Pro Right Speaker Replacement: step 7, image 1 of 1
    • Cut the two wires that are attached to the speaker.

    • Cut the wires as close to the speaker as possible. These wires will be used in the next step.

  8. Turtle Beach Elite Pro Right Speaker Replacement: step 8, image 1 of 2 Turtle Beach Elite Pro Right Speaker Replacement: step 8, image 2 of 2
    • Replace the old speaker with the new speaker.

    • Using the soldering iron, solder the wires to the new speaker.

    • Make sure to solder the wires to their original locations on the speaker.

Conclusion

To reassemble your device, follow these instructions in reverse order.

One other person completed this guide.

Alexis Uribe

Member since: 03/24/17

510 Reputation

4 Guides authored

Team

Baylor, Team S5-G1, Williams Spring 2017 Member of Baylor, Team S5-G1, Williams Spring 2017

BU-WILLIAMS-S17S5G1

3 Members

8 Guides authored

0 Comments

Add Comment

View Statistics:

Past 24 Hours: 0

Past 7 Days: 1

Past 30 Days: 5

All Time: 956