
Toshiba Satellite P55W-C5200X Keyboard Replacement

What you need

  1. Toshiba Satellite P55W-C5200X Keyboard Replacement, Battery: step 1, image 1 of 3 Toshiba Satellite P55W-C5200X Keyboard Replacement, Battery: step 1, image 2 of 3 Toshiba Satellite P55W-C5200X Keyboard Replacement, Battery: step 1, image 3 of 3
    • Use the Phillips #00 screwdriver to remove the ten 4.0 mm screws located at the bottom of the laptop.

  2. Toshiba Satellite P55W-C5200X Keyboard Replacement: step 2, image 1 of 1
    • Use the black nylon spudger to pry the back casing along the edges.

    • Continue to pry along the edge of the back case until the back is ready to be removed.

  3. Toshiba Satellite P55W-C5200X Keyboard Replacement: step 3, image 1 of 2 Toshiba Satellite P55W-C5200X Keyboard Replacement: step 3, image 2 of 2
    • Remove the four 6.0 mm screws that hold the battery in place using the JIS #000 screwdriver.

  4. Toshiba Satellite P55W-C5200X Keyboard Replacement: step 4, image 1 of 2 Toshiba Satellite P55W-C5200X Keyboard Replacement: step 4, image 2 of 2
    • Disconnect the battery cable from the motherboard by carefully pulling on the black wire at the point closest to the white tab.

  5. Toshiba Satellite P55W-C5200X Keyboard Replacement: step 5, image 1 of 2 Toshiba Satellite P55W-C5200X Keyboard Replacement: step 5, image 2 of 2
    • Gently remove the battery from your device.

  6. Toshiba Satellite P55W-C5200X Keyboard Replacement, RAM: step 6, image 1 of 3 Toshiba Satellite P55W-C5200X Keyboard Replacement, RAM: step 6, image 2 of 3 Toshiba Satellite P55W-C5200X Keyboard Replacement, RAM: step 6, image 3 of 3
    • For this particular model of the device there will be two sticks of RAM.

    • There are two metal brackets holding each RAM stick in place. Carefully move the metal brackets outward on both sides at the same time.

    • Pull the RAM sticks out.

  7. Toshiba Satellite P55W-C5200X Keyboard Replacement, Fan: step 7, image 1 of 3 Toshiba Satellite P55W-C5200X Keyboard Replacement, Fan: step 7, image 2 of 3 Toshiba Satellite P55W-C5200X Keyboard Replacement, Fan: step 7, image 3 of 3
    • Remove the two 4.0 mm screws using the Phillips #00 screwdriver.

    • Remove the four 2.0 mm screws using the Phillips #0 screwdriver.

  8. Toshiba Satellite P55W-C5200X Keyboard Replacement: step 8, image 1 of 2 Toshiba Satellite P55W-C5200X Keyboard Replacement: step 8, image 2 of 2
    • Disconnect the fan cable from the motherboard by carefully pulling on the black wire at the point closest to the white tab.

  9. Toshiba Satellite P55W-C5200X Keyboard Replacement: step 9, image 1 of 2 Toshiba Satellite P55W-C5200X Keyboard Replacement: step 9, image 2 of 2
    • Gently remove the fan from your device.

  10. Toshiba Satellite P55W-C5200X Keyboard Replacement, Keyboard: step 10, image 1 of 1
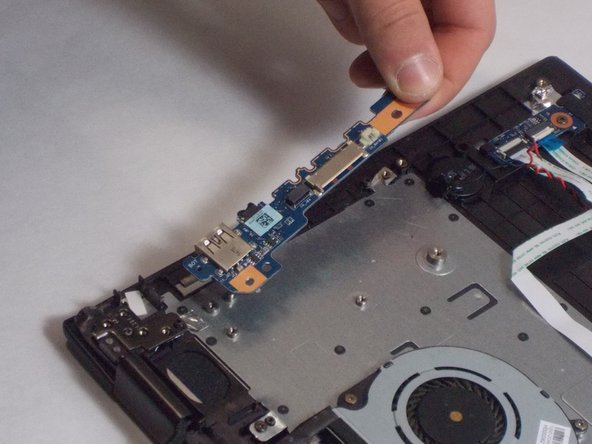
    • Once the fan, ram, and battery are removed, remove the motherboard.

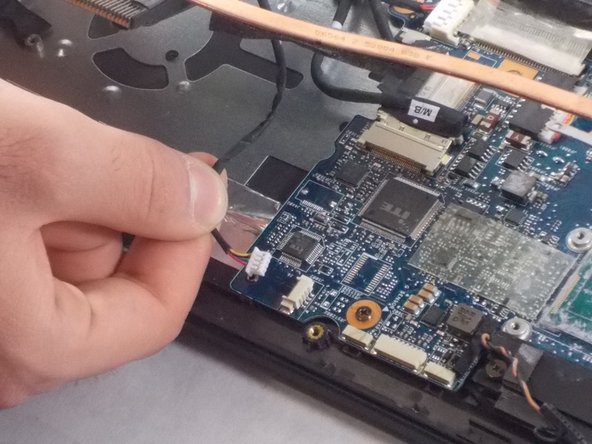
    • Detach the three connecting wires.

    • Remove the white, blue-tipped cable ribbon too.

  11. Toshiba Satellite P55W-C5200X Keyboard Replacement: step 11, image 1 of 3 Toshiba Satellite P55W-C5200X Keyboard Replacement: step 11, image 2 of 3 Toshiba Satellite P55W-C5200X Keyboard Replacement: step 11, image 3 of 3
    • Remove the three wires that are connected to the motherboard first.

  12. Toshiba Satellite P55W-C5200X Keyboard Replacement: step 12, image 1 of 2 Toshiba Satellite P55W-C5200X Keyboard Replacement: step 12, image 2 of 2
    • Remove the ribbon by using the black nylon spudger to avoid tearing the ribbon.

  13. Toshiba Satellite P55W-C5200X Keyboard Replacement: step 13, image 1 of 3 Toshiba Satellite P55W-C5200X Keyboard Replacement: step 13, image 2 of 3 Toshiba Satellite P55W-C5200X Keyboard Replacement: step 13, image 3 of 3
    • Use the Phillips #00 screwdriver to remove the three 5.0 mm screws that are holding the metal bracket in place.

    • Gently remove the metal bracket.

  14. Toshiba Satellite P55W-C5200X Keyboard Replacement: step 14, image 1 of 3 Toshiba Satellite P55W-C5200X Keyboard Replacement: step 14, image 2 of 3 Toshiba Satellite P55W-C5200X Keyboard Replacement: step 14, image 3 of 3
    • Use the Phillips #00 to remove the four 8.0 mm screws that are holding the motherboard in place.

    • After removing all the screws, gently remove the motherboard.

  15. Toshiba Satellite P55W-C5200X Keyboard Replacement: step 15, image 1 of 3 Toshiba Satellite P55W-C5200X Keyboard Replacement: step 15, image 2 of 3 Toshiba Satellite P55W-C5200X Keyboard Replacement: step 15, image 3 of 3
    • Similar to step 4, there is a metal bracket that must be removed to get to some ports.

    • Use the Phillips #00 screwdriver to remove the three 5.0 mm screws that are holding the metal plate in place.

    • Gently remove the metal bracket off the ports underneath.

  16. Toshiba Satellite P55W-C5200X Keyboard Replacement: step 16, image 1 of 3 Toshiba Satellite P55W-C5200X Keyboard Replacement: step 16, image 2 of 3 Toshiba Satellite P55W-C5200X Keyboard Replacement: step 16, image 3 of 3
    • Once the ports are accessible, remove four connecting wires from the ports themselves.

    • Be gentle when removing the four wires.

  17. Toshiba Satellite P55W-C5200X Keyboard Replacement: step 17, image 1 of 2 Toshiba Satellite P55W-C5200X Keyboard Replacement: step 17, image 2 of 2
    • Once the connecting wires are removed, remove the 8.0 mm screw of the USB ports, using the Phillips #00 screwdriver.

    • Gently remove the USB ports.

  18. Toshiba Satellite P55W-C5200X Keyboard Replacement: step 18, image 1 of 3 Toshiba Satellite P55W-C5200X Keyboard Replacement: step 18, image 2 of 3 Toshiba Satellite P55W-C5200X Keyboard Replacement: step 18, image 3 of 3
    • Remove the thirty-three 1.0 mm screws with the Phillips Head #000.

    • Gently remove the metal cover.

  19. Toshiba Satellite P55W-C5200X Keyboard Replacement: step 19, image 1 of 3 Toshiba Satellite P55W-C5200X Keyboard Replacement: step 19, image 2 of 3 Toshiba Satellite P55W-C5200X Keyboard Replacement: step 19, image 3 of 3
    • Gently pull on the tab to lift the keyboard from the device.

    • Lastly remove the keyboard.

Conclusion

To reassemble your device, follow these instructions in reverse order.

One other person completed this guide.

Vatthanak Doeung

Member since: 10/21/19

220 Reputation

1 Guide authored

Team

0 Comments

Add Comment

View Statistics:

Past 24 Hours: 0

Past 7 Days: 5

Past 30 Days: 16

All Time: 1,336