Toshiba Satellite P105-S6147 Screen Replacement

  1. Toshiba Satellite P105-S6147 Screen Replacement, Keyboard: step 1, image 1 of 1
    • Use the iFixit opening tool to remove the cover at the top of the keyboard.

    • Insert the tool in the small space above the keyboard and gently pry until the cover pops out of its retaining clips.

    • Repeat the prying across the top of the keyboard until the whole cover is loose.

  2. Toshiba Satellite P105-S6147 Screen Replacement: step 2, image 1 of 1
    • Gently lift the cover off the top of the keyboard.

  3. Toshiba Satellite P105-S6147 Screen Replacement: step 3, image 1 of 2 Toshiba Satellite P105-S6147 Screen Replacement: step 3, image 2 of 2
    • Use the Phillips #0 screwdriver to remove six 6 mm screws labeled “F4” at the top of the keyboard.

  4. Toshiba Satellite P105-S6147 Screen Replacement: step 4, image 1 of 3 Toshiba Satellite P105-S6147 Screen Replacement: step 4, image 2 of 3 Toshiba Satellite P105-S6147 Screen Replacement: step 4, image 3 of 3
    • Use the iFixit opening tool to pry the keyboard out of its retaining clips.

    • Insert the tool into the groove surrounding the laptop and pry until the keyboard “pops” out of the laptop body.

    • Once the keyboard is free from the laptop body, gently flip the keyboard over, as seen in the third picture.

  5. Toshiba Satellite P105-S6147 Screen Replacement: step 5, image 1 of 2 Toshiba Satellite P105-S6147 Screen Replacement: step 5, image 2 of 2
    • Lay the keyboard down on the bottom of the laptop, as seen in image one.

    • Locate the ribbon cable connecting the bottom of the keyboard to the laptop. There will be a small black and white clip securing the ribbon cable to the laptop.

    • Use the iFixit opening tool to gently open the clip, freeing the ribbon cable from the laptop body.

    • Gently remove the keyboard from the laptop body.

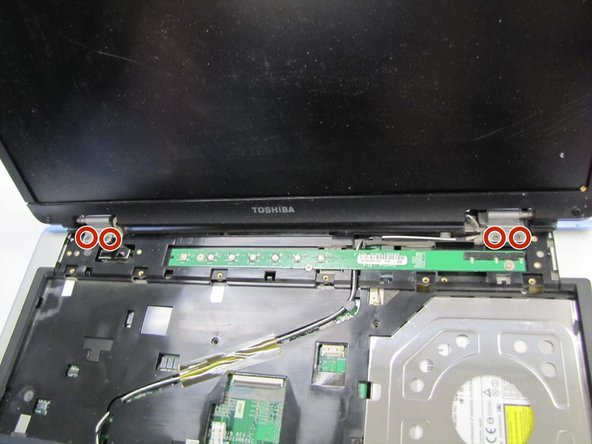
  6. Toshiba Satellite P105-S6147 Screen Replacement, Screen: step 6, image 1 of 2 Toshiba Satellite P105-S6147 Screen Replacement, Screen: step 6, image 2 of 2
    • Use the Phillips #0 screwdriver to unscrew the four 3 mm screws connecting the screen to the keyboard.

  7. Toshiba Satellite P105-S6147 Screen Replacement: step 7, image 1 of 3 Toshiba Satellite P105-S6147 Screen Replacement: step 7, image 2 of 3 Toshiba Satellite P105-S6147 Screen Replacement: step 7, image 3 of 3
    • Disconnect the white cord that is connected from the screen to the keyboard.

    • Disconnect the cord from the bottom of the keyboard.

    • Gently pull the cord out from the fastening clips on the keyboard.

  8. Toshiba Satellite P105-S6147 Screen Replacement: step 8, image 1 of 2 Toshiba Satellite P105-S6147 Screen Replacement: step 8, image 2 of 2
    • Remove the rubber pads from the four corners of the screen, revealing four screws.

  9. Toshiba Satellite P105-S6147 Screen Replacement: step 9, image 1 of 1
    • Remove the plastic bevel from around the screen.

    • Pull the bevel up and off.

  10. Toshiba Satellite P105-S6147 Screen Replacement: step 10, image 1 of 3 Toshiba Satellite P105-S6147 Screen Replacement: step 10, image 2 of 3 Toshiba Satellite P105-S6147 Screen Replacement: step 10, image 3 of 3
    • Use the Phillips #0 screwdriver to remove the 4 mm screws located on the top of the screen and the sides.

  11. Toshiba Satellite P105-S6147 Screen Replacement: step 11, image 1 of 3 Toshiba Satellite P105-S6147 Screen Replacement: step 11, image 2 of 3 Toshiba Satellite P105-S6147 Screen Replacement: step 11, image 3 of 3
    • Remove the 2 white plugins from the bottom of the screen.

    • Pull gently on the white plugs to remove them.

  12. Toshiba Satellite P105-S6147 Screen Replacement: step 12, image 1 of 1
    • Pull the screen out of the laptop cover.

Conclusion

To reassemble your device, follow these instructions in reverse order.

0 Comments

Add Comment

View Statistics:

Past 24 Hours: 1

Past 7 Days: 1

Past 30 Days: 3

All Time: 284