
Toshiba Satellite C55-B5302 Screen Bezel Replacement

What you need

  1. Toshiba Satellite C55-B5302 Screen Bezel Replacement, Battery: step 1, image 1 of 2 Toshiba Satellite C55-B5302 Screen Bezel Replacement, Battery: step 1, image 2 of 2
    • Flip laptop upside down so you can see the screws.

  2. Toshiba Satellite C55-B5302 Screen Bezel Replacement: step 2, image 1 of 2 Toshiba Satellite C55-B5302 Screen Bezel Replacement: step 2, image 2 of 2
    • Using the Phillips #0 screwdriver, remove the two 7 mm screws from the back casing.

  3. Toshiba Satellite C55-B5302 Screen Bezel Replacement: step 3, image 1 of 1
    • Pull the battery from the back of the laptop for removal from the laptop.

  4. Toshiba Satellite C55-B5302 Screen Bezel Replacement, Fan: step 4, image 1 of 3 Toshiba Satellite C55-B5302 Screen Bezel Replacement, Fan: step 4, image 2 of 3 Toshiba Satellite C55-B5302 Screen Bezel Replacement, Fan: step 4, image 3 of 3
    • Remove the remaining 7 mm screws on the back panel of the laptop with a Phillips #0 screwdriver.

    • Use the plastic opening tool to pry up a corner of the back panel and continue to pop the back panel off.

    • Expect to hear popping as you pull the back panel off.

  5. Toshiba Satellite C55-B5302 Screen Bezel Replacement: step 5, image 1 of 1
    • Disconnect the fan wire from the motherboard.

  6. Toshiba Satellite C55-B5302 Screen Bezel Replacement: step 6, image 1 of 3 Toshiba Satellite C55-B5302 Screen Bezel Replacement: step 6, image 2 of 3 Toshiba Satellite C55-B5302 Screen Bezel Replacement: step 6, image 3 of 3
    • Remove the three 3 mm screws with a Phillips #00 screwdriver.

    • Remove the 5 mm screw with a Phillips #0 screwdriver.

  7. Toshiba Satellite C55-B5302 Screen Bezel Replacement: step 7, image 1 of 1
    • You can now lift the fan out of the laptop.

  8. Toshiba Satellite C55-B5302 Screen Bezel Replacement, Screen Bezel: step 8, image 1 of 3 Toshiba Satellite C55-B5302 Screen Bezel Replacement, Screen Bezel: step 8, image 2 of 3 Toshiba Satellite C55-B5302 Screen Bezel Replacement, Screen Bezel: step 8, image 3 of 3
    • After the fan has been removed, lift the hinge so as to get access to the parts below it.

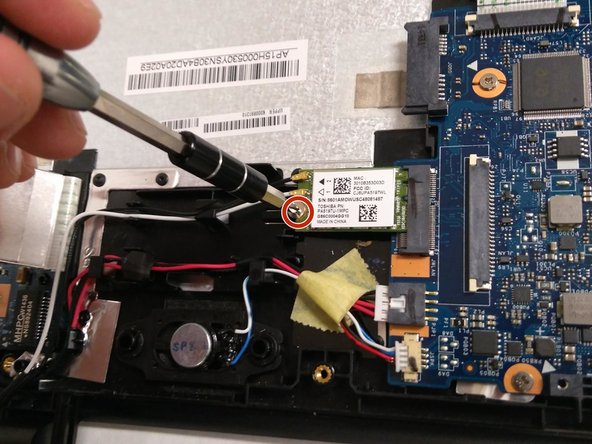
    • Remove the the black colored cable that is now exposed.

  9. Toshiba Satellite C55-B5302 Screen Bezel Replacement: step 9, image 1 of 3 Toshiba Satellite C55-B5302 Screen Bezel Replacement: step 9, image 2 of 3 Toshiba Satellite C55-B5302 Screen Bezel Replacement: step 9, image 3 of 3
    • Remove the 7 mm Phillips #0 screw on the other hinge.

    • Remove the 3.1 mm Phillips #0 screw on the the same hinge.

    • Lift the hinge up and towards you.

  10. Toshiba Satellite C55-B5302 Screen Bezel Replacement: step 10, image 1 of 2 Toshiba Satellite C55-B5302 Screen Bezel Replacement: step 10, image 2 of 2
    • Pull out the wide cable to reveal the components underneath.

  11. Toshiba Satellite C55-B5302 Screen Bezel Replacement: step 11, image 1 of 2 Toshiba Satellite C55-B5302 Screen Bezel Replacement: step 11, image 2 of 2
    • Remove the 3.1 mm Phillips #0 screw holding the chip in place.

    • Pull out the chip.

  12. Toshiba Satellite C55-B5302 Screen Bezel Replacement: step 12, image 1 of 3 Toshiba Satellite C55-B5302 Screen Bezel Replacement: step 12, image 2 of 3 Toshiba Satellite C55-B5302 Screen Bezel Replacement: step 12, image 3 of 3
    • Hold the cable that is to be removed.

    • Use an iFixit opening tool to push down on the white protrusion of cable connector.

    • Now you can pull out the cable.

  13. Toshiba Satellite C55-B5302 Screen Bezel Replacement: step 13, image 1 of 3 Toshiba Satellite C55-B5302 Screen Bezel Replacement: step 13, image 2 of 3 Toshiba Satellite C55-B5302 Screen Bezel Replacement: step 13, image 3 of 3
    • Pivot and lift up the monitor and separate it from the base of the laptop.

  14. Toshiba Satellite C55-B5302 Screen Bezel Replacement: step 14, image 1 of 3 Toshiba Satellite C55-B5302 Screen Bezel Replacement: step 14, image 2 of 3 Toshiba Satellite C55-B5302 Screen Bezel Replacement: step 14, image 3 of 3
    • Use an iFixit opening tool to separate the two halves of the bezel starting at both the plastic hinges.

    • Use the metal spudger to separate the rest of the bezel.

    • Be careful not to scratch the screen with the metal spudger.

    • You may hear some sounds as the clips on the bezel disconnect from the back cover. This is normal.

Conclusion

To reassemble your device, follow these instructions in reverse order.

One other person completed this guide.

David Browning

Member since: 03/25/19

310 Reputation

2 Guides authored

Team

IUPUI, Team S1-G3, Henning Spring 2019 Member of IUPUI, Team S1-G3, Henning Spring 2019

IUPUI-HENNING-S19S1G3

4 Members

6 Guides authored

2 Comments

Sir how will I find screen strip of toshiba c55-b1326

Shahid Iqbal - Reply

Sir how can I find screen strip of toshiba c55-b1326

Shahid Iqbal - Reply

Add Comment

View Statistics:

Past 24 Hours: 0

Past 7 Days: 2

Past 30 Days: 13

All Time: 521