Free Shipping on Domestic Orders $75+

Tomado Rechargeable Vacuum Cleaner Disassembly

What you need

    1. Tomado Rechargeable Vacuum Cleaner Disassembly, Tomado Rechargeable Vacuum Cleaner Disassembly: step 1, image 1 of 1
      • The full product in its original state.

      Ask FixBot

      Add Comment

    2. Tomado Rechargeable Vacuum Cleaner Disassembly: step 2, image 1 of 2 Tomado Rechargeable Vacuum Cleaner Disassembly: step 2, image 2 of 2
      • Remove the nozzle by pressing the white button on the top of the product just under the name of the brand.

      Ask FixBot

      Add Comment

    3. Tomado Rechargeable Vacuum Cleaner Disassembly: step 3, image 1 of 1
      • Remove the big parts that are inside of the nozzle. These parts consist of a plastic structure with a filter.

      Ask FixBot

      Add Comment

    4. Tomado Rechargeable Vacuum Cleaner Disassembly: step 4, image 1 of 2 Tomado Rechargeable Vacuum Cleaner Disassembly: step 4, image 2 of 2
      • Remove the rubber fitting from the inside of the nozzle by pulling it from the metal pieces.

      Ask FixBot

      Add Comment

      • Remove the blue switchbutton from the upper part of the nozzle by putting a momentum on the edge. After you have this signature move you can remove the brush. You can see the video for the signature move.

      Ask FixBot

      Add Comment

    5. Tomado Rechargeable Vacuum Cleaner Disassembly: step 6, image 1 of 3 Tomado Rechargeable Vacuum Cleaner Disassembly: step 6, image 2 of 3 Tomado Rechargeable Vacuum Cleaner Disassembly: step 6, image 3 of 3
      • Remove the blue switchbutton from the upper part of the nozzle by putting a momentum on the edge. After you have done this signature move you can remove the brush.

      Ask FixBot

      Add Comment

    6. Tomado Rechargeable Vacuum Cleaner Disassembly: step 7, image 1 of 1
      • Right now the whole nozzle is disassembled, except for two small steel rings. These will break if you try to remove them.

      Ask FixBot

      Add Comment

    7. Tomado Rechargeable Vacuum Cleaner Disassembly: step 8, image 1 of 1
      • Now the nozzle is disassembled we can start with the body.

      Ask FixBot

      Add Comment

    8. Tomado Rechargeable Vacuum Cleaner Disassembly: step 9, image 1 of 2 Tomado Rechargeable Vacuum Cleaner Disassembly: step 9, image 2 of 2
      • Remove 4 screws on the side and 1 screw on the bottom. You'll do this by crosshead screwdriver size number 1.

      Ask FixBot

      Add Comment

    9. Tomado Rechargeable Vacuum Cleaner Disassembly: step 10, image 1 of 2 Tomado Rechargeable Vacuum Cleaner Disassembly: step 10, image 2 of 2
      • Remove the black clip from the inner top side of the body.

      Ask FixBot

      Add Comment

    10. Tomado Rechargeable Vacuum Cleaner Disassembly: step 11, image 1 of 2 Tomado Rechargeable Vacuum Cleaner Disassembly: step 11, image 2 of 2
      • Remove the lid from the battery lid by sliding it and after pull it out.

      Ask FixBot

      Add Comment

    11. Tomado Rechargeable Vacuum Cleaner Disassembly: step 12, image 1 of 1
      • Remove the screw after removing the lid above the battery.

      Ask FixBot

      Add Comment

    12. Tomado Rechargeable Vacuum Cleaner Disassembly: step 13, image 1 of 3 Tomado Rechargeable Vacuum Cleaner Disassembly: step 13, image 2 of 3 Tomado Rechargeable Vacuum Cleaner Disassembly: step 13, image 3 of 3
      • Seperate the two body parts.

      Ask FixBot

      Add Comment

    13. Tomado Rechargeable Vacuum Cleaner Disassembly: step 14, image 1 of 2 Tomado Rechargeable Vacuum Cleaner Disassembly: step 14, image 2 of 2
      • Remove the turbine protector in front of the turbine.

      Ask FixBot

      Add Comment

    14. Tomado Rechargeable Vacuum Cleaner Disassembly: step 15, image 1 of 2 Tomado Rechargeable Vacuum Cleaner Disassembly: step 15, image 2 of 2
      • Pull the battery out. It still has some wires attached to it.

      Ask FixBot

      Add Comment

    15. Tomado Rechargeable Vacuum Cleaner Disassembly: step 16, image 1 of 2 Tomado Rechargeable Vacuum Cleaner Disassembly: step 16, image 2 of 2
      • Use the pliers to remove the wires from the battery.

      Ask FixBot

      Add Comment

    16. Tomado Rechargeable Vacuum Cleaner Disassembly: step 17, image 1 of 1
      • Pull the charge socket out of the plastic cover.

      Ask FixBot

      Add Comment

    17. Tomado Rechargeable Vacuum Cleaner Disassembly: step 18, image 1 of 2 Tomado Rechargeable Vacuum Cleaner Disassembly: step 18, image 2 of 2
      • Remove the button from the body.

      Ask FixBot

      Add Comment

    18. Tomado Rechargeable Vacuum Cleaner Disassembly: step 19, image 1 of 2 Tomado Rechargeable Vacuum Cleaner Disassembly: step 19, image 2 of 2
      • Pull the button off the switch.

      Ask FixBot

      Add Comment

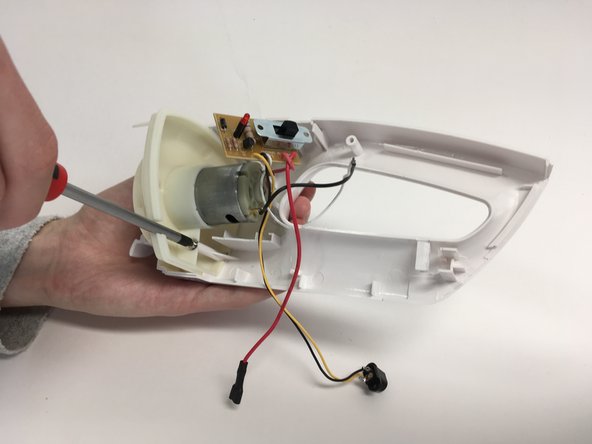
    19. Tomado Rechargeable Vacuum Cleaner Disassembly: step 20, image 1 of 1
      • Remove the last screw with a number 1 screwdriver, next to the electro motor to release the motor + turbine.

      Ask FixBot

      Add Comment

    20. Tomado Rechargeable Vacuum Cleaner Disassembly: step 21, image 1 of 1
      • The remaining part consists of moving pieces that cannot be disassembled.

      Ask FixBot

      Add Comment

Conclusion

To reassemble your device, follow these instructions in reverse order.

Cancel: I did not complete this guide.

0 Guide Comments

Add Comment

View Statistics:

Past 24 Hours: 2

Past 7 Days: 13

Past 30 Days: 52

All Time: 750