
Texas Instruments TI-83 Plus Back Case Replacement

Jared and
Last updated on Nov 5, 2015
Views: 11K
View statistics:
- Past 24 Hours:
- 4
- Past 7 Days:
- 26
- Past 30 Days:
- 115
- All Time:
- 11,081
Comments: 5
5 comments on steps.
Completed: 8 9
8 people have marked this guide "completed." Will you be next?
9 people have marked this guide "completed." Including you — great job!
Favorites: 2 3
2 people have favorited (and subscribed to) this guide. Will you be next?
3 people have favorited (and subscribed to) this guide — including you!
Introduction
Go to step 1 ↓If your back case is cracked or broken this guide will show you how it is removed and replaced.
What you need
Tools


-
-
-
Remove the battery cover.
-
Remove the AAA batteries from the calculator.
 Ask FixBot
-
-
-
Remove the 5mm Philips #00 screw holding backup battery cover.
-
Remove the backup battery cover.
-
-
-
-
Use plastic opening tool to remove the backup battery. Place the tool in the small cut-out next to the battery and pry the battery out.
-
-
-
-
-
Unscrew the six 7.5mm T6 screws on the back case. You will need to use a screwdriver with a long and skinny head.
-
-
-
Pry back case off. Insert the plastic opening tool in the track for the protective cover and pry the halves of the case apart.
-
-



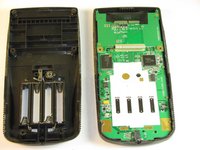
To reassemble your device, follow these instructions in reverse order.
Cancel: I did not complete this guide.
8 other people completed this guide.

Team

Cal Poly, Team 18-37, Regan Fall 2012 Member of Cal Poly, Team 18-37, Regan Fall 2012
CPSU-REGAN-F12S18G37
5 Members
60 Guides authored
