Introduction
Follow this guide to remove and replace the printing unit in the TI-5130 electronic calculator.
What you need
-
-
Flip the calculator over and remove the 4 main 10mm screws with a PH1 screwdriver.
 Ask FixBot
-
-
-
-
Disconnect the printing unit from the motherboard by pulling up on the connector – located in the bottom left of the motherboard.
-
-
-
Remove the ink cartridge by pushing the tab back then lifting it out to gain access to the screw that holds the printer in place.
-
-
-
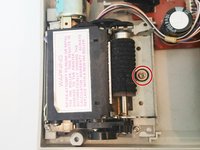
Using a PH1 screwdriver remove the 10mm screw that holds down the printer unit.
-
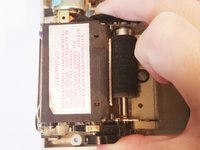
Remove the printer unit by lifting it up.
-


To reassemble your device, follow these instructions in reverse order.
Cancel: I did not complete this guide.
3 other people completed this guide.
Team

USF Sarasota-Manatee, Team 1-2, Stewart Fall 2015 Member of USF Sarasota-Manatee, Team 1-2, Stewart Fall 2015
USFSM-STEWART-F15S1G2
5 Members
21 Guides authored
2 Guide Comments
wehre did you buy the replacement printer
what sources are there for TI-5130 printer unit?