This translation was generated by a machine and has not been reviewed by a person yet. Speak this language? Review it.
-
-
-
3 uF / 450V capacitor, why such a high voltage?: It does not mean that the capacitor will work at 450 V; that voltage means that the capacitor CAN WITHSTAND up to 450 V.
-
In this first check, I am going to check it with a capacitance meter, a device similar to a multimeter, but this one only measures capacitors (in each country, the capacitor is called something different).
 Ask FixBot
-
-
-
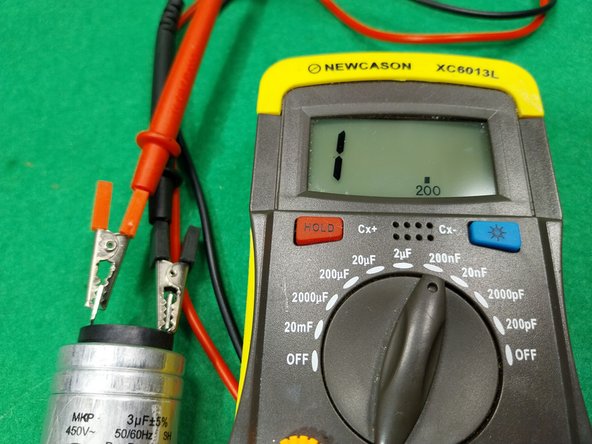
Checking the 3 µF capacitor with a capacitance meter: set the measuring device to the scale closest to, but immediately higher than, 3 µF; in this case, the 20 µF scale. If you set it to a scale lower than 3 µF, it will NOT measure.
-
In this case, this faulty, de-capacitated (low capacity = faulty) 3 µF capacitor shows a reading of 0.74 µF.
-
-
-
We already know it is faulty, but just to focus the measurement a little more, we lower the scale on the measuring device to the 2 µF scale, which gives us a reading of 0.718 µF.
-
-
-
-
We have another “simple” capacitor testing method. It is not as reliable as a meter, but if we do not have anything else, this one is simple to build and cheap:
-
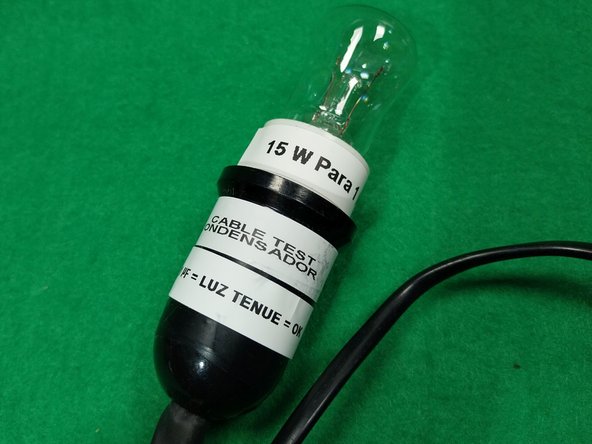
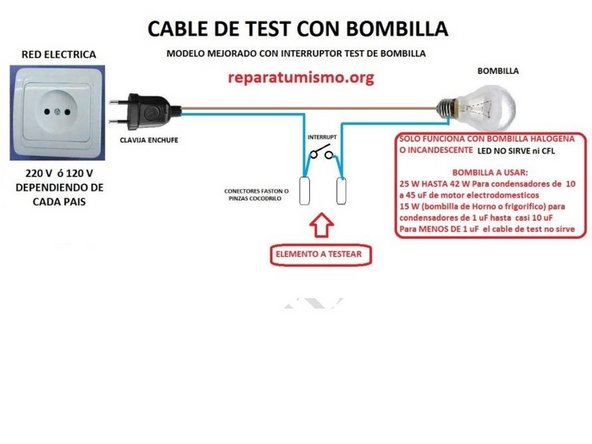
The test cable with a light bulb; in this case, a 15 W oven, refrigerator, or microwave bulb (all of those work; LED bulbs with electronics DO NOT WORK; a 25 or 42 W filament or halogen one works for us). WARNING: NEVER USE BULBS OVER 42 W.
-
Regarding this method to test capacitors, I have many videos on YouTube. It is a highly copied method. I highly doubt you will find a video earlier than 2010 that explains this method, but many insist, without providing any graphic evidence, that mine was not the first... we will leave the controversy there.
-
As you can see, this was the first video, of low quality since I did not record in digital format back then. It was my beginning on YouTube in the year 2010 and it is the 1st I filmed out of the many, more than 1450, that I have today HOMEMADE CAPACITOR TESTER CABLE, APPLIANCE CAPACITORS 1 of 5
-
Original document from 2010 with updates in 2017, with photos where I explain the construction of the light bulb tester cable, very simple. The key or password it asks for is: repara https://drive.google.com/file/d/1IspqWnQ...
-
-
-
Connect the power plug and observe the light the bulb produces:
-
With an OK capacitor, the 15 W bulb will light up to almost 100%. This is the same as if we were to close a nightstand lamp switch (this simply bridges the capacitor terminals).
-
A capacitor with low capacitance = damaged = faulty: the lamp will barely light up or the filament will not even turn on. FAULTY. Photos 2 and 3.
-
-
-
We will now compare it with another 4 µF capacitor in good condition (very similar to the faulty 3 µF one we have); we can replace a 3 µF capacitor with a 4 µF one without any issues. With this one, the lamp shines at almost 100%, as you can see.
-
-
-
What is the test knob switch or 100% test button for?
-
We will now compare it with another 4 µF capacitor in good condition (very similar to the faulty 3 µF one we have). We can replace a 3 µF one with a 4 µF one without any issues; with this one, the lamp lights up at almost 100%, as you can see in the photos.
-
2nd: When checking a capacitor, the switch allows us to compare the light generated by the capacitor with the light generated by the lamp at 100% power, so we can determine how much energy is being lost in the capacitor (loss of light).
-
-
-
Test with a 25 W lamp, we see that the result is similar to the 15 W lamp.
-
Note for this test for capacitors between 2 uF and 40 uF: We must never exceed 42 or 50 W of power for the lamp; for example, a 75 W filament lamp DOES NOT WORK for this test, it always lights up at 100%. Or CFL-type fluorescent lamps, or LED, or higher-power halogen lamps DO NOT WORK.
-
A remake of videos I made in 2017 where the test cable made on a board can be seen better: Videos.
-
End of the Guide
-
-







To reassemble your device, follow these instructions in reverse order.
Cancel: I did not complete this guide.
One other person completed this guide.

1 Guide Comment
Despues de bastantes meses con este documento a medias de finalizar, a 22 de diciembre 2024,lo he finalizado para que no me queden guías pendientes de 2024.
