This translation was generated by a machine and has not been reviewed by a person yet. Speak this language? Review it.
Introduction
Guide on how to replace the hard disk in a Technisat HD-S2. You can also replace it with a bigger sized HDD then the original disk. It is unknown if there is an upper limit for the hard drive. In this case, a 160GB disk has been replaced with a 1TB disk. This guide can also help with similar models of Technisat.
What you need
-
-
-
Remove the three screws (marked) on the back side of the device
-
Remove one screw on each the right and left side of the device
 Ask FixBot
-
-
-
Remove both cables from the disk. There are little notches which have to be pressed down a little bit to unlock the connector
-
-
-
-
Remove both screws on the top front-cover
-
Below the two removed screws, the front bezel is still fastened with clips. See red arrows in the picture (the clips themselves are not visible in the picture because they are under the cover).
-
There are three plastic lugs on the underside of the bezel (red circles in the picture), one on the left and one on the right (rough position marked with an arrow in the picture).
-
When you release the two internal clips, you can fold the bezel forward, then the clips on the underside should also release, otherwise help a little with a flathead screwdriver.
-
-
-
Remove the two screws underneath the front cover
-
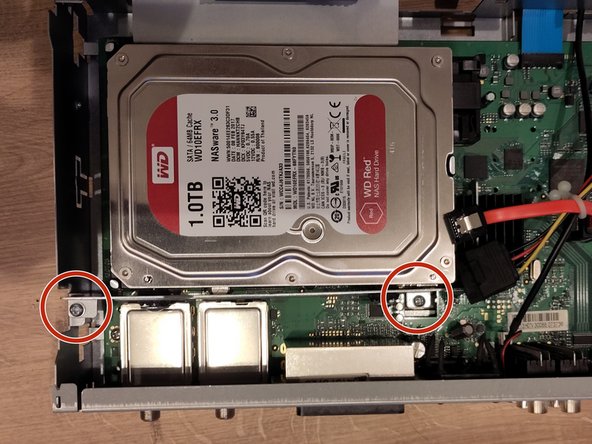
Remove the two screws which hold the hard disk to the bottom of the frame
-
The hard drive can now be removed including its metal frame. This frame is fixed with two screws on each side of the hard disk.
-
-
-
A new hard disk (or also the existing one) can be formatted using a normal computer with the exFAT (not NTFS). Caution: all data will be lost! Now you can put in the disk again and re-assemble the device.
-
Within the menu of the device, you have to again format the disk to be properly recognized and usable.
-
There were cases, where the receiver had issues with the hard drive. After formatting the drive with a computer, it worked again properly within the Technisat device, so it is not always needed to replace the hard drive with a new one!
-
-




To reassemble your device follow the steps in reverse order.
Cancel: I did not complete this guide.
One other person completed this guide.
Special thanks to these translators:
100%


These translators are helping us fix the world! Want to contribute?
Start translating ›

