TECHUP Bluetooth Speaker Motherboard Replacement

What you need

  1. TECHUP Bluetooth Speaker Motherboard Replacement, Motherboard: step 1, image 1 of 1
    • Pry the foam buffer from the speaker using a nylon spudger or flathead screwdriver (pictured).

    • You will need to re-apply adhesive if you want to reattach this foam after removing it.

  2. TECHUP Bluetooth Speaker Motherboard Replacement: step 2, image 1 of 3 TECHUP Bluetooth Speaker Motherboard Replacement: step 2, image 2 of 3 TECHUP Bluetooth Speaker Motherboard Replacement: step 2, image 3 of 3
    • Remove the two bottom screws using a Phillips #0 screwdriver.

  3. TECHUP Bluetooth Speaker Motherboard Replacement: step 3, image 1 of 2 TECHUP Bluetooth Speaker Motherboard Replacement: step 3, image 2 of 2
    • Pull the plastic casing away from the speaker.

    • You may have to twist-and-pull to remove it.

  4. TECHUP Bluetooth Speaker Motherboard Replacement: step 4, image 1 of 2 TECHUP Bluetooth Speaker Motherboard Replacement: step 4, image 2 of 2
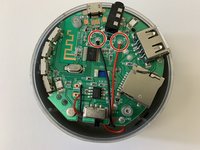
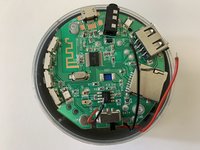
    • Desolder the two battery wires from the motherboard.

    • Because you are dealing with battery connections, be aware of the shock hazard.

  5. TECHUP Bluetooth Speaker Motherboard Replacement: step 5, image 1 of 2 TECHUP Bluetooth Speaker Motherboard Replacement: step 5, image 2 of 2
    • Desolder the two speaker wires from the motherboard.

  6. TECHUP Bluetooth Speaker Motherboard Replacement: step 6, image 1 of 1
    • Grasp the motherboard and pull it from the encasement.

    • Take care to not rip the wires as you pull the motherboard out, as they may catch in the grooves on the motherboard.

  7. TECHUP Bluetooth Speaker Motherboard Replacement: step 7, image 1 of 1
    • Pry the battery from the motherboard using a nylon spudger.

    • You may have to apply significant force to the motherboard to remove the battery.

    • Always use an ESD-safe tool, such as a nylon spudger, when working with batteries. Metal tools can puncture an unprotected battery, potentially causing a fire.

Conclusion

To reassemble your device, follow these instructions in reverse order.

3 other people completed this guide.

0 Comments

Add Comment

View Statistics:

Past 24 Hours: 1

Past 7 Days: 8

Past 30 Days: 57

All Time: 1,847