
TDK Life on Record Trek Max A34 Buttons Replacement

What you need

  1. TDK Life on Record Trek Max A34 Buttons Replacement, Battery: step 1, image 1 of 2 TDK Life on Record Trek Max A34 Buttons Replacement, Battery: step 1, image 2 of 2
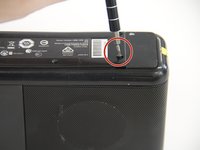
    • Flip your device upside down so the battery cover is facing upwards.

    • Using the Torx T6 screwdriver, remove all seven 6 mm Torx screws that are located along the perimeter of the battery cover.

  2. TDK Life on Record Trek Max A34 Buttons Replacement: step 2, image 1 of 2 TDK Life on Record Trek Max A34 Buttons Replacement: step 2, image 2 of 2
    • Use the metal spudger prying tool to gently pry off the battery cover.

    • The battery should now be exposed.

  3. TDK Life on Record Trek Max A34 Buttons Replacement: step 3, image 1 of 3 TDK Life on Record Trek Max A34 Buttons Replacement: step 3, image 2 of 3 TDK Life on Record Trek Max A34 Buttons Replacement: step 3, image 3 of 3
    • Starting from where the wires are connected, gently pull the battery out of the device.

  4. TDK Life on Record Trek Max A34 Buttons Replacement: step 4, image 1 of 2 TDK Life on Record Trek Max A34 Buttons Replacement: step 4, image 2 of 2
    • Unplug the battery from the device by detaching the wires at the white connection box.

    • Detaching the wires may require some force.

    • Be careful not to rip the wires out of the device or the battery.

  5. TDK Life on Record Trek Max A34 Buttons Replacement: step 5, image 1 of 1
    • The battery is now separated from the device and may be replaced with a new battery.

  6. TDK Life on Record Trek Max A34 Buttons Replacement, Large Speaker: step 6, image 1 of 2 TDK Life on Record Trek Max A34 Buttons Replacement, Large Speaker: step 6, image 2 of 2
    • Turn over the device so the bottom is facing up. Remove the screws of the battery cover using the iFixit TR7 screwdriver.

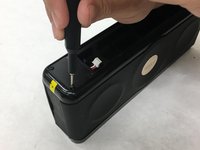
    • Remove the battery cover by pulling up where the screws should go.

  7. TDK Life on Record Trek Max A34 Buttons Replacement: step 7, image 1 of 2 TDK Life on Record Trek Max A34 Buttons Replacement: step 7, image 2 of 2
    • Carefully unplug and remove the battery.

    • Use the metal spudger to pry off the rubber bumpers from the bottom of the speaker.

  8. TDK Life on Record Trek Max A34 Buttons Replacement: step 8, image 1 of 3 TDK Life on Record Trek Max A34 Buttons Replacement: step 8, image 2 of 3 TDK Life on Record Trek Max A34 Buttons Replacement: step 8, image 3 of 3
    • Use a Phillips #00 screwdriver to remove the screws that were underneath the rubber bumpers.

    • Remove the battery holder. Be sure to thread the exposed wires through the hole within the holder.

  9. TDK Life on Record Trek Max A34 Buttons Replacement: step 9, image 1 of 3 TDK Life on Record Trek Max A34 Buttons Replacement: step 9, image 2 of 3 TDK Life on Record Trek Max A34 Buttons Replacement: step 9, image 3 of 3
    • Use a metal spudger to pry off the front and back mesh screens.

    • You may need to move the metal spudger along the edge of the screen to remove it more easily.

  10. TDK Life on Record Trek Max A34 Buttons Replacement: step 10, image 1 of 3 TDK Life on Record Trek Max A34 Buttons Replacement: step 10, image 2 of 3 TDK Life on Record Trek Max A34 Buttons Replacement: step 10, image 3 of 3
    • Turn the speaker back upright. Use the metal spudger to pry up the rubber cover to reveal the buttons underneath.

  11. TDK Life on Record Trek Max A34 Buttons Replacement: step 11, image 1 of 2 TDK Life on Record Trek Max A34 Buttons Replacement: step 11, image 2 of 2
    • Use a Phillips #00 screwdriver to remove the screws that hold the top cover in place.

    • Remove the top cover.

  12. TDK Life on Record Trek Max A34 Buttons Replacement: step 12, image 1 of 2 TDK Life on Record Trek Max A34 Buttons Replacement: step 12, image 2 of 2
    • On the backside of the device, remove the screws using the Phillips #0 screwdriver.

    • Only the screws on the backside are needed to hold the frame together. Do not remove screws on the front.

    • Once the screws are removed, separate the two frame pieces.

  13. TDK Life on Record Trek Max A34 Buttons Replacement: step 13, image 1 of 1
    • Within the device, there is a single cable connecting the large speaker to the motherboard. Unplug this cable.

  14. TDK Life on Record Trek Max A34 Buttons Replacement: step 14, image 1 of 2 TDK Life on Record Trek Max A34 Buttons Replacement: step 14, image 2 of 2
    • On the front of the device, use the Phillips #0 screwdriver to remove the four screws holding the speaker in.

    • Once the screws are removed, you are able to push the speaker out from behind.

  15. TDK Life on Record Trek Max A34 Buttons Replacement, Small Speaker: step 15, image 1 of 2 TDK Life on Record Trek Max A34 Buttons Replacement, Small Speaker: step 15, image 2 of 2
    • Use a TR7 screwdriver to remove the screws from the battery cover located on the underside of the device.

    • Remove the battery cover.

  16. TDK Life on Record Trek Max A34 Buttons Replacement: step 16, image 1 of 2 TDK Life on Record Trek Max A34 Buttons Replacement: step 16, image 2 of 2
    • Unplug and remove the battery.

    • Use a metal spudger to pry off the rubber padding.

  17. TDK Life on Record Trek Max A34 Buttons Replacement: step 17, image 1 of 3 TDK Life on Record Trek Max A34 Buttons Replacement: step 17, image 2 of 3 TDK Life on Record Trek Max A34 Buttons Replacement: step 17, image 3 of 3
    • Use a J00 screwdriver to unscrew the screws that are under the rubber pads.

    • Remove the battery holder and be sure to thread the wires through the hole within the part.

  18. TDK Life on Record Trek Max A34 Buttons Replacement: step 18, image 1 of 3 TDK Life on Record Trek Max A34 Buttons Replacement: step 18, image 2 of 3 TDK Life on Record Trek Max A34 Buttons Replacement: step 18, image 3 of 3
    • Use a metal spudger to pry off the front and back mesh screens.

    • You may need to move the metal spudger along the edge of the screen to remove it easier.

  19. TDK Life on Record Trek Max A34 Buttons Replacement: step 19, image 1 of 3 TDK Life on Record Trek Max A34 Buttons Replacement: step 19, image 2 of 3 TDK Life on Record Trek Max A34 Buttons Replacement: step 19, image 3 of 3
    • Use the a metal spudger to pry up the rubber cover on the top surface of the device.

    • Peel off the rubber cover to reveal the buttons and screws underneath.

  20. TDK Life on Record Trek Max A34 Buttons Replacement: step 20, image 1 of 2 TDK Life on Record Trek Max A34 Buttons Replacement: step 20, image 2 of 2
    • Use a J00 screwdriver to unscrew the screws that hold the top cover in place.

    • Remove the top cover.

  21. TDK Life on Record Trek Max A34 Buttons Replacement: step 21, image 1 of 2 TDK Life on Record Trek Max A34 Buttons Replacement: step 21, image 2 of 2
    • On the backside of the device, unscrew the case screws with a J00 screwdriver.

    • Only the screws on the backside are needed to hold the frame together, do not remove screws on the front.

    • Once the screws are removed, separate the two frame pieces.

  22. TDK Life on Record Trek Max A34 Buttons Replacement: step 22, image 1 of 3 TDK Life on Record Trek Max A34 Buttons Replacement: step 22, image 2 of 3 TDK Life on Record Trek Max A34 Buttons Replacement: step 22, image 3 of 3
    • The following steps can be applied to either the left or the right speaker.

    • Use a J00 screwdriver to unscrew the four screws that secure the speaker.

    • The speaker should fall out naturally. If the speaker is stuck, use a plastic opening tool or a metal spudger to gently lift it out.

    • Desolder the black and red speaker wires.

    • Review the Desolder guide if you are unfamiliar with soldering.

  23. TDK Life on Record Trek Max A34 Buttons Replacement, Motherboard: step 23, image 1 of 3 TDK Life on Record Trek Max A34 Buttons Replacement, Motherboard: step 23, image 2 of 3 TDK Life on Record Trek Max A34 Buttons Replacement, Motherboard: step 23, image 3 of 3
    • Carefully detach the 4 white rectangular clips from the motherboard.

  24. TDK Life on Record Trek Max A34 Buttons Replacement: step 24, image 1 of 1
    • Carefully remove the motherboard from the device.

  25. TDK Life on Record Trek Max A34 Buttons Replacement, Buttons: step 25, image 1 of 2 TDK Life on Record Trek Max A34 Buttons Replacement, Buttons: step 25, image 2 of 2
    • Once the soldering iron is heated, carefully place the iron onto the connection point of the button.

    • With a steady hand, hold the soldering iron in place until the metal is slightly melted.

    • For more information on soldering and desoldering connections, please read the How to Solder and Desolder Connections guide.

  26. TDK Life on Record Trek Max A34 Buttons Replacement: step 26, image 1 of 1
    • Use a pair of tweezers to remove the buttons.

    • Repeat the previous step for multiple buttons.

Conclusion

To reassemble your device, follow these instructions in reverse order.

Marilyn Ho

Member since: 11/04/19

211 Reputation

2 Guides authored

Team

IUPUI, Team S1-G3, Harley Fall 2019 Member of IUPUI, Team S1-G3, Harley Fall 2019

IUPUI-HARLEY-F19S1G3

3 Members

2 Guides authored

0 Comments

Add Comment

View Statistics:

Past 24 Hours: 0

Past 7 Days: 0

Past 30 Days: 9

All Time: 342