
Sylvania SDVD9004 Motherboard Replacement

What you need

  1. Sylvania SDVD9004 Motherboard Replacement, Back cover: step 1, image 1 of 1
    • Remove ten 7mm Phillips #0 screws.

    • Remove four 5mm Phillips #0 screws.

  2. Sylvania SDVD9004 Motherboard Replacement: step 2, image 1 of 2 Sylvania SDVD9004 Motherboard Replacement: step 2, image 2 of 2
    • Flip the device over.

    • Lift the top.

  3. Sylvania SDVD9004 Motherboard Replacement: step 3, image 1 of 1
    • This guide uses incorrect tools. Use an ESD safe tool, such as a nylon spudger, to complete this step.

  4. Sylvania SDVD9004 Motherboard Replacement, CD Drive: step 4, image 1 of 3 Sylvania SDVD9004 Motherboard Replacement, CD Drive: step 4, image 2 of 3 Sylvania SDVD9004 Motherboard Replacement, CD Drive: step 4, image 3 of 3
    • This guide uses incorrect tools. Use an ESD safe tool, such as a nylon spudger, to complete this step.

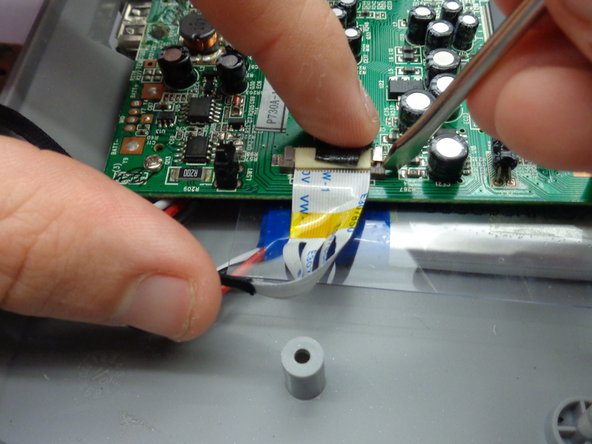
    • Wedge head lightly between drive and bottom of tab.

    • Repeat on both sides.

    • Gently pull out ribbon

  5. Sylvania SDVD9004 Motherboard Replacement: step 5, image 1 of 1
    • Drive Removal

    • Use Philip's screw driver to remove three 7 mm screws.

    • Rotate counter clockwise to loosen screws.

  6. Sylvania SDVD9004 Motherboard Replacement: step 6, image 1 of 1
    • This guide uses incorrect tools. Use an ESD safe tool, such as a nylon spudger, to complete this step.

    • Follow the red and black cables to the motherboard point of attachment.

    • Use a Flat head screwdriver.

    • Place head of driver into the grove of plug and port.

    • Wedge on all sides evenly to work out plug slowly.

    • Remove small and large plugs.

  7. Sylvania SDVD9004 Motherboard Replacement, Motherboard: step 7, image 1 of 3 Sylvania SDVD9004 Motherboard Replacement, Motherboard: step 7, image 2 of 3 Sylvania SDVD9004 Motherboard Replacement, Motherboard: step 7, image 3 of 3
    • Remove Ribbon from Rear Panel

    • This guide uses incorrect tools. Use an ESD safe tool, such as a nylon spudger, to complete this step.

  8. Sylvania SDVD9004 Motherboard Replacement: step 8, image 1 of 1
    • Anchor screw removal

    • Use Philip's head screwdriver

    • Place head of driver into screw on mother board.

    • Rotate counter clockwise

    • Remove all four screws

  9. Sylvania SDVD9004 Motherboard Replacement: step 9, image 1 of 1
    • Lift motherboard to expose battery

Conclusion

To reassemble your device, follow these instructions in reverse order.

Sarah Henry

Member since: 10/31/16

417 Reputation

4 Guides authored

Team

Baylor, Team 5-10, Williams Fall 2016 Member of Baylor, Team 5-10, Williams Fall 2016

BU-WILLIAMS-F16S5G10

2 Members

5 Guides authored

0 Comments

Add Comment

View Statistics:

Past 24 Hours: 1

Past 7 Days: 2

Past 30 Days: 5

All Time: 384