
SwagTron T1 Back Panels Replacement

What you need

  1. SwagTron T1 Back Panels Replacement, Back Panels: step 1, image 1 of 1
    • Ensure that the SwagTron is off.

    • Turn the SwagTron upside down to see the underside.

  2. SwagTron T1 Back Panels Replacement: step 2, image 1 of 3 SwagTron T1 Back Panels Replacement: step 2, image 2 of 3 SwagTron T1 Back Panels Replacement: step 2, image 3 of 3
    • Unscrew the eighteen 10mm screws that secure the back panels using a Phillips #2 screwdriver.

    • The screws are tightly in place. It will take effort to screw them out.

    • The panel is still attached to the SwagTron by wires that go to the motherboard.

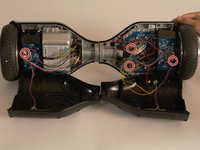
    • Carefully lift the panels off

  3. SwagTron T1 Back Panels Replacement: step 3, image 1 of 3 SwagTron T1 Back Panels Replacement: step 3, image 2 of 3 SwagTron T1 Back Panels Replacement: step 3, image 3 of 3
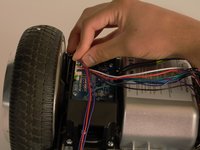
    • Follow the wires from the panels to the motherboard.

    • You may need to cut any zip ties that are holding the wires together.

    • There is one connection on the battery side and three on the other side that must be removed.

    • These connections may be difficult to remove. Try to securely press the connection and pull firmly.

    • Your back panels are now completely removed.

Conclusion

To reassemble your device, follow these instructions in reverse order.

Adrian Abarca

Member since: 04/18/17

360 Reputation

2 Guides authored

Team

Cal Poly, Team S17-G5, Banghart Spring 2017 Member of Cal Poly, Team S17-G5, Banghart Spring 2017

CPSU-BANGHART-S17S17G5

4 Members

5 Guides authored

0 Comments

Add Comment

View Statistics:

Past 24 Hours: 0

Past 7 Days: 2

Past 30 Days: 5

All Time: 665