Introduction
This is a step by step guide tearing down the Steam Machine enough to replace the SSD.
WARNING: Be 100% sure to remove the microSD card from the front IO before starting.
You will need.
- The replacement M.2 SSD
- 30mm SSD is what the machine should have shipped with
- 80mm SSDs also have a standoff point that can be used.
- WARNING: there are no other standoff mount points for alternatively sized drives, outside the 80mm or 30mm.
- A T8 Bit (security bit not required)
- A Spudger (or any slim flat object)
- A USB flashed with the SteamOS recovery/installer Image
- can be found here
- Security Clearance from Aperture science to open registered test equipment
What you need
-
-
-
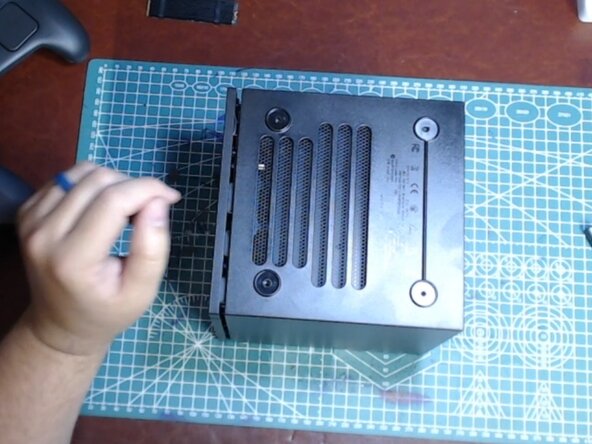
Remove the 4 screws that are part of the rubber feet on the bottom of the steam machine.
-
These screws are held captive inside their rubber and plastic feet material. They are NOT captive to the shell of the machine, and need to be completely removed.
 Ask FixBot
-
-
-
The Top 2 screws on the back plate are captive. Loosen them until they spin freely, they may sag in place.
-
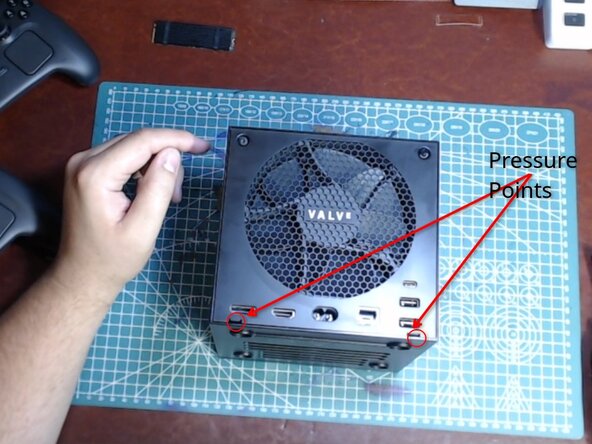
At the Bottom of the backplate, there are 2 pressure friction points that hold the plate in place. Use a spudger, or other flat tool to gently pry the bottom of the shell away from the metal backplate.
-
When the screws are free, and the pressure points are released, the backplate should lift off.
-
-
-
-
Remove screws from the top left and upper right of the fan shroud. These are sunk into the outer shell of the machine. These are NOT captive, and will come out cleanly. Set them aside for reassembly.
-
-
-
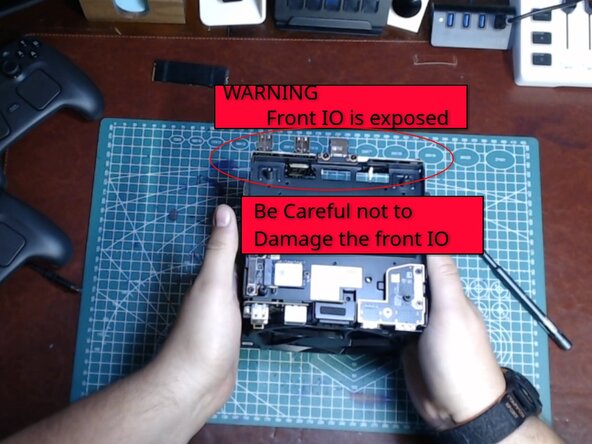
GENTLY turn the steam machine over and lay it on its back. Firmly grab the sides of the outer shell and lift upwards. The outershell should slide freely off the core of the machine.
-
-
-
WARNING : The front IO of the steam machine is very exposed at this point of the process. Be careful not to bump it, or lean the machine against the front IO ports. There is a high chance of snapping or damaging them.
-
Gently rotate the machine to "stand on its head" so the bottom of the machine is facing upwards. This exposes the SSD.
-
Remove the retaining screw that is keeping the original drive depressed and seated in the m.2 port.
-
The drive should spring upward. Gently pull it straight away from the port.
-
If installing a 30mm drive, you dont need to adjust the standoff.
-
If installing an 80mm drive, you will need to move the standoff to the correct position.
-
WARNING: THERE ARE NO STANDOFF POSITIONS FOR OTHER SIZES
-
Install the new drive at a slight upward angle, when the notch on your drive hovers over the standoff, press it down and reinstall the retaining screw.
-
-
-
Reassemble the machine
-
Insert your previously flashed SteamOS installer. and turn the machine on.
-
The Steam Machine should automatically detect the SteamOS installer and begin the installation process.
-
-







To reassemble your device, follow these instructions in reverse order.
Cancel: I did not complete this guide.
2 other people completed this guide.

2 Guide Comments
A 4.5-5mm or a 3/16 inch hex bit might be needed for the SSD standoff if moving to the 2280 position. They do use thread lock on the standoff and many people have reported it to be too tight to remove by hand.
