Free Shipping on Domestic Orders $75+

Steam Machine (2026) Inner Assembly Removal

Prerequisite Only
This is a prerequisite-only guide! This guide is part of another procedure and isn’t meant to be used alone.

What you need

    1. Steam Machine (2026) Inner Assembly Removal, Before you begin: step 1, image 1 of 3 Steam Machine (2026) Inner Assembly Removal, Before you begin: step 1, image 2 of 3 Steam Machine (2026) Inner Assembly Removal, Before you begin: step 1, image 3 of 3
      • Before you begin this repair:

      • Power down your Steam Machine and disconnect the power cable.

      • Unplug any remaining cables or accessories from all ports.

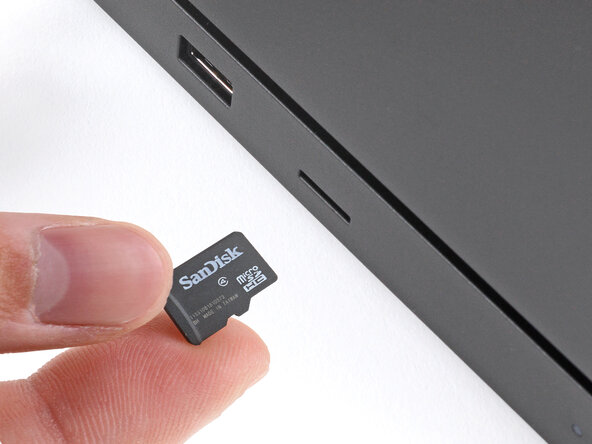
      • If you have a microSD card installed, remove it. Otherwise, it may break during this procedure.

      Ask FixBot

      Add Comment

    1. Steam Machine (2026) Inner Assembly Removal, Reposition the Steam Machine: step 2, image 1 of 1
      • Reposition the Steam Machine so the bottom is facing up.

      Ask FixBot

      Add Comment

    2. Steam Machine (2026) Inner Assembly Removal, Remove the feet: step 3, image 1 of 3 Steam Machine (2026) Inner Assembly Removal, Remove the feet: step 3, image 2 of 3 Steam Machine (2026) Inner Assembly Removal, Remove the feet: step 3, image 3 of 3
      • Use a T8 Torx screwdriver to remove the four rubber feet.

      Ask FixBot

      Add Comment

    1. Steam Machine (2026) Inner Assembly Removal, Reposition the Steam Machine: step 4, image 1 of 1
      • Reposition the Steam Machine so the back panel is facing up.

      Ask FixBot

      Add Comment

    2. Steam Machine (2026) Inner Assembly Removal, Loosen the back panel screws: step 5, image 1 of 2 Steam Machine (2026) Inner Assembly Removal, Loosen the back panel screws: step 5, image 2 of 2
      • Use a T8 Torx screwdriver to fully loosen the two captive screws securing the back panel.

      Ask FixBot

      Add Comment

    3. Steam Machine (2026) Inner Assembly Removal, Remove the back panel: step 6, image 1 of 3 Steam Machine (2026) Inner Assembly Removal, Remove the back panel: step 6, image 2 of 3 Steam Machine (2026) Inner Assembly Removal, Remove the back panel: step 6, image 3 of 3
      • The back panel is secured by two hinge clips near the bottom corners and two locking clips on the sides.

      • Lift the top edge of the panel (near the screws) until the two locking clips release.

      • If you're having trouble getting an initial grip on the panel, use a spudger to lift it enough to grab with your fingers.

      • Slide the panel towards the top edge and lift to remove it.

      Ask FixBot

      Add Comment

    4. Steam Machine (2026) Inner Assembly Removal, Remove the inner assembly screws: step 7, image 1 of 2 Steam Machine (2026) Inner Assembly Removal, Remove the inner assembly screws: step 7, image 2 of 2
      • Use a T8 Torx screwdriver to remove the two 7.3 mm‑long screws securing the inner assembly.

      Ask FixBot

      Add Comment

    5. Steam Machine (2026) Inner Assembly Removal, Remove the inner assembly: step 8, image 1 of 3 Steam Machine (2026) Inner Assembly Removal, Remove the inner assembly: step 8, image 2 of 3 Steam Machine (2026) Inner Assembly Removal, Remove the inner assembly: step 8, image 3 of 3
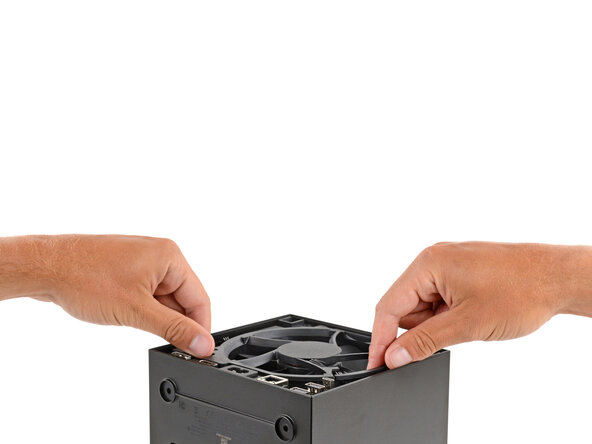
      • After removal, don't lay the inner assembly down on the microSD and USB ports. These ports are fragile and shouldn't have the weight of the assembly resting on them.

      • Grip the inner assembly under the fan and lift it straight up and out of the shell.

      • Set the inner assembly down so the SSD is on top.

      Ask FixBot

      Add Comment

Finish Line

Cancel: I did not complete this guide.

Spencer Day

Member since: 09/14/22

205,968 Reputation

1,267 Guides authored

0 Guide Comments

Add Comment

View Statistics:

Past 24 Hours: 1

Past 7 Days: 10

Past 30 Days: 16

All Time: 24