Free Shipping on Domestic Orders $75+

Soundboks 4 PCBA Replacement

What you need

    1. Soundboks 4 PCBA Replacement, Getting Ready: step 1, image 1 of 2 Soundboks 4 PCBA Replacement, Getting Ready: step 1, image 2 of 2
      • Turn off your speaker by disconnecting the battery

      Ask FixBot

      Add Comment

    2. Soundboks 4 PCBA Replacement, Remove the Volume Knob: step 2, image 1 of 3 Soundboks 4 PCBA Replacement, Remove the Volume Knob: step 2, image 2 of 3 Soundboks 4 PCBA Replacement, Remove the Volume Knob: step 2, image 3 of 3
      • Unscrew the Volume Knob by using the 2.5mm Hex/Allen Key

      • Remove the nut and washer using the 10mm Socket Tool

      Ask FixBot

      Add Comment

    3. Soundboks 4 PCBA Replacement, Remove the UI Panel: step 3, image 1 of 3 Soundboks 4 PCBA Replacement, Remove the UI Panel: step 3, image 2 of 3 Soundboks 4 PCBA Replacement, Remove the UI Panel: step 3, image 3 of 3
      • Unscrew the UI panel with the 3mm Hex bit - 6 screws in total

      • Pull the panel out at an angle. Pulling it straight can damage the PCBA!

      Ask FixBot

      Add Comment

    4. Soundboks 4 PCBA Replacement, Disconnect Red & White Wires: step 4, image 1 of 3 Soundboks 4 PCBA Replacement, Disconnect Red & White Wires: step 4, image 2 of 3 Soundboks 4 PCBA Replacement, Disconnect Red & White Wires: step 4, image 3 of 3
      • Unplug all Molex style connectors

      • Only remove Red & White cables now - 6 wires in total

      Ask FixBot

      Add Comment

    5. Soundboks 4 PCBA Replacement, Disconnect Antenna Cable: step 5, image 1 of 3 Soundboks 4 PCBA Replacement, Disconnect Antenna Cable: step 5, image 2 of 3 Soundboks 4 PCBA Replacement, Disconnect Antenna Cable: step 5, image 3 of 3
      • Cut the zip-tie on the antenna cable (from the backside)

      • Pull (don't cut) the glued cable off the PCBA using the cutter tool

      • Disconnect the antenna cable

      • Be careful not to damage the cable

      Ask FixBot

      Add Comment

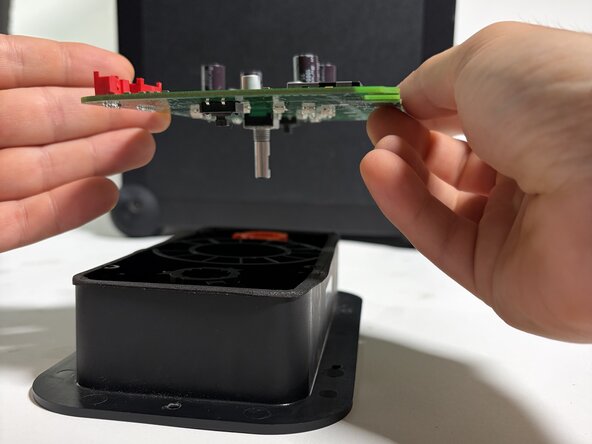
    6. Soundboks 4 PCBA Replacement, Unscrew the Screws: step 6, image 1 of 3 Soundboks 4 PCBA Replacement, Unscrew the Screws: step 6, image 2 of 3 Soundboks 4 PCBA Replacement, Unscrew the Screws: step 6, image 3 of 3
      • Using a 2mm Hex, unscrew all screws - 4 in total.

      • Remove the PCBA from the plastic housing

      Ask FixBot

      Add Comment

    7. Soundboks 4 PCBA Replacement, Mount the New PCBA: step 7, image 1 of 3 Soundboks 4 PCBA Replacement, Mount the New PCBA: step 7, image 2 of 3 Soundboks 4 PCBA Replacement, Mount the New PCBA: step 7, image 3 of 3
      • 4 Screws back in - don't over-tighten!

      • Antenna cable back on - use a zip-tie and cut of the excess

      • Add a small drop of silicone glue (at the red arrow)

      • If using a glue substitute, make sure it is not corrosive or hot-glue

      Ask FixBot

      Add Comment

    8. Soundboks 4 PCBA Replacement, Re-mounting the Volume Knob: step 8, image 1 of 3 Soundboks 4 PCBA Replacement, Re-mounting the Volume Knob: step 8, image 2 of 3 Soundboks 4 PCBA Replacement, Re-mounting the Volume Knob: step 8, image 3 of 3
      • Add the washer first, then the 10mm nut

      • Tighten the 10mm nut

      • The encoder has a flat side - match this side with the volume knob screw

      • Add pressure from top while tightening with the 2.5mm key

      • No power tools here - stuff may break

      Ask FixBot

      Add Comment

Conclusion

To reassemble your device, follow these instructions in reverse order.

Cancel: I did not complete this guide.

One other person completed this guide.

SOUNDBOKS Tech Crew

Member since: 09/17/26

1 Reputation

4 Guides authored

0 Guide Comments

Add Comment

View Statistics:

Past 24 Hours: 1

Past 7 Days: 26

Past 30 Days: 26

All Time: 26