Introduction
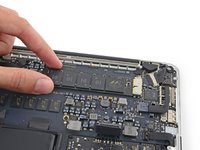
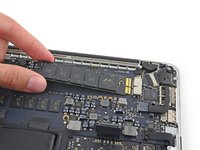
Usa questa guida per rimuovere o sostituire il disco a stato solido del tuo MacBook Pro 13" versione fine 2013. Questo MacBook Pro usa un connettore proprietario per l'unità di archiviazione, e quindi "non è compatibile" con i comuni connettori M.2 se non usando un adattatore.
Prima di procedere con la riparazione, se possibile, esegui un backup del tuo SSD. Quindi, prendi familiarità con recovery attraverso internet o con creare un disco esterno avviabile, così da essere pronto per installare macOS nel tuo nuovo SSD e migrare tutti i tuoi dati.
Infine, ti consigliamo vivamente di installare macOS 10.13 High Sierra (o una versione più recente) prima di sostituire l' SSD originale dal tuo MacBook Pro. Molti SSD nuovi richiedono driver aggiornati, che non si trovano nelle versioni macOS precedenti a High Sierra.
What you need
-
Tool used on this step:Magnetic Project Mat$16.96
-
Rimuovi le 10 viti seguenti che fissano il coperchio inferiore al case superiore:
-
Due viti Pentalobe P5 da 2,3 mm
-
Otto viti Pentalobe P5 da 3,0 mm
-
-


Per riassemblare il dispositivo, segui queste istruzioni in ordine inverso.
Cancel: I did not complete this guide.
154 other people completed this guide.
Special thanks to these translators:
100%


These translators are helping us fix the world! Want to contribute?
Start translating ›


26 Guide Comments
So… can I just buy the new PCIe SSDs and use it in the 2013 rMBP? I'm very confused about these PCIe SSDs.
My retina 15" got the logic board damage and fix it is just stupid. Now in the mean time the new ones come up next quarter, I'm using my macbook pro 2011. Now, because the 2011 is no Retina, SSD and all the other good stuff in it (crying in silence) I did some research to make the 2011 better and I found out I can upgrade to 16 ram and a SSD. Now I check and is not that expensive at least for a SSD 128. BUT this morning it hit me, and I want to ask and make research about this idea. Guys I was wondering, can I take the SSD from my Retina that is actually SSD 256 and put it in my 2011? And save in the SSD? I mean, if possible of curse, if not I would go to buy it how I plan in the first place. Anyway guys any suggestions, ideas or advice are all welcome. I want to know whats best to improve the 2011 meanwhile the new ones get the upgrade. Thanks in advance! :)
Can I use an Intel SSD 540s SSD M.2? Intel says it doesn't support NVMe. Does it need to or would that just add extra performance?
You can put an NVMe drive (with an adapter) in a late 2013 MBP, but you must have updated the OS to the latest version because the original, native OS does not support NVMe. Use Clonezilla to make a bare metal backup and use Clonezilla to restore it once NVMe is installed. Clonezilla wont work going down in size ie from a 1TB to 500GB drive.
Can you also please put a link how to reinstall mac os after installing a new hardrive? thanks