
Sony Vaio Tap 11 Screen Camera Module Replacement Replacement

Nick Catanzarite and
Last updated on Dec 16, 2015
Views: 1.6K
View statistics:
- Past 24 Hours:
- 3
- Past 7 Days:
- 29
- Past 30 Days:
- 104
- All Time:
- 1,634
Comments: 5
4 comments on steps, 1 guide comment.
Go to guide commentsCompleted: 1 2
1 person has marked this guide "completed." Will you be next?
2 people have marked this guide "completed." Including you — great job!
Favorites: 0 1
No one has favorited (and subscribed to) this guide. Will you be the first?
1 person has favorited (and subscribed to) this guide — and that's you!
Needs More Images
A few more images would make this guide's procedures crystal clear.
Missing Details
Some of this guide's details are missing. Help users by adding tools, difficulty, or time.
Introduction
Go to step 1 ↓With this guide, you will be taking the screen off of the device to locate the camera module. The following steps will explain how to remove the necessary parts in order to remove the camera module located on your screen.
What you need
Tools


-
-
-
Begin by opening the HDMI/USB port cover on the left edge.
-
Remove the three #000 headed, 3 mm long screws located underneath the port cover.
 Ask FixBot
-
-
-
Locate and open the Micro SD slot on the top side of the device.
-
Remove the two screws located beneath the cover.
-
-
-
-
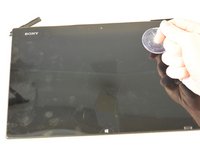
Attach the suction cup to the top right area of the screen.
-
Pull to separate the screen from the rest of the device.
-
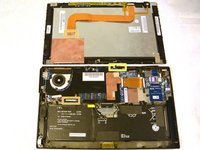
Detach the display ribbon cable.
-
-
-
-
-
Flip device upward carefully like you are turning the page of a book.
-
-
-
Remove the single 3 mm Phillips #000 screw on the left side of the module.
-
Remove the module from the front panel assembly.
-
-




To reassemble your device, follow these instructions in reverse order.
Cancel: I did not complete this guide.
One other person completed this guide.

Team

IUPUI, Team 1-2, Harley Fall 2015 Member of IUPUI, Team 1-2, Harley Fall 2015
IUPUI-HARLEY-F15S1G2
4 Members
120 Guides authored
1 Guide Comment
Is it possible to replace the camera module with a different one? I think that it is a usb camera. I would like to replace it a newer sony model.
