Introduction
When replacing the flash unit from the camera, be sure to work on a flat surface. Since there are many wires and parts that come off, be sure to keep track of all the components within the flash unit. This requires using a Phillips #00 screwdriver and tweezers.
What you need
-
-
Unscrew the four 4.0 mm Phillips #00 screws with a on the base of the camera below the the scheme that separates the front and back panels.
-
Unscrew the 5.0 mm Phillips #00 screw on the bottom right of the camera.
 Ask FixBot
-
-
-
Unscrew the 4.0 mm Phillips #00 screw on bottom of the left side of the camera.
-
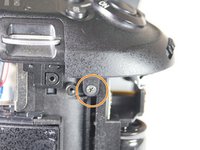
Unscrew the 5.0 mm Phillips #00 screw near the top of the left side of the camera.
-
-
-
Unscrew the two 4.0 mm Phillips #00 screw at the top of the camera by the eyepiece.
-
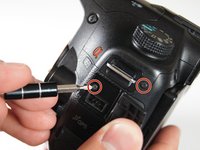
Unscrew the 5.0 mm Phillips #00 screw of the dial below the other two screws.
-
Once all the screws are removed, carefully use your hands to detach the back panel from the camera. Working around the edges can help as well.
-
-
-
Remove the two 4.0 mm Phillips #00 screws on the right of the camera that are located on the upper right side and under the "Remote" port flap.
-
Detach the right side panel with the remote and HDMI ports of the camera by gently pulling on the panel.
-
-
Tool used on this step:Tweezers$4.99
-
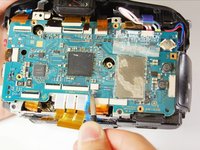
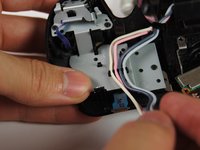
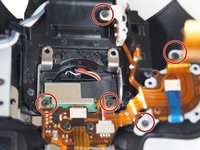
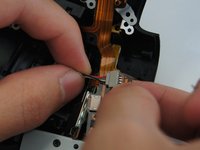
Use tweezers to remove the blue and orange ribbon connectors from their connection points pictured here.
-
-
-
Remove the four 3.0 mm Phillips #00 screws.
-
Remove the 5.0 mm Phillips #00 screw.
-
-
Tool used on this step:Tweezers$4.99
-
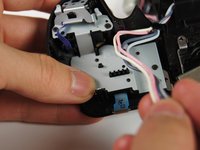
Use your finger to flip the switch that holds the dual ribbon connector in place.
-
Gently use tweezers to disconnect the dual ribbon connector and the thin blue ribbon connector to the right of it from the circuit board.
-
-
-
-
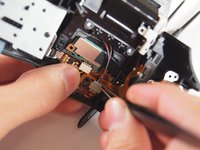
Use tweezers to disconnect the blue, gold, and brown ribbon connectors near the top of the camera.
-
-
-
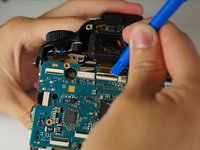
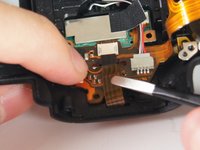
Use a plastic opening tool to pop open the connector holding the next ribbon to the circuit board.
-
Use tweezers to disconnect the ribbon.
-
-
-
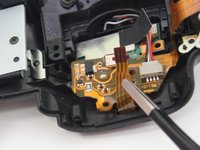
Use tweezers to unplug the blue adapter located at the top right of the circuit board.
-
-
-
Use either plastic opening tools or tweezers to unplug the white adapter located on the right side of the circuit board.
-
-
-
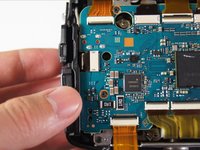
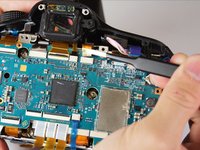
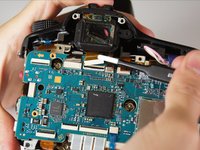
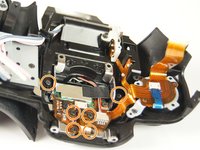
Gently lift the circuit board away from the camera and turn it over.
-
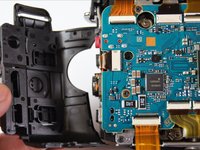
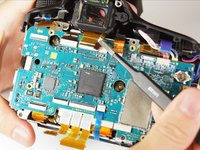
Use tweezers to disconnect the final two plugs and completely remove the circuit board from the camera.
-
-
-
Gently remove the 3.0 mm Phillips #00 screw on the back of the camera.
-
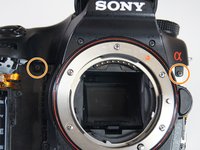
Remove the three 5.0 mm Phillips #00 screws on the front and left side of the camera.
-
-
-
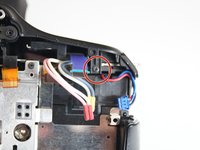
Remove the four wires (white, pink, dark blue, light blue) from the holder with your hands.
-
-
Tool used on this step:Tweezers$4.99
-
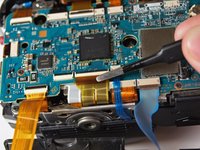
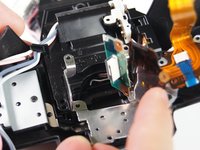
Gently remove the circuit ribbon shown with tweezers.
-
-
-
Remove the five 3.0 mm Phillips #00 screws. It might take some force to start unscrewing these screws, but once they start to unscrew, they will become easy to take off.
-
Remove the three 5.0 mm Phillips #00 screws. These screws will need more force to get started. Unscrew the screws with the part against a surface.
-
-
-
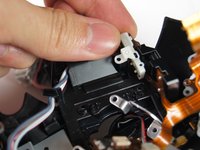
Gently lift out the tiny circuit board with your hands. A metal frame and a tiny side attachment should come off too.
-
If it does not come off, lift out the white connector piece.
-
-
-
Slowly disconnect the wire from the board using your hands or with tweezers. It may take some wiggling. Try pulling from both sides to disconnect the wires more easily.
-


To reassemble your device, follow these instructions in reverse order.
Cancel: I did not complete this guide.
4 other people completed this guide.

Team

Cal Poly, Team 14-11, Amido Spring 2015 Member of Cal Poly, Team 14-11, Amido Spring 2015
CPSU-AMIDO-S15S14G11
4 Members
13 Guides authored
2 Guide Comments
Pretty nice guide, except...
1. You forgot about the three screws above the flash assembly. You need to turn the camera on, and make the flash pop up first before disassembling, as there are three screws in total to remove that are hidden under the flash itself.
2. Also, a bit unnecessary removing all those motherboard connections as it just increases your chances of damaging the flex connections. You really only need to remove...
A. For the rear cover --> the two flexs for the rear cover for the LCD, and for the rear switches (which is exactly what the guide shows).
B. For the flash assy --> the blue flex, the two power cords (pink/white and dark grey/light grey), and the flex for mode dial (top left corner).
Guide was good, I use to repair camera's for a living (stopped a while ago), but I knew something was holding that top cover down, don't use the force people!
Hope this info helps others.
Cheers,
Chris