Introduction
The camera shell is the first thing that one needs to remove in order to expose the camera. It is important that one follows the steps below to remove the camera shell without breaking any part as it has light and sensitive plastic parts.
What you need
-
-
Remove the side 4.5 mm JIS #00 screw using JIS Screwdriver
-
Remove the 5.5 mm JIS #00 screw.
-
-
-
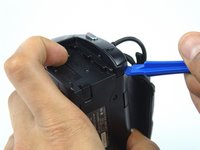
Gently pry the plastic case surrounding the start/stop button free by using the blue plastic opening tools.
-
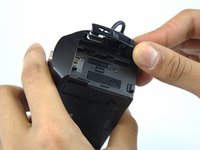
Remove the casing using your thumb and index finger.
-
-
-
-
Turn the camera around and flip open the LCD screen to expose the side panel.
-
Remove the 5.5mm #00 screw using the J00 head screwdriver.
-
-
-
Turn the camera to the handgrip side and unscrew two of the 5.5mm JIS #00 head screws using the JIS #00 head screwdriver.
-
-
-
Turn the camera around in a way that the bottom of the camera is facing you.
-
Use the blue opening tool to gently remove the camera shell off of the camera.
-


To reassemble your device, follow these instructions in reverse order.
Cancel: I did not complete this guide.
5 other people completed this guide.
Team

USF Tampa, Team 8-2, Eyestone Spring 2017 Member of USF Tampa, Team 8-2, Eyestone Spring 2017
USFT-EYESTONE-S17S8G2
3 Members
8 Guides authored
2 Guide Comments
Display Sony camera
Sony camera display