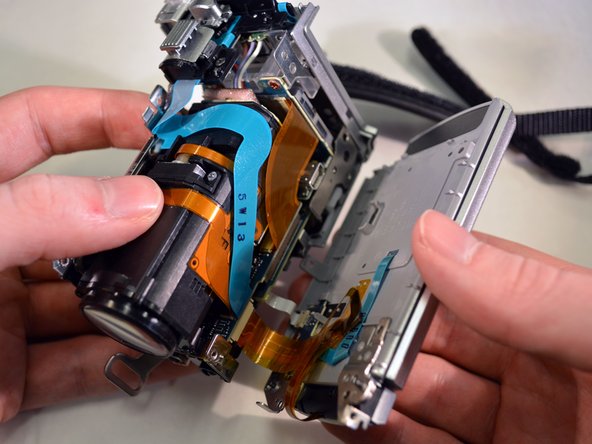
Sony Handycam DCR-SR68 Lens replacment Replacement

What you need

  1. Sony Handycam DCR-SR68  Lens replacment Replacement, HDD: step 1, image 1 of 1
    Tool used on this step:
    Anti-Static Wrist Strap
    $7.95
    Buy
    • Wash and dry your hands, then put on a properly grounded anti-static wrist strap, before handling internal electronic components. To ground the wrist strap, attach it to the metal chassis of a plugged-in three prong power supply, of a computer for example.

    • Unfasten the hand strap.

    • Remove the battery.

  2. Sony Handycam DCR-SR68  Lens replacment Replacement: step 2, image 1 of 2 Sony Handycam DCR-SR68  Lens replacment Replacement: step 2, image 2 of 2
    • Place device on left side with front lens facing right.

    • Using a JIS size #00 precision Phillips screwdriver, unscrew the left middle 3mm Phillips screw.

    • Open the "DC IN" plastic tab (Second 3mm Phillips screw is revealed).

    • Unscrew the second 3mm Phillips screw.

  3. Sony Handycam DCR-SR68  Lens replacment Replacement: step 3, image 1 of 1
    • Turn device over onto its top with the front lens facing right.

    • Unscrew the top left and top right 3mm Philips screws.

    • The right side case panel is now unfastened (the case panel facing up in the photo).

  4. Sony Handycam DCR-SR68  Lens replacment Replacement: step 4, image 1 of 2 Sony Handycam DCR-SR68  Lens replacment Replacement: step 4, image 2 of 2
    • Remove the right side case panel by pulling up.

    • The Hard Drive (HDD) is now revealed.

  5. Sony Handycam DCR-SR68  Lens replacment Replacement: step 5, image 1 of 3 Sony Handycam DCR-SR68  Lens replacment Replacement: step 5, image 2 of 3 Sony Handycam DCR-SR68  Lens replacment Replacement: step 5, image 3 of 3
    • Using your fingers, lift the HDD from its right end, pivoting on its left end.

    • The HDD ribbon wire is now exposed.

  6. Sony Handycam DCR-SR68  Lens replacment Replacement: step 6, image 1 of 2 Sony Handycam DCR-SR68  Lens replacment Replacement: step 6, image 2 of 2
    • While securely holding the HDD in your left hand, use the soft pad of your right hand fingers to gently pull the ribbon wire out of its socket, toward your right.

    • The HDD is now free from the device.

    • Replace HDD.

  7. Sony Handycam DCR-SR68  Lens replacment Replacement, Lens: step 7, image 1 of 1
    • Follow steps 1-6 on HDD removal.

  8. Sony Handycam DCR-SR68  Lens replacment Replacement: step 8, image 1 of 2 Sony Handycam DCR-SR68  Lens replacment Replacement: step 8, image 2 of 2
    • Use your fingers to remove the A/V tab.

  9. Sony Handycam DCR-SR68  Lens replacment Replacement: step 9, image 1 of 3 Sony Handycam DCR-SR68  Lens replacment Replacement: step 9, image 2 of 3 Sony Handycam DCR-SR68  Lens replacment Replacement: step 9, image 3 of 3
    • On the bottom of the device, remove the right and middle bottom 3mm Philips screws.

    • Remove the panel.

  10. Sony Handycam DCR-SR68  Lens replacment Replacement: step 10, image 1 of 2 Sony Handycam DCR-SR68  Lens replacment Replacement: step 10, image 2 of 2
    • On the left side of the device, remove all visible 3mm Philips screws.

  11. Sony Handycam DCR-SR68  Lens replacment Replacement: step 11, image 1 of 2 Sony Handycam DCR-SR68  Lens replacment Replacement: step 11, image 2 of 2
    • On the right side of the device, remove the two black 3mm Philips screws.

    • The grey tray is now free.

    • Remove the grey tray by lifting out and away.

  12. Sony Handycam DCR-SR68  Lens replacment Replacement: step 12, image 1 of 2 Sony Handycam DCR-SR68  Lens replacment Replacement: step 12, image 2 of 2
    • Using the pointed black spudger, carefully open the little black clasp on the large ribbon wire port.

    • These clasps are known to be fragile.

    • On reassembly, this wire and clasp can be troublesome to reinstall.New line.

  13. Sony Handycam DCR-SR68  Lens replacment Replacement: step 13, image 1 of 3 Sony Handycam DCR-SR68  Lens replacment Replacement: step 13, image 2 of 3 Sony Handycam DCR-SR68  Lens replacment Replacement: step 13, image 3 of 3
    • Use the blunt tweezers to unplug the red and black wire by pulling out and away.

    • Unplug the small ribbon wire.

    • Unscrew the two right three 3mm Philips screws.

  14. Sony Handycam DCR-SR68  Lens replacment Replacement: step 14, image 1 of 1
    • On the back of the device, remove the top black 3mm Philips screw.

    • The top of the device is now free.

  15. Sony Handycam DCR-SR68  Lens replacment Replacement: step 15, image 1 of 2 Sony Handycam DCR-SR68  Lens replacment Replacement: step 15, image 2 of 2
    • Remove the top of the device by lifting up and away.

    • Set aside.

  16. Sony Handycam DCR-SR68  Lens replacment Replacement: step 16, image 1 of 2 Sony Handycam DCR-SR68  Lens replacment Replacement: step 16, image 2 of 2
    • On the top of the device, unscrew the top right 3mm Philips screw.

    • On the left side of the device, unscrew the bottom left 3mm Philips screw.

  17. Sony Handycam DCR-SR68  Lens replacment Replacement: step 17, image 1 of 2 Sony Handycam DCR-SR68  Lens replacment Replacement: step 17, image 2 of 2
    • Use a plastic opening tool to pop off the shutter assembly.

  18. Sony Handycam DCR-SR68  Lens replacment Replacement: step 18, image 1 of 3 Sony Handycam DCR-SR68  Lens replacment Replacement: step 18, image 2 of 3 Sony Handycam DCR-SR68  Lens replacment Replacement: step 18, image 3 of 3
    • On the left side of the device, unscrew the left middle 3mm Philips screw.

    • Carefully pivot the loose left side of the device until the ribbon wires are fully exposed.

  19. Sony Handycam DCR-SR68  Lens replacment Replacement: step 19, image 1 of 3 Sony Handycam DCR-SR68  Lens replacment Replacement: step 19, image 2 of 3 Sony Handycam DCR-SR68  Lens replacment Replacement: step 19, image 3 of 3
    • Use the blunt tweezers to unplug the small orange ribbon wire.

    • Unplug the small white ribbon wire.

    • The left side of the device is now free.

    • Set aside.

  20. Sony Handycam DCR-SR68  Lens replacment Replacement: step 20, image 1 of 3 Sony Handycam DCR-SR68  Lens replacment Replacement: step 20, image 2 of 3 Sony Handycam DCR-SR68  Lens replacment Replacement: step 20, image 3 of 3
    • Use the blunt tweezers to unplug the blue ribbon wire.

    • Unplug the orange ribbon wire.

  21. Sony Handycam DCR-SR68  Lens replacment Replacement: step 21, image 1 of 1
    • Use the blunt tweezers to unplug the orange ribbon wire.

    • Remove the top two black 3mm Philips screws.

  22. Sony Handycam DCR-SR68  Lens replacment Replacement: step 22, image 1 of 2 Sony Handycam DCR-SR68  Lens replacment Replacement: step 22, image 2 of 2
    • The lens module is connected to the device by an adhesive foam backing.

    • Pull the lens module away from the adhesive foam backing until it's releases.

    • Don't pull it too far as there is one more ribbon wire connected to it.

  23. Sony Handycam DCR-SR68  Lens replacment Replacement: step 23, image 1 of 1
    • Unplug this ribbon wire with your fingers or tweezers.

    • This wire can be tricky to get to.

  24. Sony Handycam DCR-SR68  Lens replacment Replacement: step 24, image 1 of 1
    • With the old lens module removed, the new one can be installed.

Conclusion

To reassemble your device, follow these instructions in reverse order in addition to the HDD replacement guide.

0 Comments

Add Comment

View Statistics:

Past 24 Hours: 0

Past 7 Days: 1

Past 30 Days: 9

All Time: 1,800