Introduction
This replacement guide will instruct you how to replace a burnt out surge fuse within your speaker, which is located on the motherboard. Before doing anything, be sure to safely discharge the capacitor using this guide.
What you need
-
-
First, remove the eight screws on the speaker's back panel. These screws should be located on the top and bottom corners of the back, as well as along the sides.
-
Remove the 7.5 mm Phillips-head screws using a Phillips #1 screwdriver with a J sized head.
-
-
-
Next, remove 4 more 7.5 mm Phillips-head screws on the top part of the speaker (where the power buttons and extra BASS buttons are located). Two of the screws are located on the underside of the handle and are hidden beneath black rubber covers. Remove the covers and use a Phillips #1 screwdriver to unscrew the screws.
-
The remaining two 7.5 mm Phillips-head screws are located on the base of the indented section of the speaker, pictured here. They are also hidden beneath black rubber covers. Repeat same process in removing the screws.
-
-
-
Gently lift up the entire top plastic section of the speaker. Do so slowly, the section is still connected to the circuitboard by a belt.
-
Gently remove the belt from its junction on the board, and after doing so the top plastic casing of the speaker will be fully detached.
What’s the wire that’s being held, mine is burnt out and is split into 2 pieces at the end?
-
-
-
Additionally, the sides need to be taken apart. You will need to take out 4 additional 7.5 mm Phillips-head screws on either side. These screws are located beneath larger grey pads with adhesive on them at the side corners of your speaker.
-
Remove the pads slowly, as the adhesive makes them tougher to remove and you do not want to rip them.
-
Use an opening tool to help take out the side shell from the rest of the speaker.
-
-
-
-
Find the gold-yellow daughterboard, located underneath the top plastic housing of the speaker.
-
-
-
Gently slide the entire daughterboard towards the frontside of the speaker, unhooking it from the prong that keeps it in place.
-
The daughterboard is free to be fully removed. You are now prepared to replace or make replacements components on the daughterboard!
Where can I buy this new port?
Dear can I purchase the two boards complete to replace the original main boards? Where will I find such a business
-
-
-
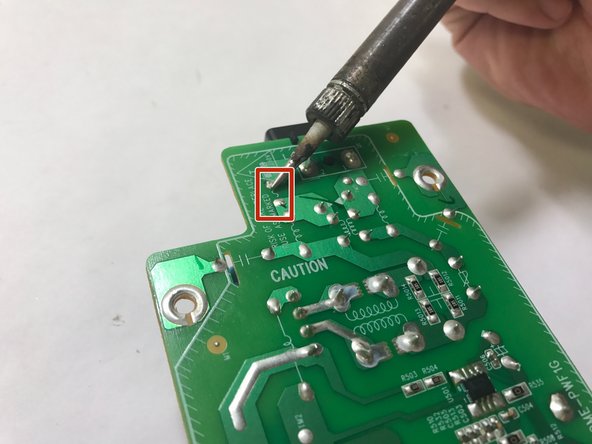
Flip the daughterboard over and desolder the fuse from it's position on the circuit. If you would like more information on the technique to soldering, refer to this link.
-
You are now prepared to replace the surge fuse in your speaker!
-


To reassemble your device, follow these instructions in reverse order.
To reassemble your device, follow these instructions in reverse order.
Cancel: I did not complete this guide.
7 other people completed this guide.
Team

Cal Poly, Team 9-3, Banghart Winter 2017 Member of Cal Poly, Team 9-3, Banghart Winter 2017
CPSU-BANGHART-W17S9G3
4 Members
6 Guides authored
8 Comments
Did you have any look finding fuse i need 1 myself
I checked my fuse with a meter and it seems to be fine. No signs of a blow out…
I have no power to power, bluetooth or party chain buttons. However, the lights button to turn the light demo on and off does work.
Any ideas?
Where can one get the fuse and the part number would be helpful too.
T3.15A250V fuse and you can get it on Ebay, Alibaba, Aliexpress and maybe Amazon.
Thanks for the instructions, I got my GTX-XB60 working again with these! You can get the fuses from Ebay.