
Sony DVP-NS300 DVD-Video Player DVD tray motor Replacement

What you need

  1. Sony DVP-NS300 DVD-Video Player DVD tray motor Replacement, DVD tray motor: step 1, image 1 of 3 Sony DVP-NS300 DVD-Video Player DVD tray motor Replacement, DVD tray motor: step 1, image 2 of 3 Sony DVP-NS300 DVD-Video Player DVD tray motor Replacement, DVD tray motor: step 1, image 3 of 3
    • Turn off the DVD player. Unplugging the DVD player while it is on may result in damage to the DVD player or an inserted disk.

    • Unplug the DVD player from the wall socket.

    • Locate the five 7mm Phillips screws holding the top panel in place, of which three are located on the back panel, and one is located on each side.

    • Unscrew the five screws using the #2 Phillips screwdriver.

  2. Sony DVP-NS300 DVD-Video Player DVD tray motor Replacement: step 2, image 1 of 3 Sony DVP-NS300 DVD-Video Player DVD tray motor Replacement: step 2, image 2 of 3 Sony DVP-NS300 DVD-Video Player DVD tray motor Replacement: step 2, image 3 of 3
    • Orient the device so the rear is facing towards you.

    • Gently slide the top panel backwards and remove it in an upwards motion.

  3. Sony DVP-NS300 DVD-Video Player DVD tray motor Replacement: step 3, image 1 of 3 Sony DVP-NS300 DVD-Video Player DVD tray motor Replacement: step 3, image 2 of 3 Sony DVP-NS300 DVD-Video Player DVD tray motor Replacement: step 3, image 3 of 3
    • Turn the device upside down, with the front of the device facing towards you.

    • Locate the black sleeve that covers the opening mechanism.

    • Using the flathead screwdriver, move the slider (located underneath the sleeve, as seen in the first photo) to the right, so that the DVD tray slides open.

    • It may take some force to move the slider to the right.

  4. Sony DVP-NS300 DVD-Video Player DVD tray motor Replacement: step 4, image 1 of 2 Sony DVP-NS300 DVD-Video Player DVD tray motor Replacement: step 4, image 2 of 2
    • Put the device upright again with the front of the device facing towards you.

    • Remove the DVD tray lid by simultaneously pulling forward and lifting up on both corners firmly.

    • Slide the DVD tray back, but do not close it completely.

    • The DVD tray lid needs to be removed in order to get the DVD tray assembly out later.

    • Do not close the DVD tray completely, as this will force you to complete step 3 again to continue with step 8.

  5. Sony DVP-NS300 DVD-Video Player DVD tray motor Replacement: step 5, image 1 of 3 Sony DVP-NS300 DVD-Video Player DVD tray motor Replacement: step 5, image 2 of 3 Sony DVP-NS300 DVD-Video Player DVD tray motor Replacement: step 5, image 3 of 3
    • Locate the three 8mm screws that hold the DVD tray assembly in place. There is one on each side and the third one is at the back of the tray.

    • Remove the three screws using the #1 Phillips screwdriver.

  6. Sony DVP-NS300 DVD-Video Player DVD tray motor Replacement: step 6, image 1 of 3 Sony DVP-NS300 DVD-Video Player DVD tray motor Replacement: step 6, image 2 of 3 Sony DVP-NS300 DVD-Video Player DVD tray motor Replacement: step 6, image 3 of 3
    • Remove the three ribbon style cables on the side of the DVD tray assembly by gently pulling them out of their slots on the board.

  7. Sony DVP-NS300 DVD-Video Player DVD tray motor Replacement: step 7, image 1 of 3 Sony DVP-NS300 DVD-Video Player DVD tray motor Replacement: step 7, image 2 of 3 Sony DVP-NS300 DVD-Video Player DVD tray motor Replacement: step 7, image 3 of 3
    • Remove the DVD tray assembly from the casing by lifting it up, sliding it back a little and tilting the back towards you as can be seen on the photos.

  8. Sony DVP-NS300 DVD-Video Player DVD tray motor Replacement: step 8, image 1 of 3 Sony DVP-NS300 DVD-Video Player DVD tray motor Replacement: step 8, image 2 of 3 Sony DVP-NS300 DVD-Video Player DVD tray motor Replacement: step 8, image 3 of 3
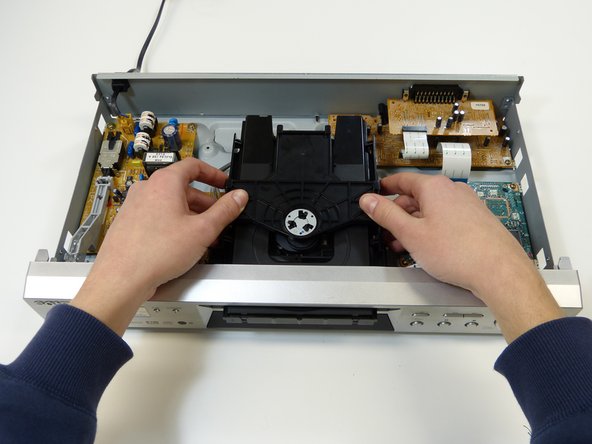
    • Put the DVD tray assembly in front of you with the DVD tray facing towards you.

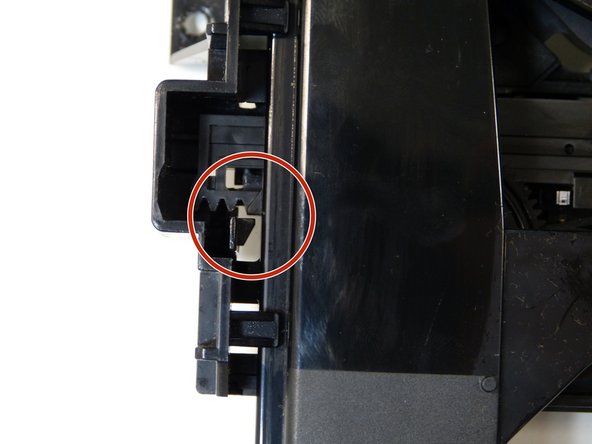
    • Slide the DVD tray as far out of the device until it is restricted of going further by two clips on the sides of the DVD tray.

    • Push the two clips to the outside of the DVD tray assembly so that the DVD tray can slide past them.

    • Remove the DVD tray from the DVD tray assembly, by horizontally sliding it completely out of the DVD tray assembly.

    • During reassembly, when sliding the DVD tray back into the DVD tray assembly, make sure the slider is lined up with the slot in the DVD tray, as seen in step 14.

  9. Sony DVP-NS300 DVD-Video Player DVD tray motor Replacement: step 9, image 1 of 2 Sony DVP-NS300 DVD-Video Player DVD tray motor Replacement: step 9, image 2 of 2
    • Remove the band from the motor and pulley by stretching it just enough to lift it over the pulley.

  10. Sony DVP-NS300 DVD-Video Player DVD tray motor Replacement: step 10, image 1 of 2 Sony DVP-NS300 DVD-Video Player DVD tray motor Replacement: step 10, image 2 of 2
    • Unscrew the two 5mm screws that are securing the motor using the #1 Phillips screwdriver.

  11. Sony DVP-NS300 DVD-Video Player DVD tray motor Replacement: step 11, image 1 of 2 Sony DVP-NS300 DVD-Video Player DVD tray motor Replacement: step 11, image 2 of 2
    • Turn the DVD tray assembly upside down with the front of the device facing towards you.

    • Detachthe PCB the motor is attached to from the DVD tray assembly by bending the clips towards you.

    • Remove the PCB and the motor by carefully lifting it straight up out of the DVD tray assembly.

  12. Sony DVP-NS300 DVD-Video Player DVD tray motor Replacement: step 12, image 1 of 2 Sony DVP-NS300 DVD-Video Player DVD tray motor Replacement: step 12, image 2 of 2
    • Put a pair of needle nose pliers between the pulley and the motor, as can be seen in the photos.

    • Remove the pulley by exerting a force parallel to the motor shaft.

    • It may take some force to remove the pulley from the motor shaft.

  13. Sony DVP-NS300 DVD-Video Player DVD tray motor Replacement: step 13, image 1 of 2 Sony DVP-NS300 DVD-Video Player DVD tray motor Replacement: step 13, image 2 of 2
    • Be carefull when using the soldering iron, it can get really hot.

    • Remove the motor from the PCB by using the soldering iron to desolder the contacts on the back of the PCB.

    • To easily remove the motor from the PCB, hold it just a little bit above the working surface so the motor is unsupported. The motor will come lose by just applying heat to the contacts, gravity will do the rest.

  14. Sony DVP-NS300 DVD-Video Player DVD tray motor Replacement: step 14, image 1 of 2 Sony DVP-NS300 DVD-Video Player DVD tray motor Replacement: step 14, image 2 of 2
    • Note for reassembling: when sliding the DVD tray back into the DVD tray assembly, make sure the slider is lined up with the slot in the DVD tray.

Conclusion

To reassemble your device, follow these instructions in reverse order.

3 other people completed this guide.

0 Comments

Add Comment

View Statistics:

Past 24 Hours: 0

Past 7 Days: 3

Past 30 Days: 15

All Time: 816