Introduction
The top panel can be cracked, and it's removal is often needed to access other parts under the top panel.
What you need
-
-
Use a Phillips head 000 screwdriver to remove the 4.0mm screw inside the USB port.
-
-
-
-
Use a Phillips head 000 screwdriver to remove the one 4.0mm screw on the side opposite of the USB port near the shutter button.
-
-
-
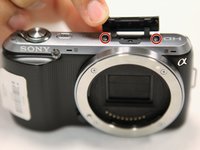
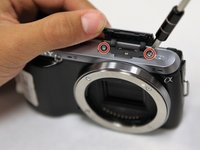
Open the flap at the top of the camera.
-
Use a Phillips head 000 screwdriver to remove the two 4.0mm screws inside.
-


To reassemble your device, follow these instructions in reverse order.
Cancel: I did not complete this guide.
2 other people completed this guide.
Team

UC Santa Barbara, Team S1-G1, Weedon Fall 2017 Member of UC Santa Barbara, Team S1-G1, Weedon Fall 2017
UCSB-WEEDON-F17S1G1
3 Members
13 Guides authored
1 Guide Comment
Sehr klar und verständlich, ich konnte ohne Probleme folgen.