
Sony Alpha A3000 shutter button Replacement

What you need

  1. Sony Alpha A3000 shutter button Replacement, Rear Case: step 1, image 1 of 3 Sony Alpha A3000 shutter button Replacement, Rear Case: step 1, image 2 of 3 Sony Alpha A3000 shutter button Replacement, Rear Case: step 1, image 3 of 3
    • Remove the seven highlighted screws shown here.

    • Screws are teeny tiny, don't lose them!

  2. Sony Alpha A3000 shutter button Replacement: step 2, image 1 of 2 Sony Alpha A3000 shutter button Replacement: step 2, image 2 of 2
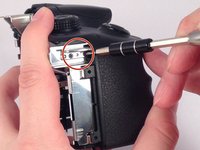
    • Remove this final screw from the memory card compartment.

    • Remove the chassis by pulling the back cover away from the camera.

    • Be careful not to damage any of the delicate ribbon cables when removing the chassis.

  3. Sony Alpha A3000 shutter button Replacement: step 3, image 1 of 2 Sony Alpha A3000 shutter button Replacement: step 3, image 2 of 2
    • Gently but forcefully lift up on the parallel cable connecting the two halves of the camera.

  4. Sony Alpha A3000 shutter button Replacement, Motherboard: step 4, image 1 of 2 Sony Alpha A3000 shutter button Replacement, Motherboard: step 4, image 2 of 2
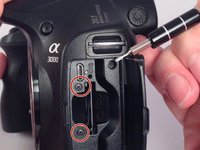
    • After removing the backing from the camera. Remove the two final screws in the memory compartment area.

    • Detach the facing for the memory dock.

  5. Sony Alpha A3000 shutter button Replacement: step 5, image 1 of 2 Sony Alpha A3000 shutter button Replacement: step 5, image 2 of 2
    • Remove the eight screws securing the mount for the flash device.

  6. Sony Alpha A3000 shutter button Replacement: step 6, image 1 of 2 Sony Alpha A3000 shutter button Replacement: step 6, image 2 of 2
    • Remove the three remaining screws holding in the protective metal casing.

  7. Sony Alpha A3000 shutter button Replacement: step 7, image 1 of 1
    • Remove the metal casing.

  8. Sony Alpha A3000 shutter button Replacement: step 8, image 1 of 1
    • Remove three screws holding down the motherboard .

  9. Sony Alpha A3000 shutter button Replacement: step 9, image 1 of 2 Sony Alpha A3000 shutter button Replacement: step 9, image 2 of 2
    • Detach the nine serial cables connecting it to the camera body.

  10. Sony Alpha A3000 shutter button Replacement: step 10, image 1 of 1
    • Finally remove the motherboard from the casing.

  11. Sony Alpha A3000 shutter button Replacement, ...: step 11, image 1 of 1
    • shutter button placement...

  12. Sony Alpha A3000 shutter button Replacement, Unscrew motherboard frame: step 12, image 1 of 2 Sony Alpha A3000 shutter button Replacement, Unscrew motherboard frame: step 12, image 2 of 2
    • Remove two screws holding plastic/metal frame.

  13. Sony Alpha A3000 shutter button Replacement, Remove motherboard frame: step 13, image 1 of 2 Sony Alpha A3000 shutter button Replacement, Remove motherboard frame: step 13, image 2 of 2
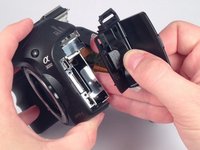
    • Holding the battery door gently lift the frame up .

  14. Sony Alpha A3000 shutter button Replacement, Capacitor module: step 14, image 1 of 2 Sony Alpha A3000 shutter button Replacement, Capacitor module: step 14, image 2 of 2
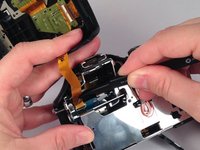
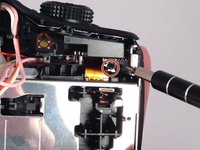
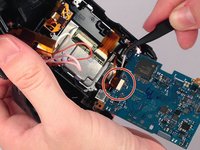
    • Pull out the capacitor and move the capacitor board (flexible) to the left to clear the way for future steps.

  15. Sony Alpha A3000 shutter button Replacement, Remove buttons module: step 15, image 1 of 3 Sony Alpha A3000 shutter button Replacement, Remove buttons module: step 15, image 2 of 3 Sony Alpha A3000 shutter button Replacement, Remove buttons module: step 15, image 3 of 3
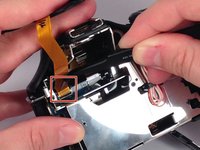
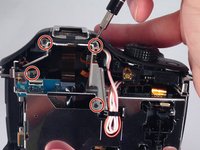
    • Remove two screws mounting plastic buttons module.

    • Remove the module.

  16. Sony Alpha A3000 shutter button Replacement, Soldering!: step 16, image 1 of 3 Sony Alpha A3000 shutter button Replacement, Soldering!: step 16, image 2 of 3 Sony Alpha A3000 shutter button Replacement, Soldering!: step 16, image 3 of 3
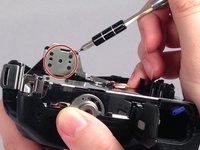
    • Replace the ALPS SKSDPCE010 microswitch. Look out for the correct allignment and orientation (first pin marked with a dot).

Conclusion

To reassemble your device, follow these instructions in reverse order.

One other person completed this guide.

Andrzej Majchrzak

Member since: 04/26/17

131 Reputation

1 Guide authored

3 Comments

Excellent article, I would like to know what should be done to replace or repair the mode selector of the camera, (Dial mode) I appreciate this great contribution. Greetings.

Edgar Delgado - Reply

Mode selector switch is visible on 2 photos of buttons module PCB. Look for a switch with blue knob on 2nd Photo of step 16. I dont know the serial number or replacement.

Andrzej Majchrzak - Reply

Thank you so much for reply.

Edgar Delgado -

Add Comment

View Statistics:

Past 24 Hours: 0

Past 7 Days: 4

Past 30 Days: 24

All Time: 2,495