
Sol Republic Deck Bluetooth Button Replacement

What you need

  1. Sol Republic Deck Bluetooth Button Replacement, Bluetooth Button: step 1, image 1 of 1
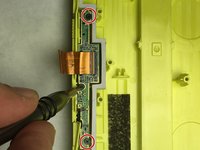
    • With plastic spudger wedge in between the top and bottom casings to force sepearation . Exposing the inside components of the Republic Deck.

  2. Sol Republic Deck Bluetooth Button Replacement: step 2, image 1 of 1
    • Use the screwdriver to unscrew two 3.6mm Phillips #0 screws securing the plastic plate.

  3. Sol Republic Deck Bluetooth Button Replacement: step 3, image 1 of 1
    • Remove the ribbon cable from the circuit board.

  4. Sol Republic Deck Bluetooth Button Replacement: step 4, image 1 of 1
    • Plug in de-soldering kit and wait 3 minutes for the solder to heat up.

    • Use the tip of your soldering iron to heat the old solder unit and apply until it melts.

    • Remove speaker wires connecting the speaker to the circuit board.

  5. Sol Republic Deck Bluetooth Button Replacement: step 5, image 1 of 1
    • Unscrew five 3.6 mm Phillips #0 screws securing the circuit board.

  6. Sol Republic Deck Bluetooth Button Replacement: step 6, image 1 of 1
    • Unscrew fifteen 6.2mm Phillips #0 screws and lift the black plastic plate from the case.

  7. Sol Republic Deck Bluetooth Button Replacement: step 7, image 1 of 2 Sol Republic Deck Bluetooth Button Replacement: step 7, image 2 of 2
    • Remove the three 3.6mm Phillips #0 screws.

    • Remove the circuit board containing the BlueTooth button.

Conclusion

To reassemble your device, follow these instructions in reverse order.

One other person completed this guide.

Jonathan Holtman

Member since: 03/20/17

368 Reputation

2 Guides authored

Team

IUPUI, Team S3-G1, Baechle Spring 2017 Member of IUPUI, Team S3-G1, Baechle Spring 2017

IUPUI-BAECHLE-S17S3G1

3 Members

3 Guides authored

0 Comments

Add Comment

View Statistics:

Past 24 Hours: 0

Past 7 Days: 0

Past 30 Days: 1

All Time: 543