
Smartab STJR700 Charging Port Replacement

What you need

  1. Smartab STJR700 Charging Port Replacement, Charging Port: step 1, image 1 of 1
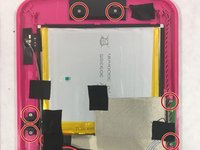
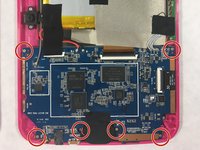
    • Power off the device by holding down the lock button. Remove the case from the tablet and place it face down.

  2. Smartab STJR700 Charging Port Replacement: step 2, image 1 of 1
    • Unscrew all four corner screws using the PH000 screwdriver head found in the iFixit kit.

  3. Smartab STJR700 Charging Port Replacement: step 3, image 1 of 1
    • CAUTION: Avoid touching the display.

    • Pry open the tablet using a metal spudger. Set aside the back panel.

  4. Smartab STJR700 Charging Port Replacement: step 4, image 1 of 1
    • Locate the charging port.

  5. Smartab STJR700 Charging Port Replacement: step 5, image 1 of 2 Smartab STJR700 Charging Port Replacement: step 5, image 2 of 2
    • Unscrew all the labeled screws using the PH000 screwdriver head.

  6. Smartab STJR700 Charging Port Replacement: step 6, image 1 of 1
    • Remove all pieces of tape using the tweezers provided in the iFixit kit.

    • Remove the two ribbon cables affixed to the camera.

  7. Smartab STJR700 Charging Port Replacement: step 7, image 1 of 1
    • Remove the motherboard component from the screen and display.

    • Because the charging port is soldered onto the motherboard, the motherboard must be replaced by one specifically made for the Smartab STJR700.

Conclusion

To reassemble your device, follow these instructions in reverse order.

Thi Le

Member since: 03/08/17

101 Reputation

1 Guide authored

Team

0 Comments

Add Comment

View Statistics:

Past 24 Hours: 0

Past 7 Days: 4

Past 30 Days: 5

All Time: 976