Free Shipping on Domestic Orders $75+

This translation was generated by a machine and has not been reviewed by a person yet. Speak this language? Review it.

Simple 12V MN21 remote control battery tester.

    1. Simple 12V MN21 remote control battery tester., Simple 12V MN21 remote control battery tester.: step 1, image 1 of 3 Simple 12V MN21 remote control battery tester., Simple 12V MN21 remote control battery tester.: step 1, image 2 of 3 Simple 12V MN21 remote control battery tester., Simple 12V MN21 remote control battery tester.: step 1, image 3 of 3
      • I have dedicated many battery tester models to most of the batteries on the market, at least all those I use for work or personally. I had one last challenge left: creating a tester for the 12V MN21 batteries, which were widely used in remote controls between approximately the 80s and 2015.

      • It is a battery that can be easily checked with a multimeter, but why not make a homemade tester? "Challenges sharpen the wit."

      • I have created a design with 4 blue LED diodes whose voltage is very close to 3V and a 100-ohm resistance for protection, so as soon as the voltage drops below 12V, the diodes stop shining at 100%, indicating that the battery is depleted (voltage below 11V).

      Ask FixBot

      Add Comment

    2. Simple 12V MN21 remote control battery tester.: step 2, image 1 of 2 Simple 12V MN21 remote control battery tester.: step 2, image 2 of 2
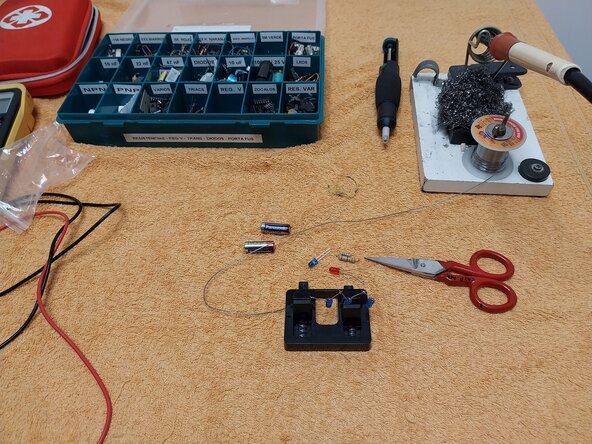
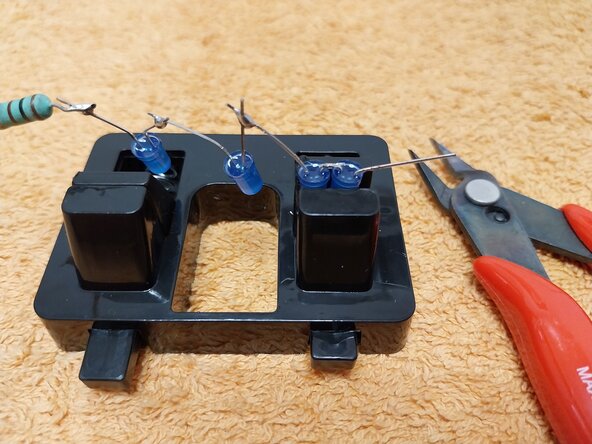
      • Assembly process during testing with the diodes separated to make various checks easier; in your case, since we already know it works, you can proceed to step 5.

      Ask FixBot

      Add Comment

    3. Simple 12V MN21 remote control battery tester.: step 3, image 1 of 3 Simple 12V MN21 remote control battery tester.: step 3, image 2 of 3 Simple 12V MN21 remote control battery tester.: step 3, image 3 of 3
      • Assembly functionality test; first, I perform a test by soldering the LEDs in the air with some separation to see how many LEDs it is most appropriate to use, the design ending up with 4 blue LEDs, just as we see that they light up at 100% with a 12 V dead battery.

      Ask FixBot

      Add Comment

    4. Simple 12V MN21 remote control battery tester.: step 4, image 1 of 2 Simple 12V MN21 remote control battery tester.: step 4, image 2 of 2
      • I will show you 2 options that I initially evaluated and discarded.

      • 1st: Using a PCB as a support; it can be used, but it adds more volume to the assembly.

      • 2nd: Choosing between 3 LEDs, or 3 blue LEDs and 1 red (the latter has a lower voltage), or 4 blue; in the end, I discarded the red and opted for the 4 blue.

      Ask FixBot

      Add Comment

    5. Simple 12V MN21 remote control battery tester.: step 5, image 1 of 3 Simple 12V MN21 remote control battery tester.: step 5, image 2 of 3 Simple 12V MN21 remote control battery tester.: step 5, image 3 of 3
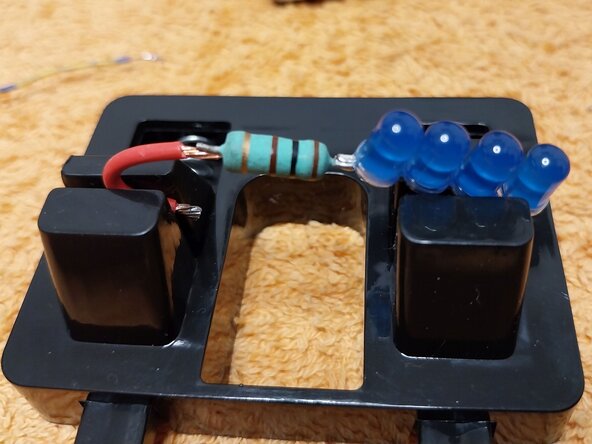
      • Final design assembly, diode soldering process, Anode - Cathode - Anode ......

      • A soldering stand is a great help in these cases.

      Ask FixBot

      Add Comment

    6. Simple 12V MN21 remote control battery tester.: step 6, image 1 of 3 Simple 12V MN21 remote control battery tester.: step 6, image 2 of 3 Simple 12V MN21 remote control battery tester.: step 6, image 3 of 3
      • Measurement of the negative terminal that will touch the battery's (-) pole and the component soldering process.

      Ask FixBot

      Add Comment

    7. Simple 12V MN21 remote control battery tester.: step 7, image 1 of 2 Simple 12V MN21 remote control battery tester.: step 7, image 2 of 2
      • View of the final assembly and comparison with the diagram.

      Ask FixBot

      Add Comment

    8. Simple 12V MN21 remote control battery tester.: step 8, image 1 of 3 Simple 12V MN21 remote control battery tester.: step 8, image 2 of 3 Simple 12V MN21 remote control battery tester.: step 8, image 3 of 3
      • To add hardness and consistency to the assembly, I apply a layer of fast-drying 2-component glue. To hold it in a vertical position, I use pliers for support.

      Ask FixBot

      Add Comment

    9. Simple 12V MN21 remote control battery tester.: step 9, image 1 of 3 Simple 12V MN21 remote control battery tester.: step 9, image 2 of 3 Simple 12V MN21 remote control battery tester.: step 9, image 3 of 3
      • Photo 1: Assembly test, a battery in good status with 12 V lights up the 4 LEDs at 100% or almost 100%.

      • Photo 2: A battery with low capacity barely lights the LEDs dimly.

      • Photo 3: A battery below 10 V does not light the LEDs.

      Ask FixBot

      Add Comment

    10. Simple 12V MN21 remote control battery tester.: step 10, image 1 of 2 Simple 12V MN21 remote control battery tester.: step 10, image 2 of 2
      Ask FixBot

      Add Comment

Finish Line

Cancel: I did not complete this guide.

One other person completed this guide.

Carlos López (España - Spain)

Member since: 07/01/15

105,342 Reputation

387 Guides authored

0 Guide Comments

Add Comment

View Statistics:

Past 24 Hours: 5

Past 7 Days: 24

Past 30 Days: 70

All Time: 163