Free Shipping on Domestic Orders $75+

Shifter Assembly Removal

Prerequisite Only
This is a prerequisite-only guide! This guide is part of another procedure and isn’t meant to be used alone.

What you need

    1. Shifter Assembly Removal, Before you begin: step 1, image 1 of 3 Shifter Assembly Removal, Before you begin: step 1, image 2 of 3 Shifter Assembly Removal, Before you begin: step 1, image 3 of 3
      • Before you begin your repair:

      • Unplug the H‑Shifter's USB cable.

      • Completely unmount the shifter from the clamp and remove any accessories so you're left with just the shifter.

      • Use a 4.0 mm hex screwdriver to remove the 31 mm‑long screws securing the shifter to the clamp.

      Ask FixBot

      Add Comment

    1. Shifter Assembly Removal, Remove the shift knob: step 2, image 1 of 3 Shifter Assembly Removal, Remove the shift knob: step 2, image 2 of 3 Shifter Assembly Removal, Remove the shift knob: step 2, image 3 of 3
      • Twist the shift knob counterclockwise to unscrew and remove it.

      Ask FixBot

      Add Comment

    1. Shifter Assembly Removal, Remove the top cover: step 3, image 1 of 2 Shifter Assembly Removal, Remove the top cover: step 3, image 2 of 2
      • Use a 2.5 mm hex screwdriver to remove the four 12 mm‑long screws securing the top cover.

      Ask FixBot

      Add Comment

    2. Shifter Assembly Removal: step 4, image 1 of 2 Shifter Assembly Removal: step 4, image 2 of 2
      • Lift the top cover straight up to remove it.

      • The metal shift gate is sitting loosely in the cover.

      Ask FixBot

      Add Comment

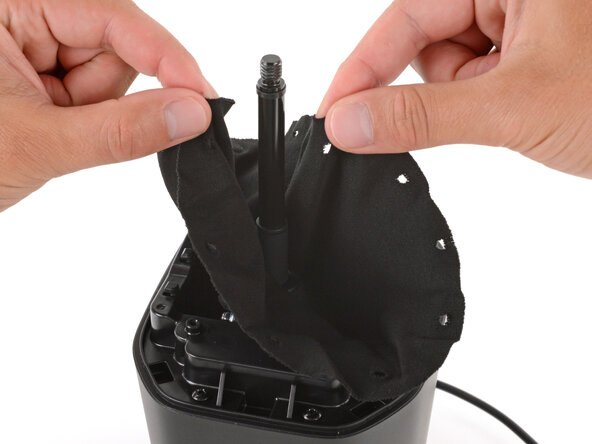
    1. Shifter Assembly Removal, Secure the gaiter: step 5, image 1 of 3 Shifter Assembly Removal, Secure the gaiter: step 5, image 2 of 3 Shifter Assembly Removal, Secure the gaiter: step 5, image 3 of 3
      • Completely unhook the fabric gaiter and use a rubber band to secure it to the shift lever.

      • During reassembly, hook the fabric back into its eight clips and four screw posts. You'll need to double up the fabric on the hooks.

      Ask FixBot

      Add Comment

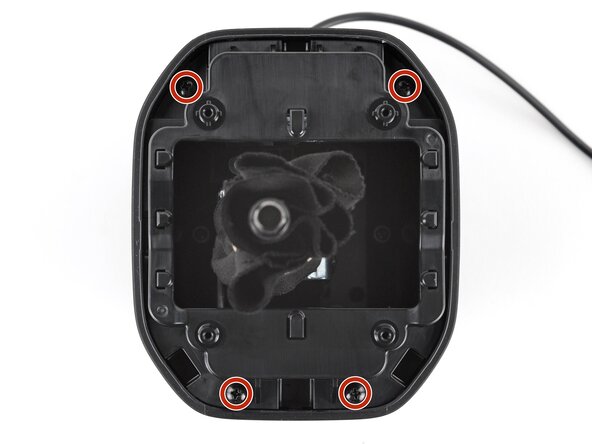
    2. Shifter Assembly Removal, Remove the chassis: step 6, image 1 of 2 Shifter Assembly Removal, Remove the chassis: step 6, image 2 of 2
      • Use a Phillips screwdriver to remove the four 12 mm‑long screws securing the chassis.

      Ask FixBot

      Add Comment

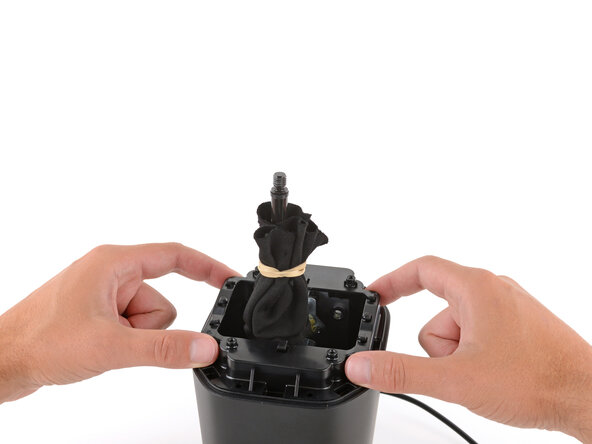
    3. Shifter Assembly Removal: step 7, image 1 of 2 Shifter Assembly Removal: step 7, image 2 of 2
      • Lift the chassis straight up and remove it.

      Ask FixBot

      Add Comment

    1. Shifter Assembly Removal, Remove the midframe: step 8, image 1 of 2 Shifter Assembly Removal, Remove the midframe: step 8, image 2 of 2
      • Use a long‑shank Phillips screwdriver to remove the six 17 mm‑long screws securing the midframe.

      • During reassembly, make sure you install the screws through the plastic midframe, not the large holes on the metal baseplate. You may need to use tweezers to place some of the screws because of magnets on the shifter assembly.

      Ask FixBot

      Add Comment

    2. Shifter Assembly Removal: step 9, image 1 of 3 Shifter Assembly Removal: step 9, image 2 of 3 Shifter Assembly Removal: step 9, image 3 of 3
      • Lift the midframe straight up and remove it.

      Ask FixBot

      Add Comment

    1. Shifter Assembly Removal, Disconnect the USB cable: step 10, image 1 of 3 Shifter Assembly Removal, Disconnect the USB cable: step 10, image 2 of 3 Shifter Assembly Removal, Disconnect the USB cable: step 10, image 3 of 3
      • Use your fingers to grip the USB cable's white connector and pull it straight out of the socket.

      • Don't pull the cable by its wires or you may damage it.

      • If you're having trouble, use a spudger to push the connector on alternating sides to "walk" it out of the socket.

      Ask FixBot

      Add Comment

    2. Shifter Assembly Removal, Remove the shifter assembly: step 11, image 1 of 3 Shifter Assembly Removal, Remove the shifter assembly: step 11, image 2 of 3 Shifter Assembly Removal, Remove the shifter assembly: step 11, image 3 of 3
      • Remove the six screws securing the shifter assembly:

      • Two 12 mm‑long Phillips screws

      • Four 14 mm‑long 3.0 mm hex screws

      • During reassembly:

      • Make sure the ground wire's metal eyelet gets installed under the hex screw nearest the USB cable connector.

      Ask FixBot

      Add Comment

    3. Shifter Assembly Removal: step 12, image 1 of 2 Shifter Assembly Removal: step 12, image 2 of 2
      • The shifter assembly has grease spread on some components. Only grip the assembly by the back metal plate near the USB cable to avoid smearing grease.

      • Secure the base with one hand, and use your free hand to lift and remove the shifter assembly by the back plate.

      Ask FixBot

      Add Comment

Finish Line

Cancel: I did not complete this guide.

Spencer Day

Member since: 09/14/22

205,821 Reputation

1,267 Guides authored

0 Guide Comments

Add Comment

View Statistics:

Past 24 Hours: 0

Past 7 Days: 4

Past 30 Days: 14

All Time: 53