Free Shipping on Domestic Orders $75+

Screen Components Install

Prerequisite Only
This is a prerequisite-only guide! This guide is part of another procedure and isn’t meant to be used alone.

What you need

    1. Screen Components Install, Install the screen board: step 1, image 1 of 3 Screen Components Install, Install the screen board: step 1, image 2 of 3 Screen Components Install, Install the screen board: step 1, image 3 of 3
      Tool used on this step:
      Tesa 61395 Tape
      $2.95
      Buy
      • Before installing the screen board, make sure you know how it will be oriented. The cables need to line up with their sockets.

      • Gently press the board into place on the replacement screen.

      • The residual adhesive should be sticky enough to reuse. If the board isn't staying in place, use thin double-sided tape to secure it.

      Ask FixBot

      Add Comment

    2. Screen Components Install, Connect the board cables: step 2, image 1 of 3 Screen Components Install, Connect the board cables: step 2, image 2 of 3 Screen Components Install, Connect the board cables: step 2, image 3 of 3
      • Use your finger to slide one of the screen board cables fully into its socket.

      • If the cable isn't sliding in, make sure the locking flap is flipped up.

      • Hold the cable in place, and flip the locking flap down to secure the cable.

      Ask FixBot

      Add Comment

    3. Screen Components Install: step 3, image 1 of 3 Screen Components Install: step 3, image 2 of 3 Screen Components Install: step 3, image 3 of 3
      • Repeat the process to reconnect the other cable to the screen board.

      Ask FixBot

      Add Comment

    4. Screen Components Install: step 4, image 1 of 3 Screen Components Install: step 4, image 2 of 3 Screen Components Install: step 4, image 3 of 3
      • Set the board's metal cover in place and press down around the perimeter to secure it.

      Ask FixBot

      Add Comment

    5. Screen Components Install, Reconnect the cable: step 5, image 1 of 1
      • Lay the screen cable in place so the bend lines up with the other screen cable.

      • If the cable is positioned the wrong way, you won't be able to reconnect the screen.

      Ask FixBot

      Add Comment

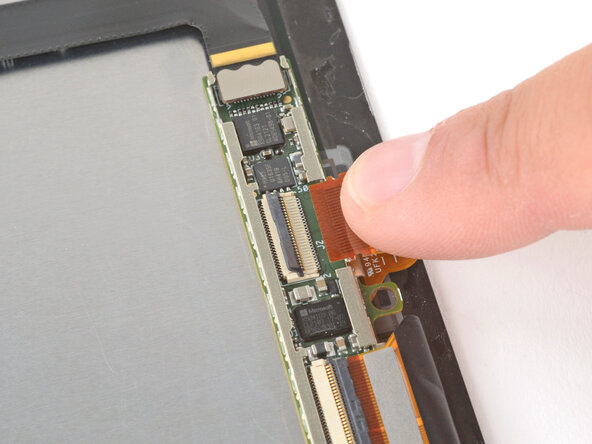
    6. Screen Components Install: step 6, image 1 of 3 Screen Components Install: step 6, image 2 of 3 Screen Components Install: step 6, image 3 of 3
      • Use your finger to press down and reconnect the screen cable press connector, starting on one side and moving to the other.

      Ask FixBot

      Add Comment

    7. Screen Components Install, Install the cable cover: step 7, image 1 of 2 Screen Components Install, Install the cable cover: step 7, image 2 of 2
      • Set the cable's metal cover in place and press down around the perimeter to secure it.

      Ask FixBot

      Add Comment

Finish Line

Cancel: I did not complete this guide.

Spencer Day

Member since: 09/14/22

205,788 Reputation

1,267 Guides authored

0 Guide Comments

Add Comment

View Statistics:

Past 24 Hours: 3

Past 7 Days: 4

Past 30 Days: 6

All Time: 44