
Samsung Rogue OLED Screen Replacement

What you need

  1. Samsung Rogue OLED Screen Replacement, Battery: step 1, image 1 of 2 Samsung Rogue OLED Screen Replacement, Battery: step 1, image 2 of 2
    • Before disassembling your Samsung Rogue, make sure it is powered off.

    • With your thumbs, push down on the back cover of your phone and slide it away from the camera.

  2. Samsung Rogue OLED Screen Replacement: step 2, image 1 of 2 Samsung Rogue OLED Screen Replacement: step 2, image 2 of 2
    • You can now remove the battery by prying it up with your finger.

  3. Samsung Rogue OLED Screen Replacement, Motherboard: step 3, image 1 of 1
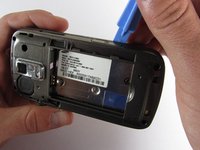
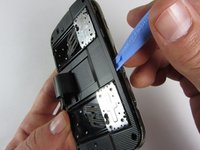
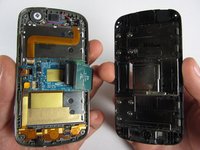
    • Use a plastic opening tool to carefully pry the back cover surrounding the camera up from the phone.

  4. Samsung Rogue OLED Screen Replacement: step 4, image 1 of 1
    • Remove the five 3.4mm Philips screws securing the backing of the phone.

  5. Samsung Rogue OLED Screen Replacement: step 5, image 1 of 3 Samsung Rogue OLED Screen Replacement: step 5, image 2 of 3 Samsung Rogue OLED Screen Replacement: step 5, image 3 of 3
    • Use a plastic opening tool to carefully pry off the back cover.

    • Make sure you are prying along the edge and not between the two halves of the phone that slide away from each other.

    • Be careful to not drop the volume changing piece, for it can easily slip out.

  6. Samsung Rogue OLED Screen Replacement: step 6, image 1 of 1
    • Remove the two 3.45 mm Philips screws below the white sticker.

  7. Samsung Rogue OLED Screen Replacement: step 7, image 1 of 2 Samsung Rogue OLED Screen Replacement: step 7, image 2 of 2
    • Carefully lift the motherboard up from the bottom edge.

    • The film of wires is still attached to the motherboard, so do not completely remove the motherboard just yet or you may damage it.

  8. Samsung Rogue OLED Screen Replacement: step 8, image 1 of 2 Samsung Rogue OLED Screen Replacement: step 8, image 2 of 2
    • Use a plastic opening tool to disconnect the film from the motherboard.

  9. Samsung Rogue OLED Screen Replacement, OLED Screen: step 9, image 1 of 1
    • Remove the eight 1.7mm Philips screws above the keyboard.

  10. Samsung Rogue OLED Screen Replacement: step 10, image 1 of 1
    • Carefully remove the keyboard frame from the sliding mechanisms underneath.

  11. Samsung Rogue OLED Screen Replacement: step 11, image 1 of 1
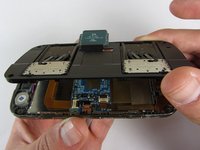
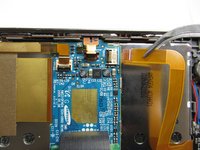
    • Remove the five 3.0mm Philips screws around the outside of the sliding mechanisms.

  12. Samsung Rogue OLED Screen Replacement: step 12, image 1 of 3 Samsung Rogue OLED Screen Replacement: step 12, image 2 of 3 Samsung Rogue OLED Screen Replacement: step 12, image 3 of 3
    • Use a plastic opening tool to pry off the upper slide plate.

    • Be careful of the film of wires when taking off the upper slide plate.

  13. Samsung Rogue OLED Screen Replacement: step 13, image 1 of 3 Samsung Rogue OLED Screen Replacement: step 13, image 2 of 3 Samsung Rogue OLED Screen Replacement: step 13, image 3 of 3
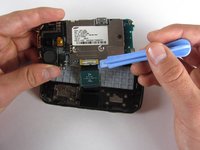
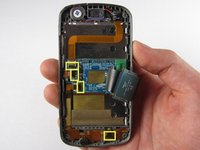
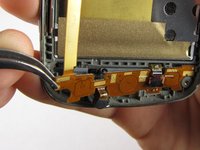
    • Use tweezers to open the four black gates by putting them in the "up" position.

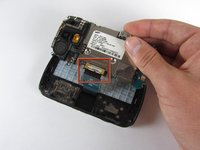
    • With the same tweezers, carefully pull out the orange strips from the four specified gates.

  14. Samsung Rogue OLED Screen Replacement: step 14, image 1 of 2 Samsung Rogue OLED Screen Replacement: step 14, image 2 of 2
    • Using tweezers, gently remove the bottom orange strip from the device

  15. Samsung Rogue OLED Screen Replacement: step 15, image 1 of 2 Samsung Rogue OLED Screen Replacement: step 15, image 2 of 2
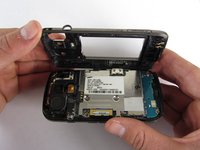
    • In this procedure, the rubber function key pad can easily fall out, so it would be best to take it out and set it safely aside.

  16. Samsung Rogue OLED Screen Replacement: step 16, image 1 of 3 Samsung Rogue OLED Screen Replacement: step 16, image 2 of 3 Samsung Rogue OLED Screen Replacement: step 16, image 3 of 3
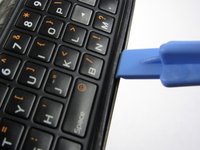
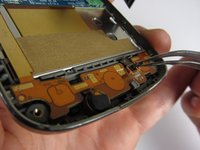
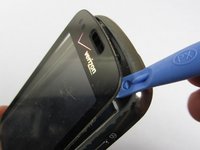
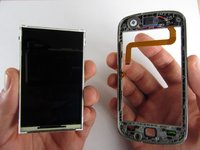
    • Starting at the top, use a plastic opening tool to pry open the protective screen on the front of the phone.

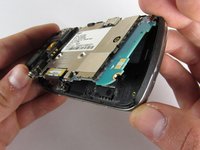
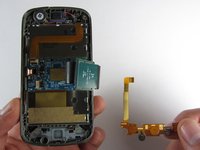
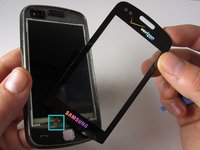
    • One of the strips you pulled out of a gate from a previous step is attached to the screen at the bottom. Be careful not to damage it when you are taking off the screen.

    • The protective screen is glued underneath the edges, so it will be a little more difficult to get off.

    • Keep your hand underneath the OLED screen at all times because it easily falls out once the protective screen detaches.

Conclusion

To reassemble your device, follow these instructions in reverse order.

One other person completed this guide.

Viktoria Mikoultchik

Member since: 04/15/12

25 Reputation

7 Guides authored

Team

Cal Poly, Team 7-32, Maness Spring 2012 Member of Cal Poly, Team 7-32, Maness Spring 2012

CPSU-MANESS-S12S7G32

4 Members

16 Guides authored

0 Comments

Add Comment

View Statistics:

Past 24 Hours: 0

Past 7 Days: 0

Past 30 Days: 3

All Time: 2,185