
Samsung Radiant 360 R1 Speaker Replacement

What you need

  1. Samsung Radiant 360 R1 Speaker Replacement, Micro USB / Power Port Panel: step 1, image 1 of 1
    • Working on your device while it is turned on may result in electric shock. Make sure to shut down and unplug your device before you begin.

    • Use the plastic opening tool to lift and remove the rubber grommet plugs.

  2. Samsung Radiant 360 R1 Speaker Replacement: step 2, image 1 of 1
    • Using a PH1 Philips screwdriver, remove four (9.5mm x 1.6mm) screws from the base plate.

    • Remove base plate by stabilizing speaker and using plastic prying tool to pry the base plate from the speaker.

  3. Samsung Radiant 360 R1 Speaker Replacement: step 3, image 1 of 1
    • Place the speaker on the table with the Touch Pad facing down. This will leave you with the Port Panel exposed.

    • Remove speaker grill by stabilizing speaker on a table and applying pressure to the bottom of the speaker. Slide the speaker grill up and away from the remaining endcap.

  4. Samsung Radiant 360 R1 Speaker Replacement: step 4, image 1 of 1
    • Remove the two exposed (9.5mm x 1.6mm) PH1 Phillips screws on the Port Panel.

    • Remove the Port Panel from the speaker body, exposing the ribbon cables.

  5. Samsung Radiant 360 R1 Speaker Replacement: step 5, image 1 of 1
    • While stabilizing the Port Panel remove the two ribbon cables one at a time by pressing the locking clip down on the ribbon cable connectors and pulling the connector away from the Port Panel.

    I understand this is a guide for working on the Samsung wam 1500 yourself. But where can you get the parts from. I can not find them online. I need to replace the usb/power port panel

    Brian Vickers - Reply

  6. Samsung Radiant 360 R1 Speaker Replacement, 1" Tweeter Speaker: step 6, image 1 of 3 Samsung Radiant 360 R1 Speaker Replacement, 1" Tweeter Speaker: step 6, image 2 of 3 Samsung Radiant 360 R1 Speaker Replacement, 1" Tweeter Speaker: step 6, image 3 of 3
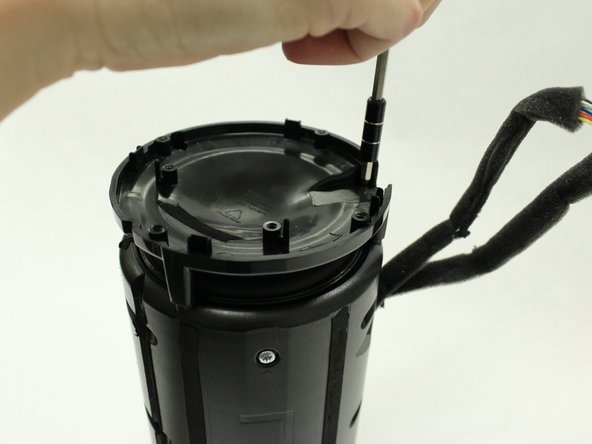
    • Remove the four (9.5mm x 1.6mm) PH1 Phillips screws on the port speaker body.

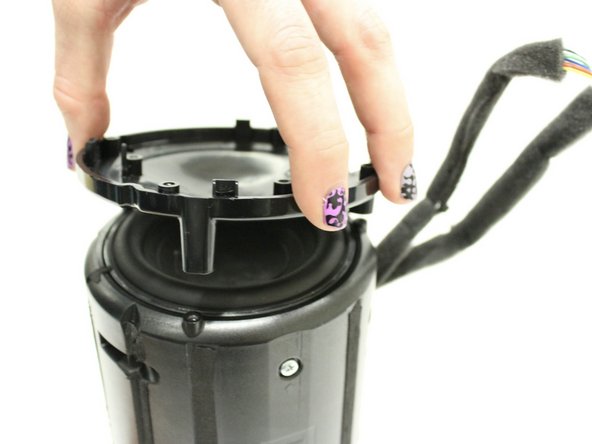
    • Remove the Port Panel exposing the subwoofer.

  7. Samsung Radiant 360 R1 Speaker Replacement: step 7, image 1 of 3 Samsung Radiant 360 R1 Speaker Replacement: step 7, image 2 of 3 Samsung Radiant 360 R1 Speaker Replacement: step 7, image 3 of 3
    • Remove the eight (9.5mm x 1.6mm) PH1 Phillips screws on the right side of the speaker body.

    • Remove the one (9.5mm x 1.6mm) PH1 Phillips screw on the left side of the speaker body.

    • The body sides are denoted with a "R" and an "L" for right and left sides.

  8. Samsung Radiant 360 R1 Speaker Replacement: step 8, image 1 of 1
    • Open up the body to expose the inner panel and motherboard.

  9. Samsung Radiant 360 R1 Speaker Replacement: step 9, image 1 of 3 Samsung Radiant 360 R1 Speaker Replacement: step 9, image 2 of 3 Samsung Radiant 360 R1 Speaker Replacement: step 9, image 3 of 3
    • Remove the ribbon cable from the tweeter which is attached to the main motherboard.

    • Slide the tweeter out of the enclosure.

Conclusion

To reassemble your device, follow these instructions in reverse order.

3 other people completed this guide.

Angelo Espinosa

Member since: 02/01/17

131 Reputation

1 Guide authored

Team

UW Tacoma, Team 2-5, Rose Winter 2017 Member of UW Tacoma, Team 2-5, Rose Winter 2017

UWT-ROSE-W17S2G5

4 Members

4 Guides authored

One Comment

Although not 100% complete, the disassembly process is exactly the same for the R3 & R5 as well as the pictured R1.

Matt - Reply

Add Comment

View Statistics:

Past 24 Hours: 0

Past 7 Days: 3

Past 30 Days: 26

All Time: 1,755