
Samsung NX1 Back Cover Replacement

What you need

  1. Samsung NX1 Back Cover Replacement, Viewfinder Focus Dial: step 1, image 1 of 2 Samsung NX1 Back Cover Replacement, Viewfinder Focus Dial: step 1, image 2 of 2
    • Push the rubber viewfinder grip upward.

  2. Samsung NX1 Back Cover Replacement: step 2, image 1 of 2 Samsung NX1 Back Cover Replacement: step 2, image 2 of 2
    • Use the Phillips #00 screwdriver to remove one 6.4 mm screw in the center of the dial.

    • Remove the dial by lifting upward with your fingers.

  3. Samsung NX1 Back Cover Replacement, Back Cover: step 3, image 1 of 3 Samsung NX1 Back Cover Replacement, Back Cover: step 3, image 2 of 3 Samsung NX1 Back Cover Replacement, Back Cover: step 3, image 3 of 3
    • Use the Phillips #00 screwdriver to remove the four 5.5 mm screws surrounding the viewfinder.

    • Use your fingers to lift the plastic viewfinder cover upward.

  4. Samsung NX1 Back Cover Replacement: step 4, image 1 of 2 Samsung NX1 Back Cover Replacement: step 4, image 2 of 2
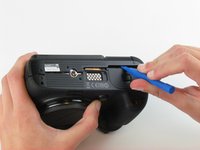
    • Use the Phillips #00 screwdriver to remove the two 5.5 mm screws from the right side of the camera above the SD card port.

  5. Samsung NX1 Back Cover Replacement: step 5, image 1 of 1
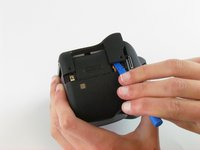
    • Use the Phillips #00 screwdriver to remove one 5.5 mm screw on the left, above the HDMI port.

  6. Samsung NX1 Back Cover Replacement: step 6, image 1 of 1
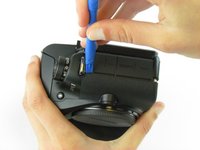
    • Use the Phillips #00 screwdriver to remove the five 5.5 mm screws from the bottom, near the battery compartment.

    • Use the Phillips #00 screwdriver to remove one 3.8 mm screw from the bottom of the hand grip, below the battery compartmen.
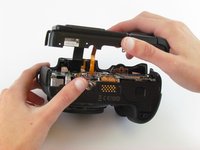
  7. Samsung NX1 Back Cover Replacement: step 7, image 1 of 3 Samsung NX1 Back Cover Replacement: step 7, image 2 of 3 Samsung NX1 Back Cover Replacement: step 7, image 3 of 3
    • Use a plastic opening tool to separate the back cover from the front cover.

    • Pry the back cover in this order: bottom, right side, left side.

  8. Samsung NX1 Back Cover Replacement: step 8, image 1 of 2 Samsung NX1 Back Cover Replacement: step 8, image 2 of 2
    • Use your fingers to pull the back cover away from the front cover.

    • Do not completely separate the back cover from the front cover as two cables hold these components together.

  9. Samsung NX1 Back Cover Replacement: step 9, image 1 of 3 Samsung NX1 Back Cover Replacement: step 9, image 2 of 3 Samsung NX1 Back Cover Replacement: step 9, image 3 of 3
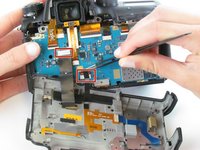
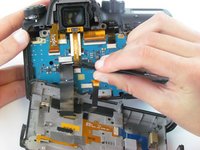
    • Use tweezers to pull the two ribbon cables horizontally out of their clips.

Conclusion

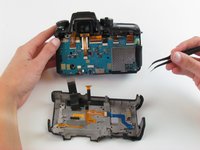
To reassemble your device, follow these instructions in reverse order.

One other person completed this guide.

Hannah Patrick

Member since: 02/24/16

891 Reputation

6 Guides authored

Team

USF Tampa, Team 1-4, Leahy Spring 2016 Member of USF Tampa, Team 1-4, Leahy Spring 2016

USFT-LEAHY-S16S1G4

3 Members

6 Guides authored

0 Comments

Add Comment

View Statistics:

Past 24 Hours: 0

Past 7 Days: 0

Past 30 Days: 6

All Time: 974