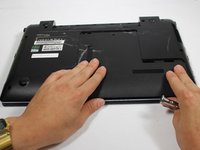
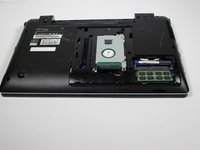
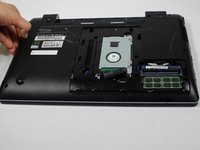
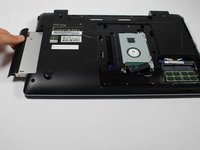
Samsung NP300E5C Optical Drive Replacement

What you need

  1. Samsung NP300E5C Optical Drive Replacement, Battery: step 1, image 1 of 1
    • Lay laptop down so that the bottom is facing the sky.

  2. Samsung NP300E5C Optical Drive Replacement: step 2, image 1 of 3 Samsung NP300E5C Optical Drive Replacement: step 2, image 2 of 3 Samsung NP300E5C Optical Drive Replacement: step 2, image 3 of 3
    • Push both tabs away from the center of the device.

    • While both are in the fully unlocked position, slide the battery out.

  3. Samsung NP300E5C Optical Drive Replacement, Optical Drive: step 3, image 1 of 1
    • Remove this 4 mm Phillips #8 screw using a Phillips #00 screwdriver.

  4. Samsung NP300E5C Optical Drive Replacement: step 4, image 1 of 2 Samsung NP300E5C Optical Drive Replacement: step 4, image 2 of 2
    • With the 4 mm Phillips #8 screw removed, firmly but gently pull the cover towards you.

    • After moving the cover about 2 centimeters, you can lift and remove it.

  5. Samsung NP300E5C Optical Drive Replacement: step 5, image 1 of 1
    • Remove the 4 mm Phillips #8 screw to the left of the hard drive using a Phillips #00 screwdriver.

  6. Samsung NP300E5C Optical Drive Replacement: step 6, image 1 of 2 Samsung NP300E5C Optical Drive Replacement: step 6, image 2 of 2
    • Using your fingernail or spudger to gently pull your optical drive out.

Conclusion

To reassemble your device, follow these instructions in reverse order.

3 other people completed this guide.

aliahsan95

Member since: 09/23/15

937 Reputation

4 Guides authored

Team

Baylor, Team 10-13, Williams Fall 2015 Member of Baylor, Team 10-13, Williams Fall 2015

BU-WILLIAMS-F15S10G13

3 Members

4 Guides authored

One Comment

Great video, simple steps to follow, very good, thanks.

Chris Hughes - Reply

Add Comment

View Statistics:

Past 24 Hours: 0

Past 7 Days: 7

Past 30 Days: 19

All Time: 2,195