Introduction
Prerequisite Only.
What you need
-
-
Apply heat to all the seams of the device using an iFixit iOpener or heat gun in order to loosen the adhesive around the edges of the screen.
-
-
-
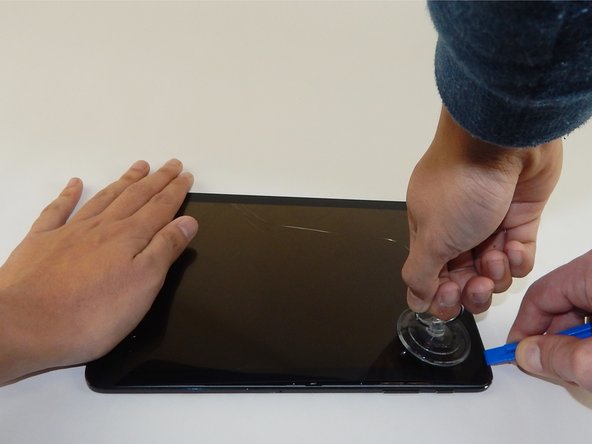
Insert the plastic opening tool into the gap on the side of the tablet, near a corner where you want to start removing the screen.
-
Place the small suction cup on the screen near the corner that the plastic opening tool is placed.
-
Lift the small suction cup up while pushing down with the plastic opening tool to remove screen (you may need to have someone else hold the device down for proper leverage).
The lower portion of the screen is glued to the body. The screen is unable to be completely removed.
starte oben, unten verhindert eine Nase an dem Audioanschluß das erste anheben.
start upside, downside a nose at the audio connector prevents the first lifting.
Difficile, j'ai acheté les outils nécessaires. Après avoir chauffé les côtés et essayé de les décoller, la vitre a craqué.😠
Had to use a heat gun to remove with patience and time, using a pic to "saw" into the seal, starting with the right side corners. Stopping every few seconds to reheat with heat gun. Take care on the bottom left corner, and left side. There is very little room between the edge and LCD, making it easy to stick a plastic pick or removal tool in between the LCD and front glass. The other sides have more room for prying. I nicked the bottom left corner with a prying pic, which killed the entire display :-( Good luck!
-
-
-
-
Remove the nineteen 3mm Phillips #1 screws.
make sure to remove the 2 black screws on the frame. i fix it doesnt say to take those off. nearly damaged the frame
-
-
-
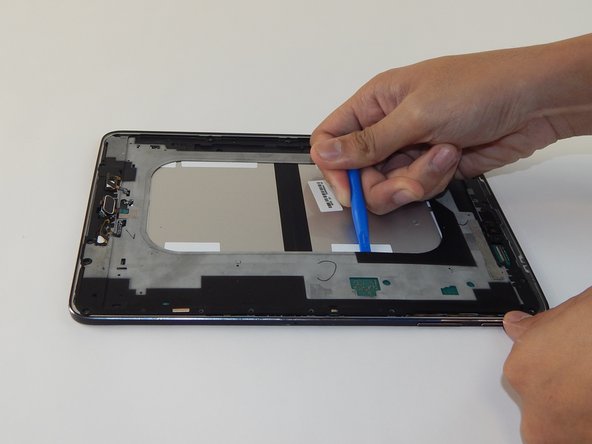
Pry open the next layer of the device using the plastic opening tool.
-Zuvor unbedingt SIM Karte u microSD entfernen, sonst bleibt der Elekronikpart am Gehäuse fest und das Flachbandkabel davon kann beschädigt werden!
-Lösen des unteren Teils des Innengehäuses zum Schluss, da Ladebuchse eine Nase hat und sich erst löst wenn man es schräg nach unten abhebt.
-


To reassemble your device, follow these instructions in reverse order.
To reassemble your device, follow these instructions in reverse order.
Team

USF Tampa, Team 10-4, Remmell Spring 2016 Member of USF Tampa, Team 10-4, Remmell Spring 2016
USFT-REMMELL-S16S10G4
4 Members
18 Guides authored
m.E. wichtig vorher die Kartenhalter für SIM und SD entfernen, sonst löst sich der Kontakt unkontrolliert bei Schritt 6.
Frank Huebner - Reply
You make no mention of re-Glueing the screen, just applying the steps in reverse order - does that mean simply applying heat again will re-glue the components from the residue?
Robin Penny - Reply
i replaced the battery, the sticky tape did hold up again, but if you replace the screen it depends on whate side the tape sticks to. On ine the most part of the tape stuck to the screen.
Steffen Hahn -
I know its 2020 but i cracked my screen and idk if its on or not
benjamin burkowski_FaZe - Reply