Free Shipping on Domestic Orders $75+

This translation was generated by a machine and has not been reviewed by a person yet. Speak this language? Review it.

Samsung Galaxy A8(2018) Back Cover Replacement

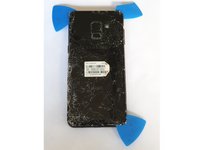
    1. Samsung Galaxy A8(2018) Back Cover Replacement, Back cover: step 1, image 1 of 2 Samsung Galaxy A8(2018) Back Cover Replacement, Back cover: step 1, image 2 of 2
      • Turn off your phone.

      • Prepare an iOpener or hair dryer to soften the adhesive on the back of the A8.

      • The adhesive is distributed over the outline of the back cover shown in red in the photo.

      Ask FixBot

      Add Comment

    2. Samsung Galaxy A8(2018) Back Cover Replacement: step 2, image 1 of 1
      • Use a suction cup to lift the back cover and insert an opening pick into the slot created.

      • Start in the middle and cut the adhesive while maintaining tension on the suction cup.

      • If you find it increasingly difficult to move the opening pick, reheat the iOpener or hair dryer.

      Ask FixBot

      Add Comment

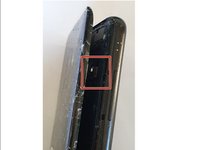
    3. Samsung Galaxy A8(2018) Back Cover Replacement: step 3, image 1 of 2 Samsung Galaxy A8(2018) Back Cover Replacement: step 3, image 2 of 2
      • As you go, take additional opening picks and carefully move them from corner to corner until all 4 corners are freed.

      • Do not force the cover open. Re-soften the adhesive with an iOpener or hair dryer if the back cover does not come off or begins to warp.

      • In the photo opposite, 3 corners have been released; only one corner remains to be able to completely remove the glass.

      • Be careful not to damage the fingerprint reader connector when opening the back cover. Disconnect it following the instructions in the next step.

      Ask FixBot

      Add Comment

    4. Samsung Galaxy A8(2018) Back Cover Replacement: step 4, image 1 of 1
      • Unplug the fingerprint reader with tweezers.

      Ask FixBot

      Add Comment

    5. Samsung Galaxy A8(2018) Back Cover Replacement: step 5, image 1 of 1
      • Remove the back cover.

      • Prepare for reassembly by removing the remaining adhesive from the phone with a spudger. Clean the adhesive surfaces with isopropyl alcohol and a lint-free cloth.

      Ask FixBot

      Add Comment

Conclusion

To reassemble your device, follow the instructions in reverse order.

Cancel: I did not complete this guide.

11 other people completed this guide.

Special thanks to these translators:

fr en

100%

Jerry Wheeler is helping us fix the world! Want to contribute?
Start translating ›

Jean pierre bourhis

Member since: 03/06/18

466 Reputation

1 Guide authored

Team

Leroy Merlin Member of Leroy Merlin

Community

39 Members

1,630 Guides authored

0 Guide Comments

Add Comment

View Statistics:

Past 24 Hours: 5

Past 7 Days: 29

Past 30 Days: 126

All Time: 5,250