
Samsung Chromebook 3 XE500C13-K05US Speaker Replacement

What you need

  1. Samsung Chromebook 3 XE500C13-K05US Speaker Replacement, Speaker: step 1, image 1 of 1
    • Place the Chromebook face down so the bottom case is uncovered.

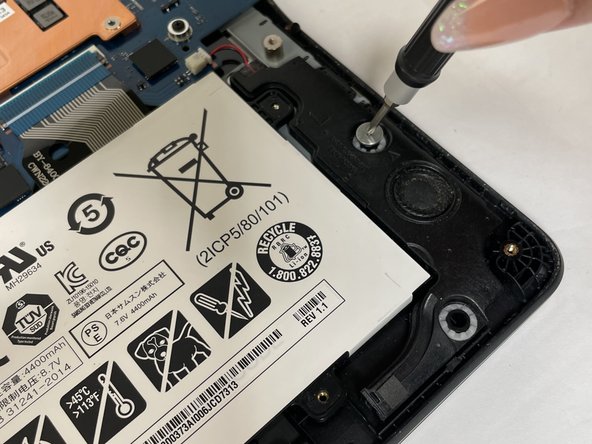
    • Use the Phillips #00 screwdriver to remove all nine 4.6mm screws from the back case.

  2. Samsung Chromebook 3 XE500C13-K05US Speaker Replacement: step 2, image 1 of 1
    • Use a nylon spudger or plastic opening tool to pry the case up from the vent on the hinge side of the Chromebook.

    • You will hear a popping sound as the connectors disengage inside the case.

  3. Samsung Chromebook 3 XE500C13-K05US Speaker Replacement: step 3, image 1 of 1
    • Raise the case up and off the device.

  4. Samsung Chromebook 3 XE500C13-K05US Speaker Replacement: step 4, image 1 of 3 Samsung Chromebook 3 XE500C13-K05US Speaker Replacement: step 4, image 2 of 3 Samsung Chromebook 3 XE500C13-K05US Speaker Replacement: step 4, image 3 of 3
    • Disconnect the battery from the motherboard by prying upwards on the cable connector with a spudger.

  5. Samsung Chromebook 3 XE500C13-K05US Speaker Replacement: step 5, image 1 of 3 Samsung Chromebook 3 XE500C13-K05US Speaker Replacement: step 5, image 2 of 3 Samsung Chromebook 3 XE500C13-K05US Speaker Replacement: step 5, image 3 of 3
    • Remove one 4.9mm silver screw from each speaker.

  6. Samsung Chromebook 3 XE500C13-K05US Speaker Replacement: step 6, image 1 of 3 Samsung Chromebook 3 XE500C13-K05US Speaker Replacement: step 6, image 2 of 3 Samsung Chromebook 3 XE500C13-K05US Speaker Replacement: step 6, image 3 of 3
    • Use a spudger to gently push the cable connector sideways from the motherboard and the left speaker to disconnect the cable.

    • Remove the speaker.

  7. Samsung Chromebook 3 XE500C13-K05US Speaker Replacement: step 7, image 1 of 2 Samsung Chromebook 3 XE500C13-K05US Speaker Replacement: step 7, image 2 of 2
    • Use a spudger to gently push the cable connector sideways from the motherboard and the right speaker to disconnect the cable.

    • Remove the speaker.

Conclusion

To reassemble your device, follow these instructions in reverse order.

Yamaris Acosta

Member since: 02/07/23

557 Reputation

3 Guides authored

Team

Gateway, Team 4-4, Gonzalez Spring 2023 Member of Gateway, Team 4-4, Gonzalez Spring 2023

GCC-GONZALEZ-S23S4G4

4 Members

3 Guides authored

0 Comments

Add Comment

View Statistics:

Past 24 Hours: 0

Past 7 Days: 0

Past 30 Days: 1

All Time: 58