
SSD

Last updated on Oct 18, 2026
Views: 1.4K
View statistics:
- Past 24 Hours:
- 25
- Past 7 Days:
- 179
- Past 30 Days:
- 745
- All Time:
- 1,443
Comments: 0
No one has left comments on this guide. Will you be first?
Go to guide commentsCompleted: 0 1
No one has marked this guide "completed." Will you be the first?
1 person has marked this guide "completed." It's you — great job!
Favorites: 1 2
1 person has favorited (and subscribed to) this guide. Will you be next?
2 people have favorited (and subscribed to) this guide — including you!
Community-Contributed Guide
An awesome member of our community made this guide. It was not created by iFixit staff.
Introduction
Go to step 1 ↓MacBook Pro A1708 SSD Removal & Replacement Guide
This guide explains how to remove and replace the SSD in the MacBook Pro 13-inch A1708 (2016–2017). The A1708 is the non-Touch Bar model with function keys and has a removable SSD.
Before starting, shut down your MacBook, unplug all cables, and work on a clean, static-free surface. Keep track of screws because they vary in size. A magnetic mat is recommended.
🛠️ Tools Needed
- Pentalobe 1.2 mm screwdriver – bottom case screws
- Torx T5 screwdriver – SSD screw
- Plastic opening tools – safely lift the bottom cover
- Tweezers – small screws/connectors
⚠️ Check SSD Compatibility
The A1708 uses a proprietary Apple PCIe 3.0 SSD. Common capacities are 128GB, 256GB, 512GB, and 1TB.
There are two 256GB SSD variants, and some may not work with the Mid-2017 A1708. Check the SSD's model/serial information before purchasing.
💾 Apple OEM SSD Options
128GB
256GB
You can also buy the SSD directly from iFixit link in guide parts section
🔄 NVMe Upgrade Option
Instead of buying an Apple OEM SSD, you can use an NVMe SSD with an A1708-compatible adapter. This can be a cheaper way to increase storage.
A1708 NVMe Adapter:
⚠️ Important
This guide applies specifically to the A1708 MacBook Pro with function keys. Later MacBook Pro models use soldered storage and cannot have their SSD replaced in the same way.
Always verify the exact MacBook model and SSD compatibility before purchasing parts.
What you need
Parts
-
Apple SSD (A1708 original)Optional
-
Replacement SSD (third‑party)Optional
-
NVMe Adapter CardOptional
-
-
Magnetic Screw MatOptional

Tools


-
-
-
Before starting this procedure, you must disable your Mac's Auto Boot feature. Auto Boot powers on your Mac when you open the lid, and may be accidentally triggered during disassembly. Use this guide or follow the abbreviated instructions below to disable Auto Boot. This command may not work on all Macs.
-
Power on your Mac and launch Terminal.
-
Copy and paste the following command (or type it exactly) into Terminal:
-
sudo nvram AutoBoot=%00
-
Press [return]. If prompted, enter your administrator password and press [return] again. Note: Your return key may also be labeled ⏎ or "enter.
-
You can now safely power down your Mac and open the bottom case, without it accidentally powering on.
-
When your repair is complete and your Mac is successfully reassembled, re-enable Auto Boot with the following command:
-
sudo nvram AutoBoot=%03
 Ask FixBot
-
-
-
You’ll need specific screwdrivers and opening tools to safely disassemble the MacBook.
-
Screwdriver set
-
Suction cup
-
Pentalobe 1.2mm screwdriver
-
Torx T5 screwdriver
-
Plastic opening tools
-
Tweezers
-
Magnetic mat (recommended)
-
-
Tool used on this step:Magnetic Project Mat$19.95
-
Before proceeding, unplug and power down your MacBook. Close the display and lay it on a soft surface, top-side down.
-
Use Your P5 Pentalobe driver to remove the six screws securing the lower case:
-
Two 6.2 mm screws
-
Two 5.3 mm screws
-
Two 3.4 mm screws
-
Throughout this repair, keep track of each screw and make sure it goes back exactly where it came from to avoid damaging your device.
-
-
-
Insert one corner of an opening pick into the space between the lower case and the chassis.
-
Slide the opening pick around the nearest corner and halfway up the side of the case.
-
This releases the first of the hidden clips securing the lower case to the chassis. You should feel and hear the clip pop free.
-
-
-
Repeat the previous step on the opposite side, sliding your opening pick under the lower case and up the side to pop the second clip free.
-
-
-
Insert your opening pick once again under the front edge of the lower case, near one of the two centermost screw holes.
-
Give the pick a firm twist to pop free the third clip securing the lower case to the chassis.
-
Repeat this procedure near the other of the two centermost screw holes, popping the fourth clip free.
-
-
-
Pull the lower case firmly towards the front of the MacBook (away from the hinge area) to separate the last of the clips securing the lower case.
-
It may help to pull first at one corner, then the other.
-
This may require a lot of force.
-
-
-
Carefully peel up the large piece of tape covering the battery connector, on the edge of the logic board nearest the battery.
-
Remove the tape.
-
-
-
Gently peel back the small piece of tape covering the battery board data cable connector.
-
The tape is integrated into the ribbon cable and will not detach completely. Simply peel it back enough to access the connector
-
-
-
Use the tip of a spudger to flip up the small black locking tab securing the cable in its connector.
-
-
-
Disconnect the battery board data cable by sliding it out from its socket.
-
Slide parallel to the logic board, in the direction of the cable.
-
-
-
Use a T5 Torx driver to remove the 3.7 mm pancake screw securing the battery power connector.
-
-
-
Use a spudger to gently lift the battery power connector, disconnecting the battery.
-
Lift the connector high enough so that it stays separated from its socket. If it accidentally makes contact during the course of your repair, it could damage your MacBook Pro.
-
-
-
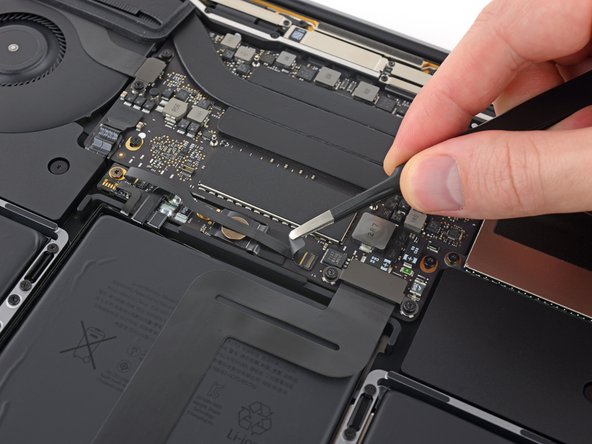
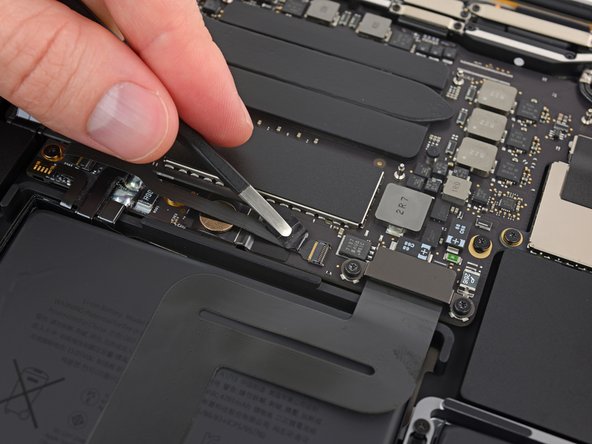
The removable SSD can now be accessed.
-
Locate SSD module
-
Unscrew retaining screw with Torx T5
-
Gently slide SSD out of connector
-
-
-
Congratulations on completing disassembly! The remaining steps will show how to reassemble your MacBook Pro 13" Function Keys 2017
-
For the Apple SSD reassemble see step 18
-
For The NVMe SSD reassemble see steps 19-20-21
-
-
-
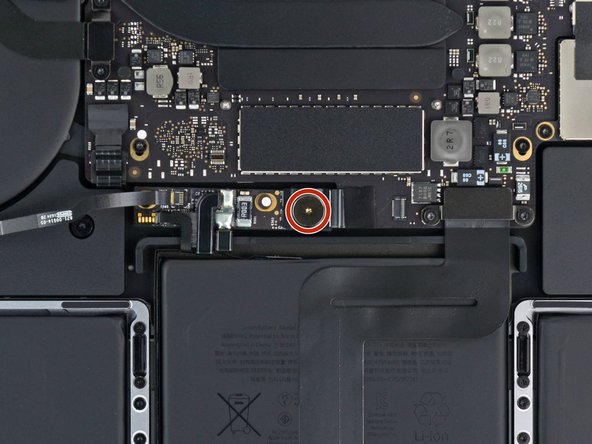
Using Your T5 Screwdriver screw the 2 screws by the SSD (Marked by red)
-
-
-
-
Form Factor: You must use an M.2 2242 (or 2230) size NVMe SSD. Standard 2280 drives are too long and will not fit inside the A1708 enclosure without hitting components.
-
Recommended Drives: Popular stable, lower-heat choices include the Sabrent Rocket Nano 2242 or Toshiba XG5.
-
1st Image showing M.2 NVMe SSD showing edge connector pins. Source: VitaliyPozdeyev / Getty Images
-
2nd image shows NVMe ssd adapter screenshot from amazon link https://tinyurl.com/3maxzx62
-
-
-
Ensure the battery remains disconnected (the battery cable should be pulled loose and the plastic tab/metal bracket kept safe).
-
Hold the assembled adapter-and-SSD unit so that the gold connector pins are facing upwards (or matching the orientation of the original drive).
-
Insert the adapter straight into the logic board's proprietary SSD socket, pushing it firmly and evenly until it seats completely.
-
Fasten the SSD/adapter in place using the original T5 Torx screws on either side.
-
Reapply any black protective tape or thermal cover if applicable.
-
-
-
Use a T5 Torx driver to put the 3.7 mm pancake screw back which secures the battery power connector.
-
-
-
Put the lower case.
-
Slide the lower case firmly toward the rear of the MacBook (toward the hinge area) until the internal clips snap back into place.
-
Use your P5 Pentalobe driver to reinstall and tighten the six screws securing the lower case.
-
Two 6.2 mm screws
-
Two 5.3 mm screws
-
Two 3.4 mm screws
-
Open the display, power on your MacBook, and plug in the power adapter.
-
-
-
If you have another mac you can create the installer by going to this link https://support.apple.com/en-us/102662 https://support.apple.com/en-us/101578
-
if you have a windows PC (10 or 11) you can download the installer using GibMacOS https://github.com/corpnewt/gibmacos
-
and if you are using the windows method after it finish's downloading download transmac free trail https://www.acutesystems.com/dl_tmac and right click your usb drive and select restore from disk image select the installassistant.pkg
-
the latest macOS version this MacBook Pro 13" Function Keys 2017 supports is macOS ventura 13
-
boot from the usb drive my holding option at startup and select install macOS (version name) and choose your language
-
go to disk unity and press cmd+2 and click the ssd and hit erase and put the file system to APFS and name to macintosh HD and hit erase then quit disk unity cmd+Q and open install macOS (version name) and install it (this may take quite a while)
-
-








You’ve now successfully removed and replaced the SSD in your MacBook Pro 13" A1708 (2017). By carefully following the steps and keeping track of screws and connectors, your MacBook should boot up with the new drive ready for macOS installation or migration.
To reassemble your device, follow the Above instructions in reverse order.
- Take your e-waste to an R2 certified recycler or an e-Stewards certified recycler.
- These facilities ensure safe handling of hazardous materials, secure data destruction, and environmentally responsible recycling.
- This way, you protect the environment, keep toxic materials out of landfills, and ensure your data is securely destroyed.
Remember to reinstall macOS or restore from backup after the upgrade. If you’re unsure about compatibility, double-check the SSD part number against your MacBook’s EMC code (3164 for 2017).
With the right tools and patience, upgrading your SSD can extend the life of your MacBook and give you the storage space you need.
Repair didn’t go as planned? Check out our Answers community for troubleshooting help.

