Free Shipping on Domestic Orders $75+

Right Speaker Housing Installation

Prerequisite Only
This is a prerequisite-only guide! This guide is part of another procedure and isn’t meant to be used alone.

What you need

    1. Right Speaker Housing Installation, Replace the speaker housing adhesive: step 1, image 1 of 3 Right Speaker Housing Installation, Replace the speaker housing adhesive: step 1, image 2 of 3 Right Speaker Housing Installation, Replace the speaker housing adhesive: step 1, image 3 of 3
      • Before installing the speaker housing, check the condition of its adhesive—it will be on the underside of the housing, on the metal lip of the ear cup, or on both.

      • Use tweezers and scissors to remove any sections of bunched-up or overlapping adhesive that would prevent the housing from sitting perfectly flat.

      • Try to remove as little adhesive as possible. If all the adhesive looks fine, you can skip this step.

      • Apply thin, double-sided adhesive where you removed the original, using short sections to help match the curve of the lip.

      • Don't remove the top adhesive liners yet—the adhesive should not be exposed.

      • Make sure not to double up on any sections (i.e. don't apply adhesive on the ear cup if it's already on the corresponding spot on the housing).

      Ask FixBot

      Add Comment

    2. Right Speaker Housing Installation, Connect the speaker housing: step 2, image 1 of 2 Right Speaker Housing Installation, Connect the speaker housing: step 2, image 2 of 2
      • Hold the speaker housing up and use your finger to press down and reconnect its press connector.

      Ask FixBot

      Add Comment

    3. Right Speaker Housing Installation, Install the housing cable cover: step 3, image 1 of 2 Right Speaker Housing Installation, Install the housing cable cover: step 3, image 2 of 2
      • Slide the tab on the connector cover into its slot and lay the cover down.

      Ask FixBot

      Add Comment

    4. Right Speaker Housing Installation: step 4, image 1 of 2 Right Speaker Housing Installation: step 4, image 2 of 2
      • Use a Torx Plus 1IP screwdriver to install the 1.7 mm‑long screw securing the speaker housing cable cover.

      Ask FixBot

      Add Comment

    5. Right Speaker Housing Installation, Secure the speaker housing: step 5, image 1 of 3 Right Speaker Housing Installation, Secure the speaker housing: step 5, image 2 of 3 Right Speaker Housing Installation, Secure the speaker housing: step 5, image 3 of 3
      • If you installed replacement adhesive, remove any liners to expose the adhesive.

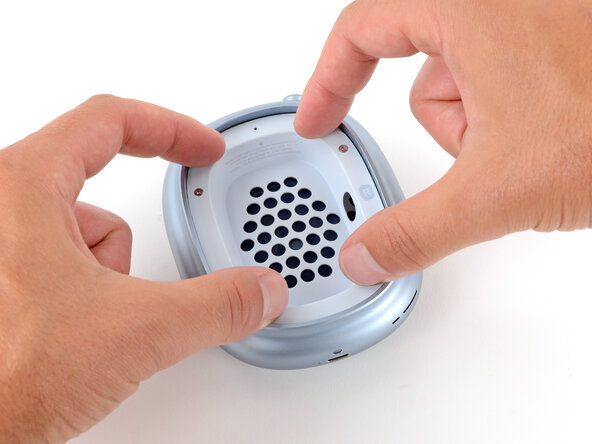
      • Flip the speaker housing into the cup and press it into place around the perimeter.

      • Don't press on the center of the housing or you may damage the grille and/or speaker underneath.

      Ask FixBot

      Add Comment

    6. Right Speaker Housing Installation, Turn the housing screws to the locked position: step 6, image 1 of 2 Right Speaker Housing Installation, Turn the housing screws to the locked position: step 6, image 2 of 2
      • Turn these screws slowly and gently, stopping when you feel resistance—about 1/4 turn. If turned too far, the locking mechanism will break.

      • Use a P5 pentalobe screwdriver to turn the four speaker housing screws to the locked position:

      • Turn the top left and bottom right screws clockwise.

      • Turn the top right and bottom left screws counterclockwise.

      Ask FixBot

      Add Comment

Finish Line

Cancel: I did not complete this guide.

Spencer Day

Member since: 09/14/22

205,981 Reputation

1,267 Guides authored

0 Guide Comments

Add Comment

View Statistics:

Past 24 Hours: 0

Past 7 Days: 1

Past 30 Days: 7

All Time: 65