
Right Joy-Con Joystick Replacement

What you need

  1. Right Joy-Con Joystick Replacement, Right Joystick: step 1, image 1 of 1
    Tool used on this step:
    Magnetic Project Mat
    $19.95
    Buy
    • Remove the four tri-point Y00 screws from the back panel of the Joy-Con.

    • These screws are each 6.2 mm long, but it's still a good idea to keep them organized and make sure they go back in their proper holes!

  2. Right Joy-Con Joystick Replacement: step 2, image 1 of 3 Right Joy-Con Joystick Replacement: step 2, image 2 of 3 Right Joy-Con Joystick Replacement: step 2, image 3 of 3
    • Insert an opening pick under the lower side of the back panel (opposite the R and ZR buttons).

    • Slide the flat edge of an opening pick up the side of the Joy-Con.

    • Be careful not to slide the opening pick too far inside the Joy-Con. This may damage the inner components. The back panel has shallow interference-fit tabs on the side opposite the charging rail. These loosen fairly easily, so not much pressure is needed.

  3. Right Joy-Con Joystick Replacement: step 3, image 1 of 2 Right Joy-Con Joystick Replacement: step 3, image 2 of 2
    • Open the the Joy-Con like a book, with the charging rail facing away from you.

    • Don’t try to fully remove the back panel yet. There are still two cables connecting the charging rail to the motherboard.

  4. Right Joy-Con Joystick Replacement: step 4, image 1 of 2 Right Joy-Con Joystick Replacement: step 4, image 2 of 2
    • Use a spudger to gently pry the battery connector from its socket on the motherboard. This will keep the Joy-Con from powering on during the repair.

    • Be extremely careful while you pry up the battery connector. If it does not come up easily, try gently pulling on the wires to disconnect it.

  5. Right Joy-Con Joystick Replacement: step 5, image 1 of 3 Right Joy-Con Joystick Replacement: step 5, image 2 of 3 Right Joy-Con Joystick Replacement: step 5, image 3 of 3
    • The following two steps show the removal of the battery and the coaxial antenna cable from the midframe. These two steps make for a less cluttered repair, but are not essential. If you want, you can leave the battery and the grey coax cable in place here and proceed to step 7.

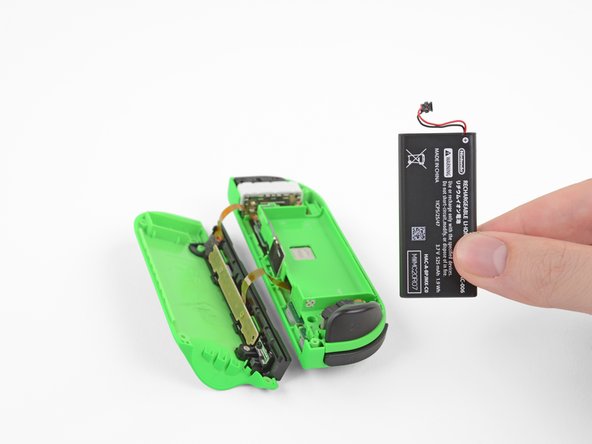
    • Insert an opening pick between the battery and the Joy-Con housing. Gently pry out the battery, which is lightly taped in place.

    • Be careful not to deform or puncture the battery—it can catch fire or explode if damaged.

  6. Right Joy-Con Joystick Replacement: step 6, image 1 of 2 Right Joy-Con Joystick Replacement: step 6, image 2 of 2
    • Before you perform this step, take note of how the antenna cable and its PCB are seated for proper reassembly later.

    • Carefully de-thread the upper half of the grey antenna cable out of the battery cavity.

  7. Right Joy-Con Joystick Replacement: step 7, image 1 of 2 Right Joy-Con Joystick Replacement: step 7, image 2 of 2
    • Pry up with the pointy end of a spudger to disconnect the antenna cable's coaxial connector from the motherboard.

    • Remove the grey antenna cable.

    • During reassembly, reconnect the antenna cable, then make sure it is routed through the battery cavity in the midframe as it was before you took it out.

  8. Right Joy-Con Joystick Replacement: step 8, image 1 of 1
    • Remove the three 3.5 mm Phillips #00 screws on midframe.

    • Do not attempt to remove the midframe yet. There is a fragile cable that still connects the ZR button on the midframe to the motherboard underneath.

  9. Right Joy-Con Joystick Replacement: step 9, image 1 of 2 Right Joy-Con Joystick Replacement: step 9, image 2 of 2
    • Carefully flip the midframe over and away from the motherboard.

    • Do your best not to stress the short ribbon cable attached to the ZR button during this step.

  10. Right Joy-Con Joystick Replacement: step 10, image 1 of 3 Right Joy-Con Joystick Replacement: step 10, image 2 of 3 Right Joy-Con Joystick Replacement: step 10, image 3 of 3
    • The ZR button cable is locked in place by a small ZIF connector on the motherboard. Use tweezers or a spudger to flip up the ZIF connector lock.

    • Use tweezers to gently pull the ZR button flex cable out of the ZIF connector socket. The midframe is now disconnected and can be removed.

  11. Right Joy-Con Joystick Replacement: step 11, image 1 of 3 Right Joy-Con Joystick Replacement: step 11, image 2 of 3 Right Joy-Con Joystick Replacement: step 11, image 3 of 3
    • The joystick cable is also locked into place by a ZIF connector. Use tweezers or a spudger to flip the ZIF lock upward and carefully disconnect the cable.

  12. Right Joy-Con Joystick Replacement: step 12, image 1 of 1
    • Remove the two 3.5 mm Phillips #00 screws from the joystick.

  13. Right Joy-Con Joystick Replacement: step 13, image 1 of 2 Right Joy-Con Joystick Replacement: step 13, image 2 of 2
    • Carefully remove the joystick from its housing.

    • There is a thin black gasket around the hole where the joystick pokes through the Joy-Con. Do your best not to disturb this gasket as you remove the joystick!

    • Once the Joy-Con is fully reassembled, connect it to your Nintendo Switch and calibrate the new joystick.

Kyler Saunders

Member since: 09/12/16

4,319 Reputation

1 Guide authored

Team

The.idoc.repair Member of The.idoc.repair

Business

1 Member

9 Guides authored

View Statistics:

Past 24 Hours: 130

Past 7 Days: 911

Past 30 Days: 4,546

All Time: 318,373