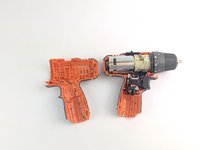
Ridgid R82005 Housing Assembly Replacement

What you need

  1. Ridgid R82005 Housing Assembly  Replacement, Housing Assembly: step 1, image 1 of 1
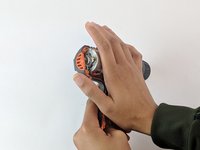
    • Eject the battery from the drill.

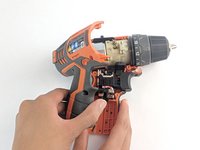
    • Unscrew the seven M3x15.3mm screws, with the 2mm hex screwdriver bit, that secures the Housing Assembly.

  2. Ridgid R82005 Housing Assembly  Replacement: step 2, image 1 of 1
    • Push the metallic Housing Connecting clip out with flat side of the plastic opening tool.

    • Eject battery before attempting this step.

  3. Ridgid R82005 Housing Assembly  Replacement: step 3, image 1 of 2 Ridgid R82005 Housing Assembly  Replacement: step 3, image 2 of 2
    • Remove the top half of the Housing Assembly.

  4. Ridgid R82005 Housing Assembly  Replacement: step 4, image 1 of 2 Ridgid R82005 Housing Assembly  Replacement: step 4, image 2 of 2
    • Grasp carefully the top and bottom of drill components.

    • LED light needs to be manually removed.

    • Lift and transfer, as a whole, the drill components from the old housing assembly to the new housing.

    • Make sure all drill components fit properly in the grooves of new Housing Assembly.

Conclusion

To reassemble your device, follow these instructions in reverse order. Also reinsert the battery to make sure the drill has power.

2 other people completed this guide.

Alex Cominos

Member since: 02/14/19

376 Reputation

2 Guides authored

Team

USF Tampa, Team S1-G2, Leahy Spring 2019 Member of USF Tampa, Team S1-G2, Leahy Spring 2019

USFT-LEAHY-S19S1G2

4 Members

10 Guides authored

0 Comments

Add Comment

View Statistics:

Past 24 Hours: 1

Past 7 Days: 1

Past 30 Days: 3

All Time: 230