Introduction
Use this guide to replace the screen in a Retroid Pocket Flip handheld gaming console. The screen displays all visual output during gameplay and system navigation. If the screen is cracked, shows dead pixels, flickers, or no longer turns on, it may need to be replaced.
This repair is difficult and requires full disassembly of the device, including motherboard removal.
Before beginning, power off the device completely and remove the microSD card. Follow Electrostatic Discharge when working inside the device to prevent damage to sensitive electronic components.
The screen is fragile. Avoid bending, twisting, or applying pressure during removal to prevent damage.
What you need
-
-
Remove the four 5.9 mm screws from the backplate of the device with a 1.3mm hex screwdriver.
-
Use a plastic opening pick to carefully separate the back cover from the device.
 Ask FixBot
-
-
-
Use a plastic spudger to carefully lift and disconnect the battery connector.
-
Use tweezers to disconnect the connector from its socket.
-
-
-
Remove the two 3.2 mm screws securing the top of the shield with a JIS #000 screwdriver.
-
Remove the five 3.2mm screws securing the plastic insulating shield to the motherboard.
-
-
-
Carefully lift and unstick the fan module using a plastic spudger, then remove it.
-
Remove the sticky ribbon connectors on each side of the plate with a plastic spudger.
-
Use a plastic spudger to carefully separate the shield from the board.
-
-
-
-
Use tweezers to unclip and remove the two ribbon cables on each joystick module.
-
Use a plastic spudger to lift and remove the joystick modules; they are secured with double sided tape.
-
-
-
Use a plastic spudger to disconnect the sliding connector by pushing on the tab to slide it out of its socket.
-
Use tweezers to disconnect the ribbon cables from the board.
-
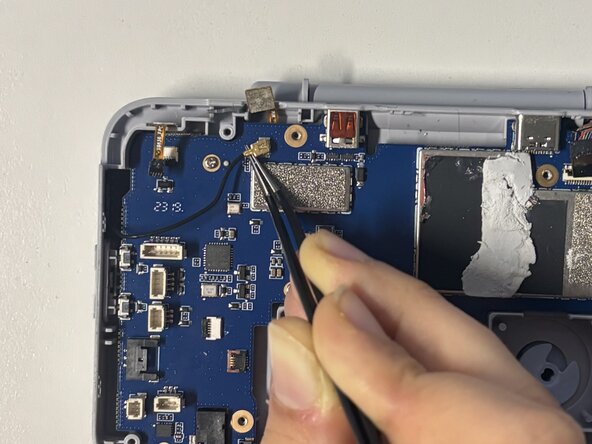
Disconnect the coaxial connector on the left of the motherboard by positioning tweezers under the metal neck of the connector to lift it straight up.
-
-
-
Remove the six 5.8 mm screws from the motherboard using a JIS #00 screwdriver.
-
Carefully lift the motherboard out of the device.
-
-
-
Use a plastic opening pick to carefully separate the screen from its back cover.
-
Use a plastic spudger to disconnect the first ribbon cable.
-
Use tweezers to disconnect the second ribbon cable.
-
-
-
Use a JIS #000 screwdriver to remove the two 3.2mm screws securing the hinge.
-
Carefully pivot the screen display assembly to separate it from the bottom half.
-
As you pull the two halves apart, carefully guide the ribbon cable through the hinge opening.
-
-
-
Once the cable is free, fully separate the screen assembly from the lower half of the device.
-


To reassemble your device, follow these instructions in reverse order.

Team

Université Paris Cité, Team 2-2, Grohan Winter 2026 Member of Université Paris Cité, Team 2-2, Grohan Winter 2026
UPARIS-GROHAN-W26S2G2
4 Members
6 Guides authored