Introduction
After working fine for a long time, one or more buttons on your TV remote stopped working. You can still control your TV by getting up, trudging across the room, and pushing the buttons on the front or side of your TV.
This, of course, is no fun at all. The problem could be with the remote failing to send commands to the TV. It could be a problem with the TV failing to respond correctly to commands received from the remote. We will explore various ways that you can identify the cause and get your remote working again.
These instructions are fairly general. I have performed them on a number of remotes, including a Sony and an LG. For the record, my TV in this repair is an LG 42LV3500 and the remote is labeled AKB729/15239.
-
-
When your remote control stops working, it is best to quickly rule out the most common problem so you can focus on more challenging fixes.
-
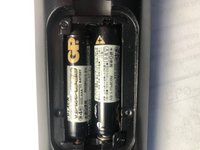
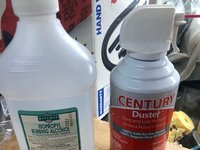
Check the batteries. Weak batteries can cause erratic behavior or even prevent the remote from working at all. If you have a multimeter, check the voltage of each battery to make sure they are fresh.
-
If you don't have a multimeter, or if the multimeter shows that the batteries are no longer producing their rated voltage, pop in some new batteries and test to see if this cures the problem.
 Ask FixBot
-
-
-
Play around with the remote to see if any buttons are working correctly. Turn the TV on manually, and methodically press each one of the buttons on the remote while observing the results. Make note of which buttons are working.
-
If at least some of the buttons on the remote are working, then the batteries are fine, the remote is sending some commands to the TV, and the TV is responding to them. Two possibilities remain: either some of the buttons on the remote are bad, or the TV is not responding correctly when commanded.
-
If you have a second remote control from the same manufacturer, see if it works with your TV. If it work correctly with a second remote, then the problem lies with the original remote.
-
If a second remote also fails, chances are that the problem is inside the TV. That repair is possible but outside the scope of this repair guide.
-
If you have a second TV with the same brand, try pointing your remote at the second TV. If it works with this second TV, then the fault is with your first TV.
-
In my case, I discovered that my remote's Power button was ineffective, but that pushing the "TV" button on the remote turned the TV on. This told me that the TV was capable of turning itself on when commanded, so the problem lay with the Power button on the remote.
-
-
-
Remote controls fail for many reasons. If no buttons at all are working on the remote, then suspect some sort of power problem. Perhaps batteries leaked, causing corrosion to the batter contacts. If this is the case, scrape the contacts until shiny metal contacts the batteries.
-
Another problem is that one button is stuck in the "down" position, and no other buttons can be detected until the stuck button is released. To check this, press and wiggle each button on the remote to make sure they are not stuck. Test the remote to see if it now works.
-
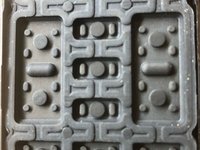
Most remote controls use extremely simple membrane keyboards. If something spills on the remote, the button switches can get dirty or gummy and stop working. We will disassemble the remote to investigate this.
-
The membrane keyboards on remotes are not robust. On the bottom of each button is a flat piece of plastic painted with conducting paint. Pushing a button makes the conducting paint complete a circuit, and the button fires. The conducting paint can wear out after many pushes. We will disassemble the remote to investigate this too.
-
-
-
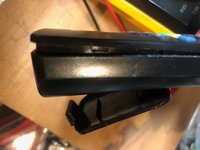
Remote controls can be tricky to open. If you are lucky the case is held together by screws hiding under batteries, labels, or rubber feet. Usually, though, they are held together by plastic latches. The challenge is to pop the latches without marring the plastic case of the remote control.
-
My LG remote indeed snaps together with plastic latches. Starting at a rear corner, use fingernails to pry apart the crack that runs all the way around the case of the remote. If you can open the crack wide enough, insert a credit card or other plastic to hold the crack open while you work to expand the crack.
-
If you can't do this, use a broad flat bladed screwdriver blade to gently pry the corner apart. Push a credit card or screwdriver blade along the crack to wedge it further open. At some point you should hear a pop as each plastic latch releases. Work your way all the way around. When the last latch pops, the case top and bottom will separate.
-
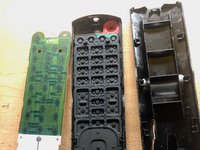
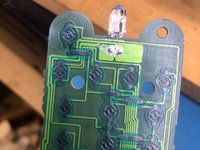
You should have the case top, the keyboard membrane, the remote's circuit board, and the case bottom.
-
-
-
-
If anything sticky ever spilled on the remote, the top of the membrane will be a mess. Use a Q-tip and water to gently clean the mess. Avoid touching the bottom of the membrane, to avoid contaminating the membrane contacts with oil from your skin.
-
If the membrane is dusty but not sticky, use compressed air or a small vacuum to clear it away.
-
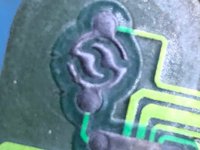
Inspect the contact pads on the bottom of the membrane. They should look uniformly dull and clean. If any of them look shiny compared to the rest, they may be contaminated and need to be cleaned.
-
To clean a contact pad, use a Q-tip moistened with rubbing alcohol. Rub the contact gently. You don't want to rub off any of the conductive paint, because that will prevent the key from firing.
-
Make note of any membrane contacts that look worn or where conducting paint is missing. We will deal with them later.
-
-
-
If there is dust, hair, or sticky cola on the circuit board, it too can prevent buttons from activating when pressed. Use a Q-tip dipped in rubbing alcohol to gently clean any of the contact pads for non-functioning keys. Leave well enough alone and avoid cleaning any contact pads for keys that are working.
-
-
-
If you cleaned any contacts, the remote buttons might now be working. Now is a good time to reassemble and test. Since cracking the case open is probably a chore, let's not do that again unless we have to. If we are lucky, we can test without complete reassembly.
-
With the LG remote that is under repair, I found that I could put the circuit board back into the case bottom, followed by the keyboard membrane. After putting the batteries in place, I could test the keys without replacing the top part of the remote. If you can do this, it will save a lot of work.
-
Thoroughly test all buttons to see if they work. Take note of any new failures, or any buttons that were repaired by your cleaning. In my case, the Power button was still not working, but all the others were fine.
-
-
-
If some keys are still not working, try cleaning again. Take care not to rub off the conducting paint on the bottom of the membrane.
-
Test as in Step 7.
-
-
-
Could the circuit board be bad? If a button still won't work, test the corresponding circuit board contact pad. Touch a small piece of conducting foil to the circuit board pad.
-
If the circuit board contact pad is clean but you can't get the button to fire, there might be a problem with the electronics on the circuit board. That repair is outside the scope of this guide.
-
If a piece of foil triggers the button, then there are 3 possible repairs. 1) Apply more conducting paint to the bottom of the membrane, beneath the non-functioning key; 2) Purchase tiny round conducting dots to glue to replace the failed conducting paint; or 3) Glue a piece of conducting foil over the failed conducting paint.
-
Reapplying conducting paint is the "right" way to fix this, but the paint costs a lot: $10-$30. A set of round conducting dots might cost $10-$20. Therefore, I favor cutting out my own circle of conducting foil.
-
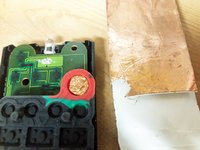
Thin adhesive-backed metal foil is readily available from electronics suppliers. I had some on hand so I cut out a round piece and stuck it to the bottom of the keyboard membrane for the failed Power key.
-
-
-
Test the repair to confirm that the remote key is now functioning correctly.
-
The downside of this repair is that it depends upon the adhesive-backed foil staying in place. If the adhesive isn't good, or you apply it to a dirty surface, the foil will eventually fall off and the button will stop working again.
-


If it works, declare victory and reassemble the remote control. If this doesn't work, you can always try options 1 or 2 from Step 9.3.
Cancel: I did not complete this guide.
7 other people completed this guide.

3 Guide Comments
Very nice guide, however, l would like to recoat the contact pads with conductive paint but you did not divulge what the name was or where to find it. You just said its expensive but surely it would be less expensive than throwing out my DVD player and purchasing another. I can't understand why you went to all this trouble to make this beautiful long video and then dropped the ball. How frustrating
Thanks for your kind words before expressing your frustration. To find conducting paint, fire up your favorite search engine and look for these words (without quotes): "conducting paint for remote control repair".
Another option is to purchase a so-called Universal Remote. These can typically be programmed to control any popular manufacturer's devices, by pressing a setup key and then entering the numeric code (as specified in the universal remote's documentation) corresponding to the manufacturer. Sometimes a single manufacturer will have several different numeric codes, so you'll have to try all of them until you find the one that works for your particular model.