Introduction
I dropped my camera and the LCD screen stopped working - went completely black. The flip out screen frame became damaged and screws on the extension arms for the LCD display were loose. I use this camera to take images for my website at CecilesBathandBody.net
What you need
-
-
This model does not have a viewfinder and requires the LCD display to take pictures, so trouble shooting is difficult.
-
Turn the knob to "Auto" mode and make sure the shutter is not stuck. Take a few test pictures while looking INTO the lens so you can see whether the shutter closes and opens. Also Zoom in and zoom out to check if the aperture opens and closes.
-
Next, test the zoom lens is working and the mechanism is moving smoothly - without catching or grinding. The zoom can be knocked crooked, and can be very gently pushed back into place.
 Ask FixBot
-
-
-
Next, press the MENU button on the back of the camera and listen for the typical change in sound. Move the selection buttons and listen for the beeps to ensure the options are changing (since you can't see it on screen).
-
Press the shutter button to make sure the camera can take pictures. Since the screen is not working, just listen for the proper timing and sounds (does the auto focus work? does the red light come on/off on? Does it beep once the auto focus is complete?)
-
-
-
-
Turn off camera and connect via USB cable. Make sure the camera is charged sufficiently so that it doesn't shut off.
-
Turn on the camera and wait for the computer to recognize it as a new device. Explore the image files from the directory to make sure that the previous test shots you made are saving. If the pictures are there, then you know the camera works.
-
If there is no Memory Card, delete the photos from the DCIM file on your computer, and take more test shots. The camera has limited internal memory and might not capture shots if the memory is already full.
-
-
-
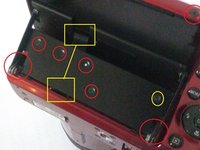
CHECK TO SEE FLAT CABLE IS LOOSE at the base on the metal arms. If the LDC screen is disconnected, this will be loose or sticking out. Otherwise, you should only see it coming out the back of the LCD screen.
-
Use Phillips screwdriver to remove the plate over the cable and the screws on the bottom left and bottom right corners of the arm. KEEP TRACK OF SCREWS, the ones connecting the arms to the camera body will be market with blue/color.
-
Once arm is removed, remove the screws around the LCD screen to take apart the assembly. THIS IMAGE IS NOT THE EXACT MODEL but it helped me take the LCD assembly apart.
-
Take off the protective cover (like in photo) and use something thin and flat to pry the LCD screen from the metal frame. On the back of the interior LCD screen is the connection to the camera body.
-
-
Tool used on this step:Tweezers$4.99
-
You need tweezers, very bright light and magnifying glass to reconnect the cable. TEST TO SEE IF SCREEN WORKS, does it light up (if cable is installed upside down, the screen will light up but not show images).
-
If the screen DOES light up, start reassembling the entire LCD mechanism. TURN OFF camera and (1) Connect the arms back onto the camera body, making sure to place flat cable through the slot in the LCD frame.
-
(2) There will be very little room to connect the cable, use the magnifier and light see clearly, and use the tweezers to push the cable connection firmly into the slot on the back of the interior LCD screen.
-
(3) TURN ON the camera to test if the screen is working properly. This step took a few tries before the display worked properly, so try it several times! The connector must be inserted fully and evenly otherwise the screen will light up, but no image will be shown.
-
-
-
Once the screen is showing the current images, use a sticker or adhesive to the exposed portion of the flat cable. If this gets pulled loose, you have to start over again. Replace flat plate over the cable to hold it in place.
-
Final step is to replace and tighten all of the screws on the exterior LCD screen housing and attached to camera body, especially in the corners. From there, everything should work as normal :)))
-


Be careful as you reassemble the flip out arm, Interior LCD screen and Exterior LCD housing. This requires a slow and steady hand. Good luck!
Attached Documents
