
Removing DVD Drive from Acer Aspire 5100

What you need

  1. Removing DVD Drive from Acer Aspire 5100, Removing DVD Drive from Acer Aspire 5100: step 1, image 1 of 2 Removing DVD Drive from Acer Aspire 5100, Removing DVD Drive from Acer Aspire 5100: step 1, image 2 of 2
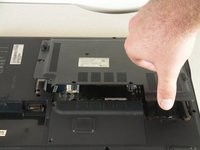
    • Locate tab with battery symbol on back of laptop. Slide to left to eject battery.

  2. Removing DVD Drive from Acer Aspire 5100: step 2, image 1 of 1
    • Locate cover on back of laptop, diagonal to battery compartment. Remove four screws securing cover.

  3. Removing DVD Drive from Acer Aspire 5100: step 3, image 1 of 2 Removing DVD Drive from Acer Aspire 5100: step 3, image 2 of 2
    • After removing screws, carefully detach cover. You will see the cooling fan in the corner.

  4. Removing DVD Drive from Acer Aspire 5100: step 4, image 1 of 2 Removing DVD Drive from Acer Aspire 5100: step 4, image 2 of 2
    • Opposite the cooling fan is the component that contains the RAM card. Remove the screws holding the component in place. Carefully detach the component to expose the RAM card.

  5. Removing DVD Drive from Acer Aspire 5100: step 5, image 1 of 1
    • Locate the DVD drive and remove screw securing drive. Carefully push drive out from laptop.

Conclusion

To reassemble, follow above steps in reverse.

2 other people completed this guide.

luis

Member since: 04/21/10

167 Reputation

1 Guide authored

Team

Cal Poly, Team 18-66, Johann Spring 2010 Member of Cal Poly, Team 18-66, Johann Spring 2010

CPSU-JOHANN-S10S18G66

5 Members

1 Guide authored

0 Comments

Add Comment

View Statistics:

Past 24 Hours: 1

Past 7 Days: 2

Past 30 Days: 13

All Time: 2,768