
Free Shipping on Domestic Orders $75+

Realme 7i Screen Replacement

  1. Realme 7i Screen Replacement, Prepare the new screen, silicone glue, some precision driver set and a plastic card for prying: step 1, image 1 of 1
    • If needed, cover your phone screen with clear packaging tape to prevent glass shards from falling onto your workspace, as this guide involves a lot of wedging and work that could affect your broken screen.

  2. Realme 7i Screen Replacement, Pry the back plastic cover: step 2, image 1 of 3 Realme 7i Screen Replacement, Pry the back plastic cover: step 2, image 2 of 3 Realme 7i Screen Replacement, Pry the back plastic cover: step 2, image 3 of 3
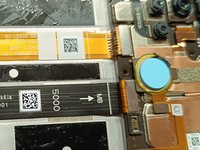
    • Use a card if you don't have a prying tool. Bear in mind that the fingerprint sensor also has glue on the perimeter.

  3. Realme 7i Screen Replacement, Remove the inner panel: step 3, image 1 of 3 Realme 7i Screen Replacement, Remove the inner panel: step 3, image 2 of 3 Realme 7i Screen Replacement, Remove the inner panel: step 3, image 3 of 3
    • Remove all the screws at the back. There should be 16 screws in total and they are all the same length.

  4. Realme 7i Screen Replacement, Remove the inner cover: step 4, image 1 of 3 Realme 7i Screen Replacement, Remove the inner cover: step 4, image 2 of 3 Realme 7i Screen Replacement, Remove the inner cover: step 4, image 3 of 3
    • Remove the sim card tray and pry the side of the frame,they are held on with tiny clips.

  5. Realme 7i Screen Replacement, Disconnect and remove the battery: step 5, image 1 of 3 Realme 7i Screen Replacement, Disconnect and remove the battery: step 5, image 2 of 3 Realme 7i Screen Replacement, Disconnect and remove the battery: step 5, image 3 of 3
    • Disconnect the battery from the motherboard and peel off the plastics on both sides of the battery. Pull on the green tab firmly and gently until the battery is free.

  6. Realme 7i Screen Replacement, Removing the screen: step 6, image 1 of 3 Realme 7i Screen Replacement, Removing the screen: step 6, image 2 of 3 Realme 7i Screen Replacement, Removing the screen: step 6, image 3 of 3
    • Remove the adhesive plastic and disconnect the screen from the motherboard. The screen can then be pried off from the front.

  7. Realme 7i Screen Replacement, Clean the frame: step 7, image 1 of 2 Realme 7i Screen Replacement, Clean the frame: step 7, image 2 of 2
    • Once the screen is off, use a small flathead to scrape the perimeter to clean the residue.

  8. Realme 7i Screen Replacement, Reapply the silicone glue: step 8, image 1 of 3 Realme 7i Screen Replacement, Reapply the silicone glue: step 8, image 2 of 3 Realme 7i Screen Replacement, Reapply the silicone glue: step 8, image 3 of 3
    • Prepare the new screen and apply glue to the perimeter of the frame

  9. Realme 7i Screen Replacement, Attach the new screen: step 9, image 1 of 2 Realme 7i Screen Replacement, Attach the new screen: step 9, image 2 of 2
    • Thread the ribbon cable through the cutout and press the new screen firmly. Reattach the cable to the motherboard at the back.

  10. Realme 7i Screen Replacement, Reinstall battery and test.: step 10, image 1 of 3 Realme 7i Screen Replacement, Reinstall battery and test.: step 10, image 2 of 3 Realme 7i Screen Replacement, Reinstall battery and test.: step 10, image 3 of 3
    • Apply the silicone glue to the dark areas so that the battery is secured. Ensure that the battery is connected to the motherboard. Install the plastic frame and test the phone before screwing it down.

Conclusion

To reassemble your device, follow these instructions in reverse order.

5 other people completed this guide.

clem

Member since: 05/08/19

505 Reputation

2 Guides authored

0 Guide Comments

Add Comment

View Statistics:

Past 24 Hours: 1

Past 7 Days: 12

Past 30 Days: 59

All Time: 728